CompletableFuture

해당 포스팅은 토비님의 토비의 봄 TV 11회 스프링 리액티브 프로그래밍 (7) CompletableFuture 라이브 코딩을 보며 따라했던 실습 내용을 바탕으로 정리한 글입니다.

실습 코드들은 IntelliJ를 이용해 SpringBoot 2.1.3.RELEASE 버전 기반으로 프로젝트를 생성 후(web, lombok 포함) 진행했습니다.

이번에는 자바8에 나온 CompletableFuture 라는 새로운 비동기 자바 프로그래밍 기술에 대해서 알아보고, 지난 3회 정도 동안 다루어 왔던 자바 서블릿, 스프링의 비동기 기술 발전의 내용을 자바 8을 기준으로 다시 재작성합니다.

CompletableFuture

먼저 간단한 코드를 통해서 CompletableFuture 사용법에 대해서 알아보겠습니다.

runAsync & thenRun

1
2
3
4
5
6
7
8
9
10
11
12
13
14
15
16
17
18
19
20
21
22
@Slf4j
public class CFuture {

public static void main(String[] args) throws ExecutionException, InterruptedException {
// Async 작업이 끝나고 해당 스레드에서 계속해서 작업을 수행한다.
CompletableFuture
.runAsync(() -> log.info("runAsync"))
.thenRun(() -> log.info("thenRun"))
.thenRun(() -> log.info("thenRun"));
log.info("exit");

// 별도의 pool을 설정하지 않으면 자바7 부터는 ForkJoinPool이 자동으로 사용된다.
ForkJoinPool.commonPool().shutdown();
ForkJoinPool.commonPool().awaitTermination(10, TimeUnit.SECONDS);
}
}

// 결과
23:43:15.841 [main] INFO com.example.study.CFuture - exit
23:43:15.841 [ForkJoinPool.commonPool-worker-1] INFO com.example.study.CFuture - runAsync
23:43:15.845 [ForkJoinPool.commonPool-worker-1] INFO com.example.study.CFuture - thenRun

supplyAsync, thenApply, thenAccept

1
2
3
4
5
6
7
8
9
10
11
12
13
14
15
16
17
18
19
20
21
22
23
24
25
26
27
28
29
30
@Slf4j
public class CFuture {

public static void main(String[] args) throws ExecutionException, InterruptedException {
// Async 작업이 끝나고 해당 스레드에서 계속해서 작업을 수행한다.
CompletableFuture
.supplyAsync(() -> {
log.info("supplyAsync");
return 1;
})
// 앞의 비동기 작업의 결과를 받아 사용해 새로운 값을 return 한다.
.thenApply(s -> {
log.info("thenApply {}", s);
return s + 1;
})
// 앞의 비동기 작업의 결과를 받아 사용하며 return이 없다.
.thenAccept(s -> log.info("thenAccept {}", s));
log.info("exit");

// 별도의 pool을 설정하지않으면 자바7 부터는 ForkJoinPool이 자동으로 사용된다.
ForkJoinPool.commonPool().shutdown();
ForkJoinPool.commonPool().awaitTermination(10, TimeUnit.SECONDS);
}
}

// 결과
23:50:00.650 [main] INFO com.example.study.CFuture - exit
23:50:00.650 [ForkJoinPool.commonPool-worker-1] INFO com.example.study.CFuture - supplyAsync
23:50:00.654 [ForkJoinPool.commonPool-worker-1] INFO com.example.study.CFuture - thenApply 1
23:50:00.656 [ForkJoinPool.commonPool-worker-1] INFO com.example.study.CFuture - thenAccept 2

thenCompose

1
2
3
4
5
6
7
8
9
10
11
12
13
14
15
16
17
18
19
20
21
22
23
24
25
26
27
28
29
30
31
32
33
34
35
36
@Slf4j
public class CFuture {

public static void main(String[] args) throws ExecutionException, InterruptedException {
// Async 작업이 끝나고 해당 스레드에서 계속해서 작업을 수행한다.
CompletableFuture
.supplyAsync(() -> {
log.info("supplyAsync");
return 1;
})
// return이 CompletableFuture인 경우 thenCompose를 사용한다.
.thenCompose(s -> {
log.info("thenApply {}", s);
return CompletableFuture.completedFuture(s + 1);
})
// 앞의 비동기 작업의 결과를 받아 사용해 새로운 값을 return 한다.
.thenApply(s -> {
log.info("thenApply {}", s);
return s + 1;
})
// 앞의 비동기 작업의 결과를 받아 사용하며 return이 없다.
.thenAccept(s -> log.info("thenAccept {}", s));
log.info("exit");

// 별도의 pool을 설정하지않으면 자바7 부터는 ForkJoinPool이 자동으로 사용된다.
ForkJoinPool.commonPool().shutdown();
ForkJoinPool.commonPool().awaitTermination(10, TimeUnit.SECONDS);
}
}

// 결과
23:50:35.893 [main] INFO com.example.study.CFuture - exit
23:50:35.893 [ForkJoinPool.commonPool-worker-1] INFO com.example.study.CFuture - supplyAsync
23:50:35.897 [ForkJoinPool.commonPool-worker-1] INFO com.example.study.CFuture - thenApply 1
23:50:35.899 [ForkJoinPool.commonPool-worker-1] INFO com.example.study.CFuture - thenApply 2
23:50:35.899 [ForkJoinPool.commonPool-worker-1] INFO com.example.study.CFuture - thenAccept 3

exceptionally

1
2
3
4
5
6
7
8
9
10
11
12
13
14
15
16
17
18
19
20
21
22
23
24
25
26
27
28
29
30
31
32
33
34
35
36
37
38
39
40
41
@Slf4j
public class CFuture {

public static void main(String[] args) throws ExecutionException, InterruptedException {
// Async 작업이 끝나고 해당 스레드에서 계속해서 작업을 수행한다.
CompletableFuture
.supplyAsync(() -> {
log.info("supplyAsync");
return 1;
})
// return이 CompletableFuture인 경우 thenCompose를 사용한다.
.thenCompose(s -> {
log.info("thenApply {}", s);
if (1 == 1) throw new RuntimeException();
return CompletableFuture.completedFuture(s + 1);
})
// 앞의 비동기 작업의 결과를 받아 사용해 새로운 값을 return 한다.
.thenApply(s -> {
log.info("thenApply {}", s);
return s + 1;
})
.exceptionally(e -> {
log.info("exceptionally");
return -10;
})
// 앞의 비동기 작업의 결과를 받아 사용하며 return이 없다.
.thenAccept(s -> log.info("thenAccept {}", s));
log.info("exit");

// 별도의 pool을 설정하지않으면 자바7 부터는 ForkJoinPool이 자동으로 사용된다.
ForkJoinPool.commonPool().shutdown();
ForkJoinPool.commonPool().awaitTermination(10, TimeUnit.SECONDS);
}
}

// 결과
23:51:31.255 [ForkJoinPool.commonPool-worker-1] INFO com.example.study.CFuture - supplyAsync
23:51:31.257 [main] INFO com.example.study.CFuture - exit
23:51:31.259 [ForkJoinPool.commonPool-worker-1] INFO com.example.study.CFuture - thenApply 1
23:51:31.261 [ForkJoinPool.commonPool-worker-1] INFO com.example.study.CFuture - exceptionally
23:51:31.261 [ForkJoinPool.commonPool-worker-1] INFO com.example.study.CFuture - thenAccept -10

thenApplyAsync

1
2
3
4
5
6
7
8
9
10
11
12
13
14
15
16
17
18
19
20
21
22
23
24
25
26
27
28
29
30
31
32
33
34
35
36
37
38
39
40
41
42
43
44
45
46
47
48
49
50
@Slf4j
public class CFuture {

public static void main(String[] args) throws ExecutionException, InterruptedException {
ExecutorService es = Executors.newFixedThreadPool(10);

// Async 작업이 끝나고 해당 스레드에서 계속해서 작업을 수행한다.
CompletableFuture
.supplyAsync(() -> {
log.info("supplyAsync");
return 1;
}, es)
// return이 CompletableFuture인 경우 thenCompose를 사용한다.
.thenCompose(s -> {
log.info("thenApply {}", s);
return CompletableFuture.completedFuture(s + 1);
})
// 앞의 비동기 작업의 결과를 받아 사용해 새로운 값을 return 한다.
.thenApply(s -> {
log.info("thenApply {}", s);
return s + 2;
})
// 이 작업은 다른 스레드에서 처리를 하려고 할 때, thenApplyAsync를 사용한다.
// 스레드의 사용을 더 효율적으로 하고 자원을 더 효율적으로 사용한다.
// 현재 스레드 풀의 정책에 따라서 새로운 스레드를 할당하거나 대기중인 스레드를 사용한다. (스레드 풀 전략에 따라 다르다.)
.thenApplyAsync(s -> {
log.info("thenApply {}", s);
return s + 3;
}, es)
.exceptionally(e -> {
log.info("exceptionally");
return -10;
})
// 앞의 비동기 작업의 결과를 받아 사용하며 return이 없다.
.thenAcceptAsync(s -> log.info("thenAccept {}", s), es);
log.info("exit");

// 별도의 pool을 설정하지않으면 자바7 부터는 ForkJoinPool이 자동으로 사용된다.
ForkJoinPool.commonPool().shutdown();
ForkJoinPool.commonPool().awaitTermination(10, TimeUnit.SECONDS);
}
}

// 결과
23:54:00.043 [pool-1-thread-1] INFO com.example.study.CFuture - supplyAsync
23:54:00.043 [main] INFO com.example.study.CFuture - exit
23:54:00.047 [pool-1-thread-1] INFO com.example.study.CFuture - thenApply 1
23:54:00.048 [pool-1-thread-1] INFO com.example.study.CFuture - thenApply 2
23:54:00.049 [pool-1-thread-2] INFO com.example.study.CFuture - thenApply 4
23:54:00.049 [pool-1-thread-3] INFO com.example.study.CFuture - thenAccept 7

ListenableFuture에서 CompletableFuture로 변환

Spring 4.0에 들어간 AsyncRestTemplate이 return하는 것은 CompletableFuture가 아닌 ListenableFuture입니다.
Spring 4까지는 자바 6~8을 지원하기 때문에 CompletableFuture로 return을 만들지 못하고 계속 ListenableFuture를 유지했습니다. 따라서 ListenableFuture를 CompletableFuture로 만들어 체이닝하기 위해서는 유틸성 wrapper 메서드를 만들어 사용하면 됩니다.

1
2
3
4
5
6
7
8
9
10
11
12
13
14
15
16
17
18
19
20
21
22
23
24
25
26
27
28
29
30
31
32
33
34
35
36
37
38
39
40
41
42
43
44
45
46
47
48
49
50
51
52
53
54
55
56
57
58
59
60
61
62
63
64
65
66
67
68
69
70
71
72
73
74
75
@SpringBootApplication
@EnableAsync
@Slf4j
public class StudyApplication {

@RestController
public static class MyController {
AsyncRestTemplate rt = new AsyncRestTemplate(new Netty4ClientHttpRequestFactory(new NioEventLoopGroup(1)));

@Autowired
MyService myService;

static final String URL1 = "http://localhost:8081/service?req={req}";
static final String URL2 = "http://localhost:8081/service2?req={req}";

@GetMapping("/rest")
public DeferredResult<String> rest(int idx) {
DeferredResult<String> dr = new DeferredResult<>();

toCF(rt.getForEntity("http://localhost:8081/service?req={req}", String.class, "hello" + idx))
.thenCompose(s -> toCF(rt.getForEntity("http://localhost:8081/service2?req={req}", String.class, s.getBody())))
.thenCompose(s -> toCF(myService.work(s.getBody())))
.thenAccept(s -> dr.setResult(s))
.exceptionally(e -> {
dr.setErrorResult(e.getMessage());
return null;
});

// f1.addCallback(s -> {
// ListenableFuture<ResponseEntity<String>> f2 = rt.getForEntity("http://localhost:8081/service2?req={req}", String.class, s.getBody());
// f2.addCallback(s2 -> {
// ListenableFuture<String> f3 = myService.work(s2.getBody());
// f3.addCallback(s3 -> {
// dr.setResult(s3);
// }, e -> {
// dr.setErrorResult(e.getMessage());
// });
// }, e -> {
// dr.setErrorResult(e.getMessage());
// });
// }, e -> {
// dr.setErrorResult(e.getMessage());
// });

return dr;
}

<T> CompletableFuture<T> toCF(ListenableFuture<T> lf) {
CompletableFuture<T> cf = new CompletableFuture<>();
lf.addCallback(s -> cf.complete(s), e -> cf.completeExceptionally(e));
return cf;
}
}

@Service
public static class MyService {
@Async
public ListenableFuture<String> work(String req) {
return new AsyncResult<>(req + "/asyncwork");
}
}

@Bean
public ThreadPoolTaskExecutor myThreadPool() {
ThreadPoolTaskExecutor te = new ThreadPoolTaskExecutor();
te.setCorePoolSize(1);
te.setMaxPoolSize(1);
te.initialize();
return te;
}

public static void main(String[] args) {
SpringApplication.run(StudyApplication.class, args);
}
}

AsyncRestTemplate의 콜백 헬과 중복 작업 문제

해당 포스팅은 토비님의 토비의 봄 TV 10회 스프링 리액티브 프로그래밍 (6) AsyncRestTemplate의 콜백 헬과 중복 작업 문제 라이브 코딩을 보며 따라했던 실습 내용을 바탕으로 정리한 글입니다.

실습 코드들은 IntelliJ를 이용해 SpringBoot 2.1.3.RELEASE 버전 기반으로 프로젝트를 생성 후(web, lombok 포함) 진행했습니다.

이번에는 포스팅에서는 지난번 ListenableFuture를 사용하면서 발생한 콜백헬을 어떻게 개선할지에 대해서 이야기합니다. ListenableFuture를 Wrapping 하는 Completion이라는 클래스를 만들어, chainable하게 사용할 수 있는 방식으로 코드를 만들어봅니다.
콜백헬의 문제로는 에러를 처리하는 코드가 중복이 된다는 것도 있는데, 이 부분도 해결해봅니다.

Completion 클래스 추가

1
2
3
4
5
6
7
8
9
10
11
12
13
14
15
16
17
18
19
20
21
22
23
24
25
26
27
28
29
30
31
32
33
34
35
36
37
38
39
40
41
42
43
44
45
46
47
48
49
50
51
52
53
54
55
56
57
58
59
60
61
62
63
64
65
66
67
68
69
70
71
72
73
74
75
76
77
78
79
80
81
82
83
84
85
86
87
88
89
90
91
92
93
94
95
96
97
98
99
100
101
102
103
104
105
106
107
@SpringBootApplication
@EnableAsync
@Slf4j
public class StudyApplication {

@RestController
public static class MyController {
AsyncRestTemplate rt = new AsyncRestTemplate(new Netty4ClientHttpRequestFactory(new NioEventLoopGroup(1)));

@Autowired
MyService myService;

static final String URL1 = "http://localhost:8081/service?req={req}";
static final String URL2 = "http://localhost:8081/service2?req={req}";

@GetMapping("/rest")
public DeferredResult<String> rest(int idx) {
DeferredResult<String> dr = new DeferredResult<>();

Completion
.from(rt.getForEntity(URL1, String.class, "hello" + idx))
.andAccept(s -> dr.setResult(s.getBody()));

/*
ListenableFuture<ResponseEntity<String>> f1 = rt.getForEntity("http://localhost:8081/service?req={req}", String.class, "hello" + idx);
f1.addCallback(s -> {
ListenableFuture<ResponseEntity<String>> f2 = rt.getForEntity("http://localhost:8081/service2?req={req}", String.class, s.getBody());
f2.addCallback(s2 -> {
ListenableFuture<String> f3 = myService.work(s2.getBody());
f3.addCallback(s3 -> {
dr.setResult(s3);
}, e -> {
dr.setErrorResult(e.getMessage());
});
}, e -> {
dr.setErrorResult(e.getMessage());
});
}, e -> {
dr.setErrorResult(e.getMessage());
});
*/

return dr;
}
}

public static class Completion {

Consumer<ResponseEntity<String>> con;

Completion next;

public Completion() {
}

public Completion(Consumer<ResponseEntity<String>> con) {
this.con = con;
}

public static Completion from(ListenableFuture<ResponseEntity<String>> lf) {
Completion c = new Completion();
lf.addCallback(s -> {
c.complete(s);
}, e -> {
c.error(e);
});
return c;
}

public void andAccept(Consumer<ResponseEntity<String>> con) {
Completion c = new Completion(con);
this.next = c;
}

void complete(ResponseEntity<String> s) {
if (next != null) next.run(s);
}

private void run(ResponseEntity<String> value) {
if (con != null) con.accept(value);
}

private void error(Throwable e) {
}
}

@Service
public static class MyService {
@Async
public ListenableFuture<String> work(String req) {
return new AsyncResult<>(req + "/asyncwork");
}
}

@Bean
public ThreadPoolTaskExecutor myThreadPool() {
ThreadPoolTaskExecutor te = new ThreadPoolTaskExecutor();
te.setCorePoolSize(1);
te.setMaxPoolSize(1);
te.initialize();
return te;
}

public static void main(String[] args) {
SpringApplication.run(StudyApplication.class, args);
}
}

andApply 메서드 추가

1
2
3
4
5
6
7
8
9
10
11
12
13
14
15
16
17
18
19
20
21
22
23
24
25
26
27
28
29
30
31
32
33
34
35
36
37
38
39
40
41
42
43
44
45
46
47
48
49
50
51
52
53
54
55
56
57
58
59
60
61
62
63
64
65
66
67
68
69
70
71
72
73
74
75
76
77
78
79
80
81
82
83
84
85
86
87
88
89
90
91
92
93
94
95
96
97
98
99
100
101
102
103
104
105
106
107
108
109
110
111
112
113
114
115
116
117
118
119
120
121
122
123
124
@SpringBootApplication
@EnableAsync
@Slf4j
public class StudyApplication {

@RestController
public static class MyController {
AsyncRestTemplate rt = new AsyncRestTemplate(new Netty4ClientHttpRequestFactory(new NioEventLoopGroup(1)));

@Autowired
MyService myService;

static final String URL1 = "http://localhost:8081/service?req={req}";
static final String URL2 = "http://localhost:8081/service2?req={req}";

@GetMapping("/rest")
public DeferredResult<String> rest(int idx) {
DeferredResult<String> dr = new DeferredResult<>();

Completion
.from(rt.getForEntity(URL1, String.class, "hello" + idx))
.andApply(s -> rt.getForEntity(URL2, String.class, s.getBody()))
.andAccept(s -> dr.setResult(s.getBody()));

/*
ListenableFuture<ResponseEntity<String>> f1 = rt.getForEntity("http://localhost:8081/service?req={req}", String.class, "hello" + idx);
f1.addCallback(s -> {
ListenableFuture<ResponseEntity<String>> f2 = rt.getForEntity("http://localhost:8081/service2?req={req}", String.class, s.getBody());
f2.addCallback(s2 -> {
ListenableFuture<String> f3 = myService.work(s2.getBody());
f3.addCallback(s3 -> {
dr.setResult(s3);
}, e -> {
dr.setErrorResult(e.getMessage());
});
}, e -> {
dr.setErrorResult(e.getMessage());
});
}, e -> {
dr.setErrorResult(e.getMessage());
});
*/

return dr;
}
}

public static class Completion {

Consumer<ResponseEntity<String>> con;

Function<ResponseEntity<String>, ListenableFuture<ResponseEntity<String>>> fn;

Completion next;

public Completion() {
}

public Completion(Consumer<ResponseEntity<String>> con) {
this.con = con;
}

public Completion(Function<ResponseEntity<String>, ListenableFuture<ResponseEntity<String>>> fn) {
this.fn = fn;
}

public static Completion from(ListenableFuture<ResponseEntity<String>> lf) {
Completion c = new Completion();
lf.addCallback(s -> {
c.complete(s);
}, e -> {
c.error(e);
});
return c;
}

public Completion andApply(Function<ResponseEntity<String>, ListenableFuture<ResponseEntity<String>>> fn) {
Completion c = new Completion(fn);
this.next = c;
return c;
}

public void andAccept(Consumer<ResponseEntity<String>> con) {
Completion c = new Completion(con);
this.next = c;
}

void complete(ResponseEntity<String> s) {
if (next != null) next.run(s);
}

private void run(ResponseEntity<String> value) {
if (con != null) con.accept(value);
else if (fn != null) {
ListenableFuture<ResponseEntity<String>> lf = fn.apply(value);
lf.addCallback(s -> complete(s), e -> error(e));
}
}

private void error(Throwable e) {
}
}

@Service
public static class MyService {
@Async
public ListenableFuture<String> work(String req) {
return new AsyncResult<>(req + "/asyncwork");
}
}

@Bean
public ThreadPoolTaskExecutor myThreadPool() {
ThreadPoolTaskExecutor te = new ThreadPoolTaskExecutor();
te.setCorePoolSize(1);
te.setMaxPoolSize(1);
te.initialize();
return te;
}

public static void main(String[] args) {
SpringApplication.run(StudyApplication.class, args);
}
}

AcceptCompletion, AsyncCompletion 클래스 추가

Completion을 결과를 받아서 사용만 하고 끝나는 Accept 처리를 하는 Completion과, 결과를 받아서 또 다른 비동기 작업을 수행하고 그 결과를 반환하는 Apply 용 Completion으로 분리합니다.

1
2
3
4
5
6
7
8
9
10
11
12
13
14
15
16
17
18
19
20
21
22
23
24
25
26
27
28
29
30
31
32
33
34
35
36
37
38
39
40
41
42
43
44
45
46
47
48
49
50
51
52
53
54
55
56
57
58
59
60
61
62
63
64
65
66
67
68
69
70
71
72
73
74
75
76
77
78
79
80
81
82
83
84
85
86
87
88
89
90
91
92
93
94
95
96
97
98
99
100
101
102
103
104
105
106
107
108
109
110
111
112
113
114
115
116
117
118
119
120
121
122
123
124
125
126
127
128
129
130
@SpringBootApplication
@EnableAsync
@Slf4j
public class StudyApplication {

@RestController
public static class MyController {
AsyncRestTemplate rt = new AsyncRestTemplate(new Netty4ClientHttpRequestFactory(new NioEventLoopGroup(1)));

@Autowired
MyService myService;

static final String URL1 = "http://localhost:8081/service?req={req}";
static final String URL2 = "http://localhost:8081/service2?req={req}";

@GetMapping("/rest")
public DeferredResult<String> rest(int idx) {
DeferredResult<String> dr = new DeferredResult<>();

Completion
.from(rt.getForEntity(URL1, String.class, "hello" + idx))
.andApply(s -> rt.getForEntity(URL2, String.class, s.getBody()))
.andAccept(s -> dr.setResult(s.getBody()));

/*
ListenableFuture<ResponseEntity<String>> f1 = rt.getForEntity("http://localhost:8081/service?req={req}", String.class, "hello" + idx);
f1.addCallback(s -> {
ListenableFuture<ResponseEntity<String>> f2 = rt.getForEntity("http://localhost:8081/service2?req={req}", String.class, s.getBody());
f2.addCallback(s2 -> {
ListenableFuture<String> f3 = myService.work(s2.getBody());
f3.addCallback(s3 -> {
dr.setResult(s3);
}, e -> {
dr.setErrorResult(e.getMessage());
});
}, e -> {
dr.setErrorResult(e.getMessage());
});
}, e -> {
dr.setErrorResult(e.getMessage());
});
*/

return dr;
}
}

public static class AcceptCompletion extends Completion {
Consumer<ResponseEntity<String>> con;

public AcceptCompletion(Consumer<ResponseEntity<String>> con) {
this.con = con;
}

@Override
public void run(ResponseEntity<String> value) {
con.accept(value);
}
}

public static class AsyncCompletion extends Completion {
Function<ResponseEntity<String>, ListenableFuture<ResponseEntity<String>>> fn;

public AsyncCompletion(Function<ResponseEntity<String>, ListenableFuture<ResponseEntity<String>>> fn) {
this.fn = fn;
}

@Override
public void run(ResponseEntity<String> value) {
ListenableFuture<ResponseEntity<String>> lf = fn.apply(value);
lf.addCallback(s -> complete(s), e -> error(e));
}
}

public static class Completion {
Completion next;

public static Completion from(ListenableFuture<ResponseEntity<String>> lf) {
Completion c = new Completion();
lf.addCallback(s -> {
c.complete(s);
}, e -> {
c.error(e);
});
return c;
}

public Completion andApply(Function<ResponseEntity<String>, ListenableFuture<ResponseEntity<String>>> fn) {
Completion c = new AsyncCompletion(fn);
this.next = c;
return c;
}

public void andAccept(Consumer<ResponseEntity<String>> con) {
Completion c = new AcceptCompletion(con);
this.next = c;
}

public void complete(ResponseEntity<String> s) {
if (next != null) next.run(s);
}

public void run(ResponseEntity<String> value) {
}

public void error(Throwable e) {
}
}

@Service
public static class MyService {
@Async
public ListenableFuture<String> work(String req) {
return new AsyncResult<>(req + "/asyncwork");
}
}

@Bean
public ThreadPoolTaskExecutor myThreadPool() {
ThreadPoolTaskExecutor te = new ThreadPoolTaskExecutor();
te.setCorePoolSize(1);
te.setMaxPoolSize(1);
te.initialize();
return te;
}

public static void main(String[] args) {
SpringApplication.run(StudyApplication.class, args);
}
}

ErrorCompletion 클래스 추가

1
2
3
4
5
6
7
8
9
10
11
12
13
14
15
16
17
18
19
20
21
22
23
24
25
26
27
28
29
30
31
32
33
34
35
36
37
38
39
40
41
42
43
44
45
46
47
48
49
50
51
52
53
54
55
56
57
58
59
60
61
62
63
64
65
66
67
68
69
70
71
72
73
74
75
76
77
78
79
80
81
82
83
84
85
86
87
88
89
90
91
92
93
94
95
96
97
98
99
100
101
102
103
104
105
106
107
108
109
110
111
112
113
114
115
116
117
118
119
120
121
122
123
124
125
126
127
128
129
130
131
132
133
134
135
136
137
138
139
140
141
142
143
144
145
146
147
148
149
150
151
152
153
154
155
156
157
158
@SpringBootApplication
@EnableAsync
@Slf4j
public class StudyApplication {

@RestController
public static class MyController {
AsyncRestTemplate rt = new AsyncRestTemplate(new Netty4ClientHttpRequestFactory(new NioEventLoopGroup(1)));

@Autowired
MyService myService;

static final String URL1 = "http://localhost:8081/service?req={req}";
static final String URL2 = "http://localhost:8081/service2?req={req}";

@GetMapping("/rest")
public DeferredResult<String> rest(int idx) {
DeferredResult<String> dr = new DeferredResult<>();

Completion
.from(rt.getForEntity(URL1, String.class, "hello" + idx))
.andApply(s -> rt.getForEntity(URL2, String.class, s.getBody()))
.andError(e -> dr.setErrorResult(e))
.andAccept(s -> dr.setResult(s.getBody()));

/*
ListenableFuture<ResponseEntity<String>> f1 = rt.getForEntity("http://localhost:8081/service?req={req}", String.class, "hello" + idx);
f1.addCallback(s -> {
ListenableFuture<ResponseEntity<String>> f2 = rt.getForEntity("http://localhost:8081/service2?req={req}", String.class, s.getBody());
f2.addCallback(s2 -> {
ListenableFuture<String> f3 = myService.work(s2.getBody());
f3.addCallback(s3 -> {
dr.setResult(s3);
}, e -> {
dr.setErrorResult(e.getMessage());
});
}, e -> {
dr.setErrorResult(e.getMessage());
});
}, e -> {
dr.setErrorResult(e.getMessage());
});
*/

return dr;
}
}

public static class AcceptCompletion extends Completion {
Consumer<ResponseEntity<String>> con;

public AcceptCompletion(Consumer<ResponseEntity<String>> con) {
this.con = con;
}

@Override
public void run(ResponseEntity<String> value) {
con.accept(value);
}
}

public static class ErrorCompletion extends Completion {
Consumer<Throwable> econ;

public ErrorCompletion(Consumer<Throwable> econ) {
this.econ = econ;
}

@Override
public void run(ResponseEntity<String> value) {
if (next != null) {
next.run(value);
}
}

@Override
public void error(Throwable e) {
econ.accept(e);
}
}

public static class AsyncCompletion extends Completion {
Function<ResponseEntity<String>, ListenableFuture<ResponseEntity<String>>> fn;

public AsyncCompletion(Function<ResponseEntity<String>, ListenableFuture<ResponseEntity<String>>> fn) {
this.fn = fn;
}

@Override
public void run(ResponseEntity<String> value) {
ListenableFuture<ResponseEntity<String>> lf = fn.apply(value);
lf.addCallback(s -> complete(s), e -> error(e));
}
}

public static class Completion {
Completion next;

public static Completion from(ListenableFuture<ResponseEntity<String>> lf) {
Completion c = new Completion();
lf.addCallback(s -> {
c.complete(s);
}, e -> {
c.error(e);
});
return c;
}

public Completion andApply(Function<ResponseEntity<String>, ListenableFuture<ResponseEntity<String>>> fn) {
Completion c = new AsyncCompletion(fn);
this.next = c;
return c;
}

public Completion andError(Consumer<Throwable> econ) {
Completion c = new ErrorCompletion(econ);
this.next = c;
return c;
}

public void andAccept(Consumer<ResponseEntity<String>> con) {
Completion c = new AcceptCompletion(con);
this.next = c;
}

public void complete(ResponseEntity<String> s) {
if (next != null) next.run(s);
}

public void run(ResponseEntity<String> value) {
}

public void error(Throwable e) {
if (next != null) next.error(e);
}
}

@Service
public static class MyService {
@Async
public ListenableFuture<String> work(String req) {
return new AsyncResult<>(req + "/asyncwork");
}
}

@Bean
public ThreadPoolTaskExecutor myThreadPool() {
ThreadPoolTaskExecutor te = new ThreadPoolTaskExecutor();
te.setCorePoolSize(1);
te.setMaxPoolSize(1);
te.initialize();
return te;
}

public static void main(String[] args) {
SpringApplication.run(StudyApplication.class, args);
}
}

Generic 적용

1
2
3
4
5
6
7
8
9
10
11
12
13
14
15
16
17
18
19
20
21
22
23
24
25
26
27
28
29
30
31
32
33
34
35
36
37
38
39
40
41
42
43
44
45
46
47
48
49
50
51
52
53
54
55
56
57
58
59
60
61
62
63
64
65
66
67
68
69
70
71
72
73
74
75
76
77
78
79
80
81
82
83
84
85
86
87
88
89
90
91
92
93
94
95
96
97
98
99
100
101
102
103
104
105
106
107
108
109
110
111
112
113
114
115
116
117
118
119
120
121
122
123
124
125
126
127
128
129
130
131
132
133
134
135
136
137
138
139
140
141
142
143
144
145
146
147
148
149
150
151
152
153
154
155
156
157
158
159
160
@SpringBootApplication
@EnableAsync
@Slf4j
public class StudyApplication {

@RestController
public static class MyController {
AsyncRestTemplate rt = new AsyncRestTemplate(new Netty4ClientHttpRequestFactory(new NioEventLoopGroup(1)));

@Autowired
MyService myService;

static final String URL1 = "http://localhost:8081/service?req={req}";
static final String URL2 = "http://localhost:8081/service2?req={req}";

@GetMapping("/rest")
public DeferredResult<String> rest(int idx) {
DeferredResult<String> dr = new DeferredResult<>();

Completion
.from(rt.getForEntity(URL1, String.class, "hello" + idx))
.andApply(s -> rt.getForEntity(URL2, String.class, s.getBody()))
.andApply(s -> myService.work(s.getBody()))
.andError(e -> dr.setErrorResult(e.toString()))
.andAccept(s -> dr.setResult(s));

/*
ListenableFuture<ResponseEntity<String>> f1 = rt.getForEntity("http://localhost:8081/service?req={req}", String.class, "hello" + idx);
f1.addCallback(s -> {
ListenableFuture<ResponseEntity<String>> f2 = rt.getForEntity("http://localhost:8081/service2?req={req}", String.class, s.getBody());
f2.addCallback(s2 -> {
ListenableFuture<String> f3 = myService.work(s2.getBody());
f3.addCallback(s3 -> {
dr.setResult(s3);
}, e -> {
dr.setErrorResult(e.getMessage());
});
}, e -> {
dr.setErrorResult(e.getMessage());
});
}, e -> {
dr.setErrorResult(e.getMessage());
});
*/

return dr;
}
}

public static class AcceptCompletion<S> extends Completion<S, Void> {
Consumer<S> con;

public AcceptCompletion(Consumer<S> con) {
this.con = con;
}

@Override
public void run(S value) {
con.accept(value);
}
}

public static class ErrorCompletion<T> extends Completion<T, T> {
Consumer<Throwable> econ;

public ErrorCompletion(Consumer<Throwable> econ) {
this.econ = econ;
}

@Override
public void run(T value) {
if (next != null) {
next.run(value);
}
}

@Override
public void error(Throwable e) {
econ.accept(e);
}
}

public static class AsyncCompletion<S, T> extends Completion<S, T> {
Function<S, ListenableFuture<T>> fn;

public AsyncCompletion(Function<S, ListenableFuture<T>> fn) {
this.fn = fn;
}

@Override
public void run(S value) {
ListenableFuture<T> lf = fn.apply(value);
lf.addCallback(s -> complete(s), e -> error(e));
}
}

// S는 넘어온 파라미터, T는 결과
public static class Completion<S, T> {
Completion next;

public static <S, T> Completion<S, T> from(ListenableFuture<T> lf) {
Completion<S, T> c = new Completion<>();
lf.addCallback(s -> {
c.complete(s);
}, e -> {
c.error(e);
});
return c;
}

public <V> Completion<T, V> andApply(Function<T, ListenableFuture<V>> fn) {
Completion<T, V> c = new AsyncCompletion<>(fn);
this.next = c;
return c;
}

public Completion<T, T> andError(Consumer<Throwable> econ) {
Completion<T, T> c = new ErrorCompletion<>(econ);
this.next = c;
return c;
}

public void andAccept(Consumer<T> con) {
Completion<T, Void> c = new AcceptCompletion<>(con);
this.next = c;
}

public void complete(T s) {
if (next != null) next.run(s);
}

public void run(S value) {
}

public void error(Throwable e) {
if (next != null) next.error(e);
}
}

@Service
public static class MyService {
@Async
public ListenableFuture<String> work(String req) {
return new AsyncResult<>(req + "/asyncwork");
}
}

@Bean
public ThreadPoolTaskExecutor myThreadPool() {
ThreadPoolTaskExecutor te = new ThreadPoolTaskExecutor();
te.setCorePoolSize(1);
te.setMaxPoolSize(1);
te.initialize();
return te;
}

public static void main(String[] args) {
SpringApplication.run(StudyApplication.class, args);
}
}

비동기 RestTemplate과 비동기 MVC/Serlvet

해당 포스팅은 토비님의 토비의 봄 TV 9회 스프링 리액티브 프로그래밍 (5) 비동기 RestTemplate과 비동기 MVC/Serlvet 라이브 코딩을 보며 따라했던 실습 내용을 바탕으로 정리한 글입니다.

실습 코드들은 IntelliJ를 이용해 SpringBoot 2.1.3.RELEASE 버전 기반으로 프로젝트를 생성 후(web, lombok 포함) 진행했습니다.

Thread Pool Hell

스프링의 비동기 기술 을 이용해 클라이언트로부터 요청을 받은 후 실제 작업은 작업 스레드 풀에 위임하고 현재의 서블릿 스레드는 서블릿 스레드 풀에 반환 후, 다음 요청이 들어올 경우 바로 사용할 수 있게 효율적으로 처리하도록 만들었습니다.
그러나 아직 문제가 있습니다.

아주 빠르게 무언가를 계산하고 해당 처리를 끝내는 경우라면 굳이 비동기 MVC(서블릿)를 사용하지 않아도 문제가 없지만, 하나의 요청에 대한 처리를 수행하면서 외부의 서비스들을 호출하는 작업이 많이 있는 경우, 문제는 단순히 비동기를 서블릿을 사용하는 것만으로 해결할 수 없는 경우가 많이 있습니다. (서블릿 요청은 바로 사용 가능하더라도 워커 스레드가 I/O 같은 작업으로 인해 블록되기 때문입니다.)

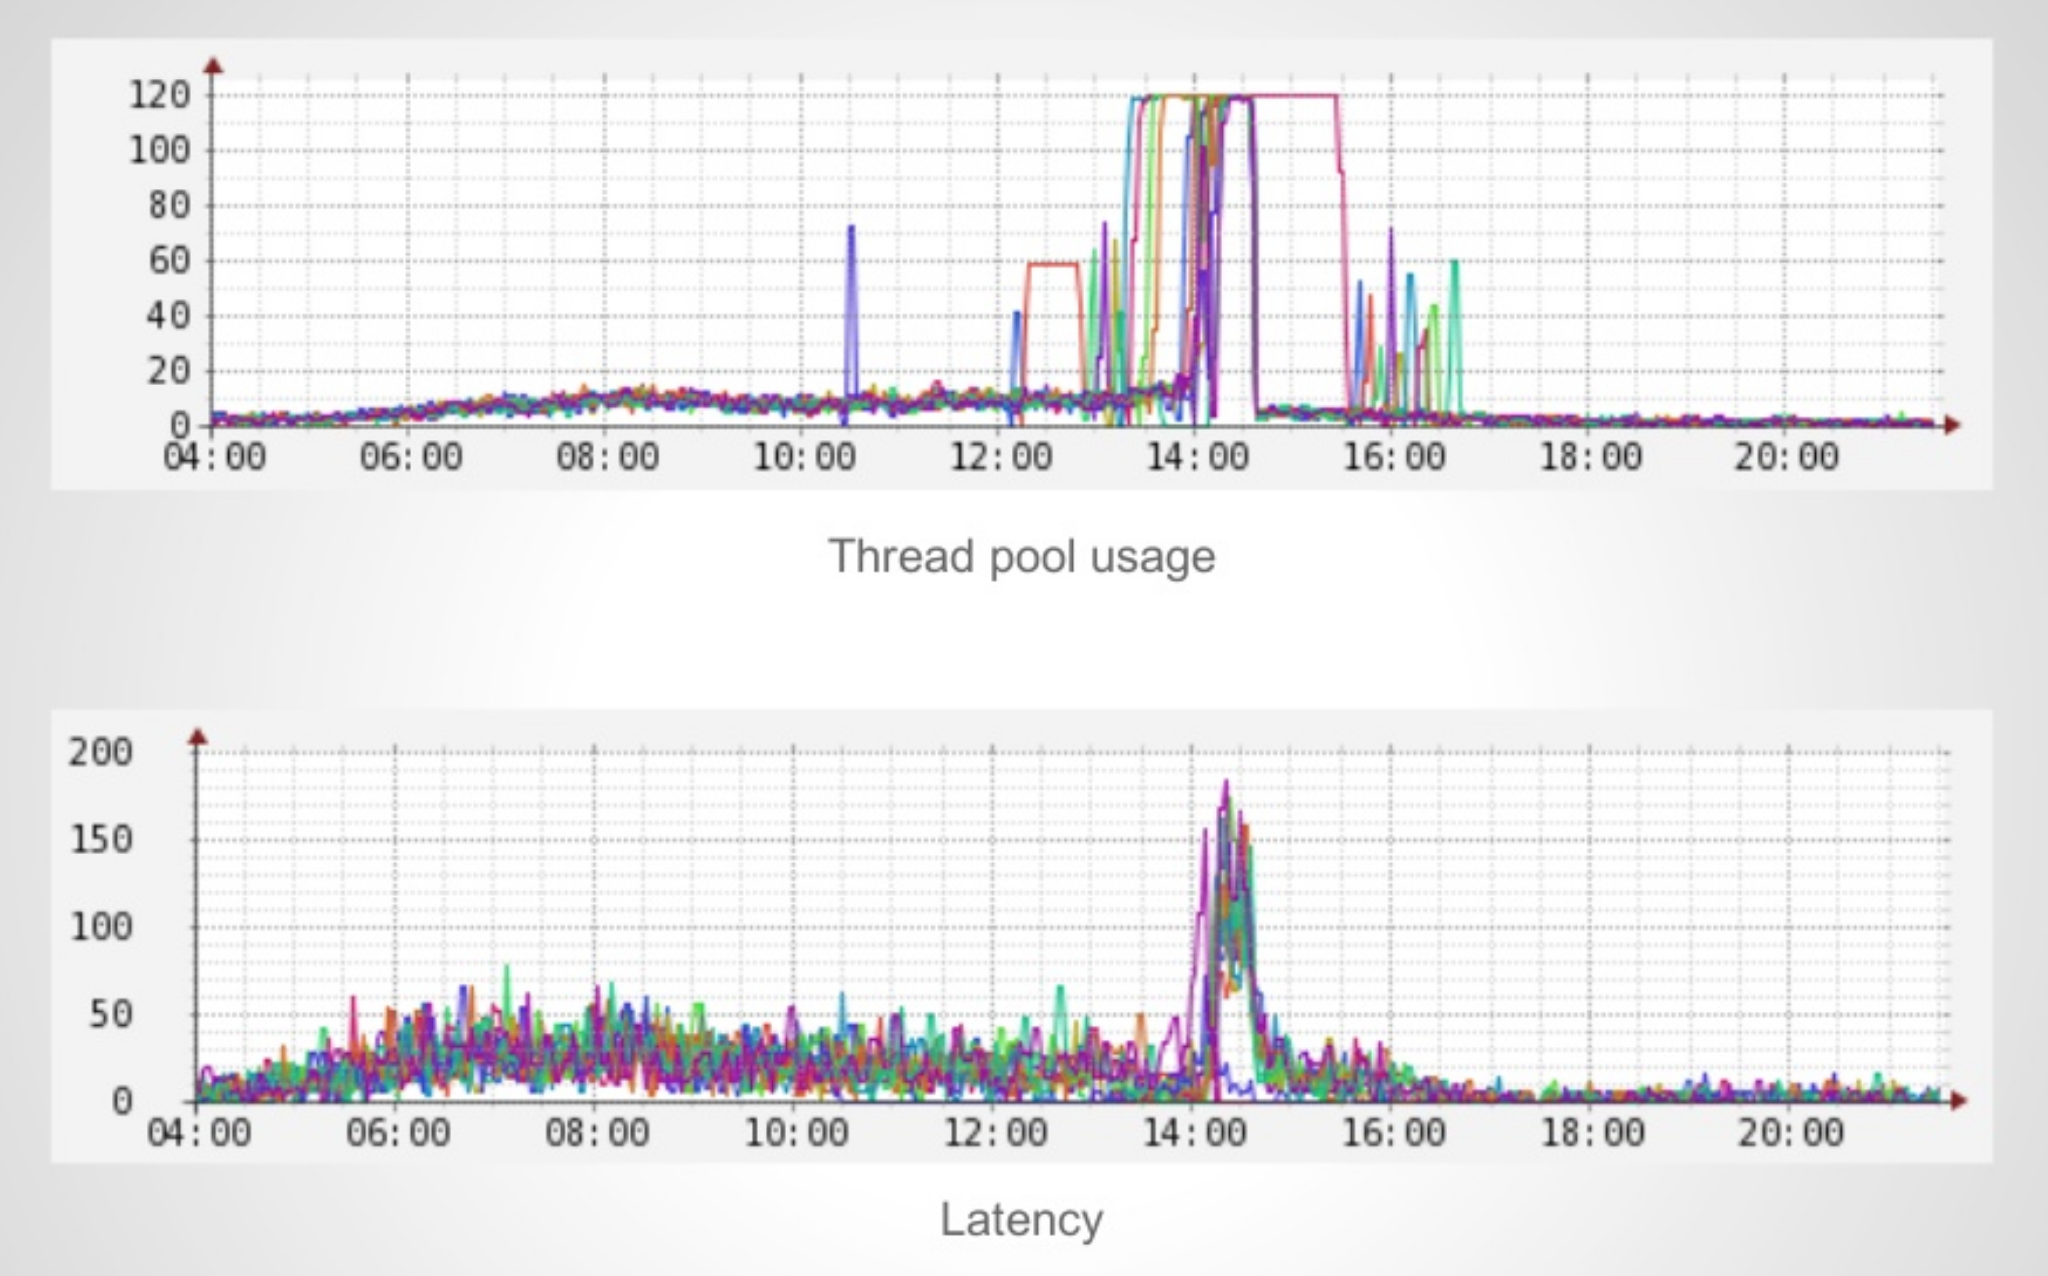
Thread Pool Hell이란 풀 안에 있는 스레드에 대한 사용 요청이 급격하게 증가해 추가적인 요청이 들어올 때, 사용 가능한 스레드 풀의 스레드가 없기 때문에 대기 상태에 빠져 요청에 대한 응답이 느려지게 되는 상태를 말합니다.
thread pool hell

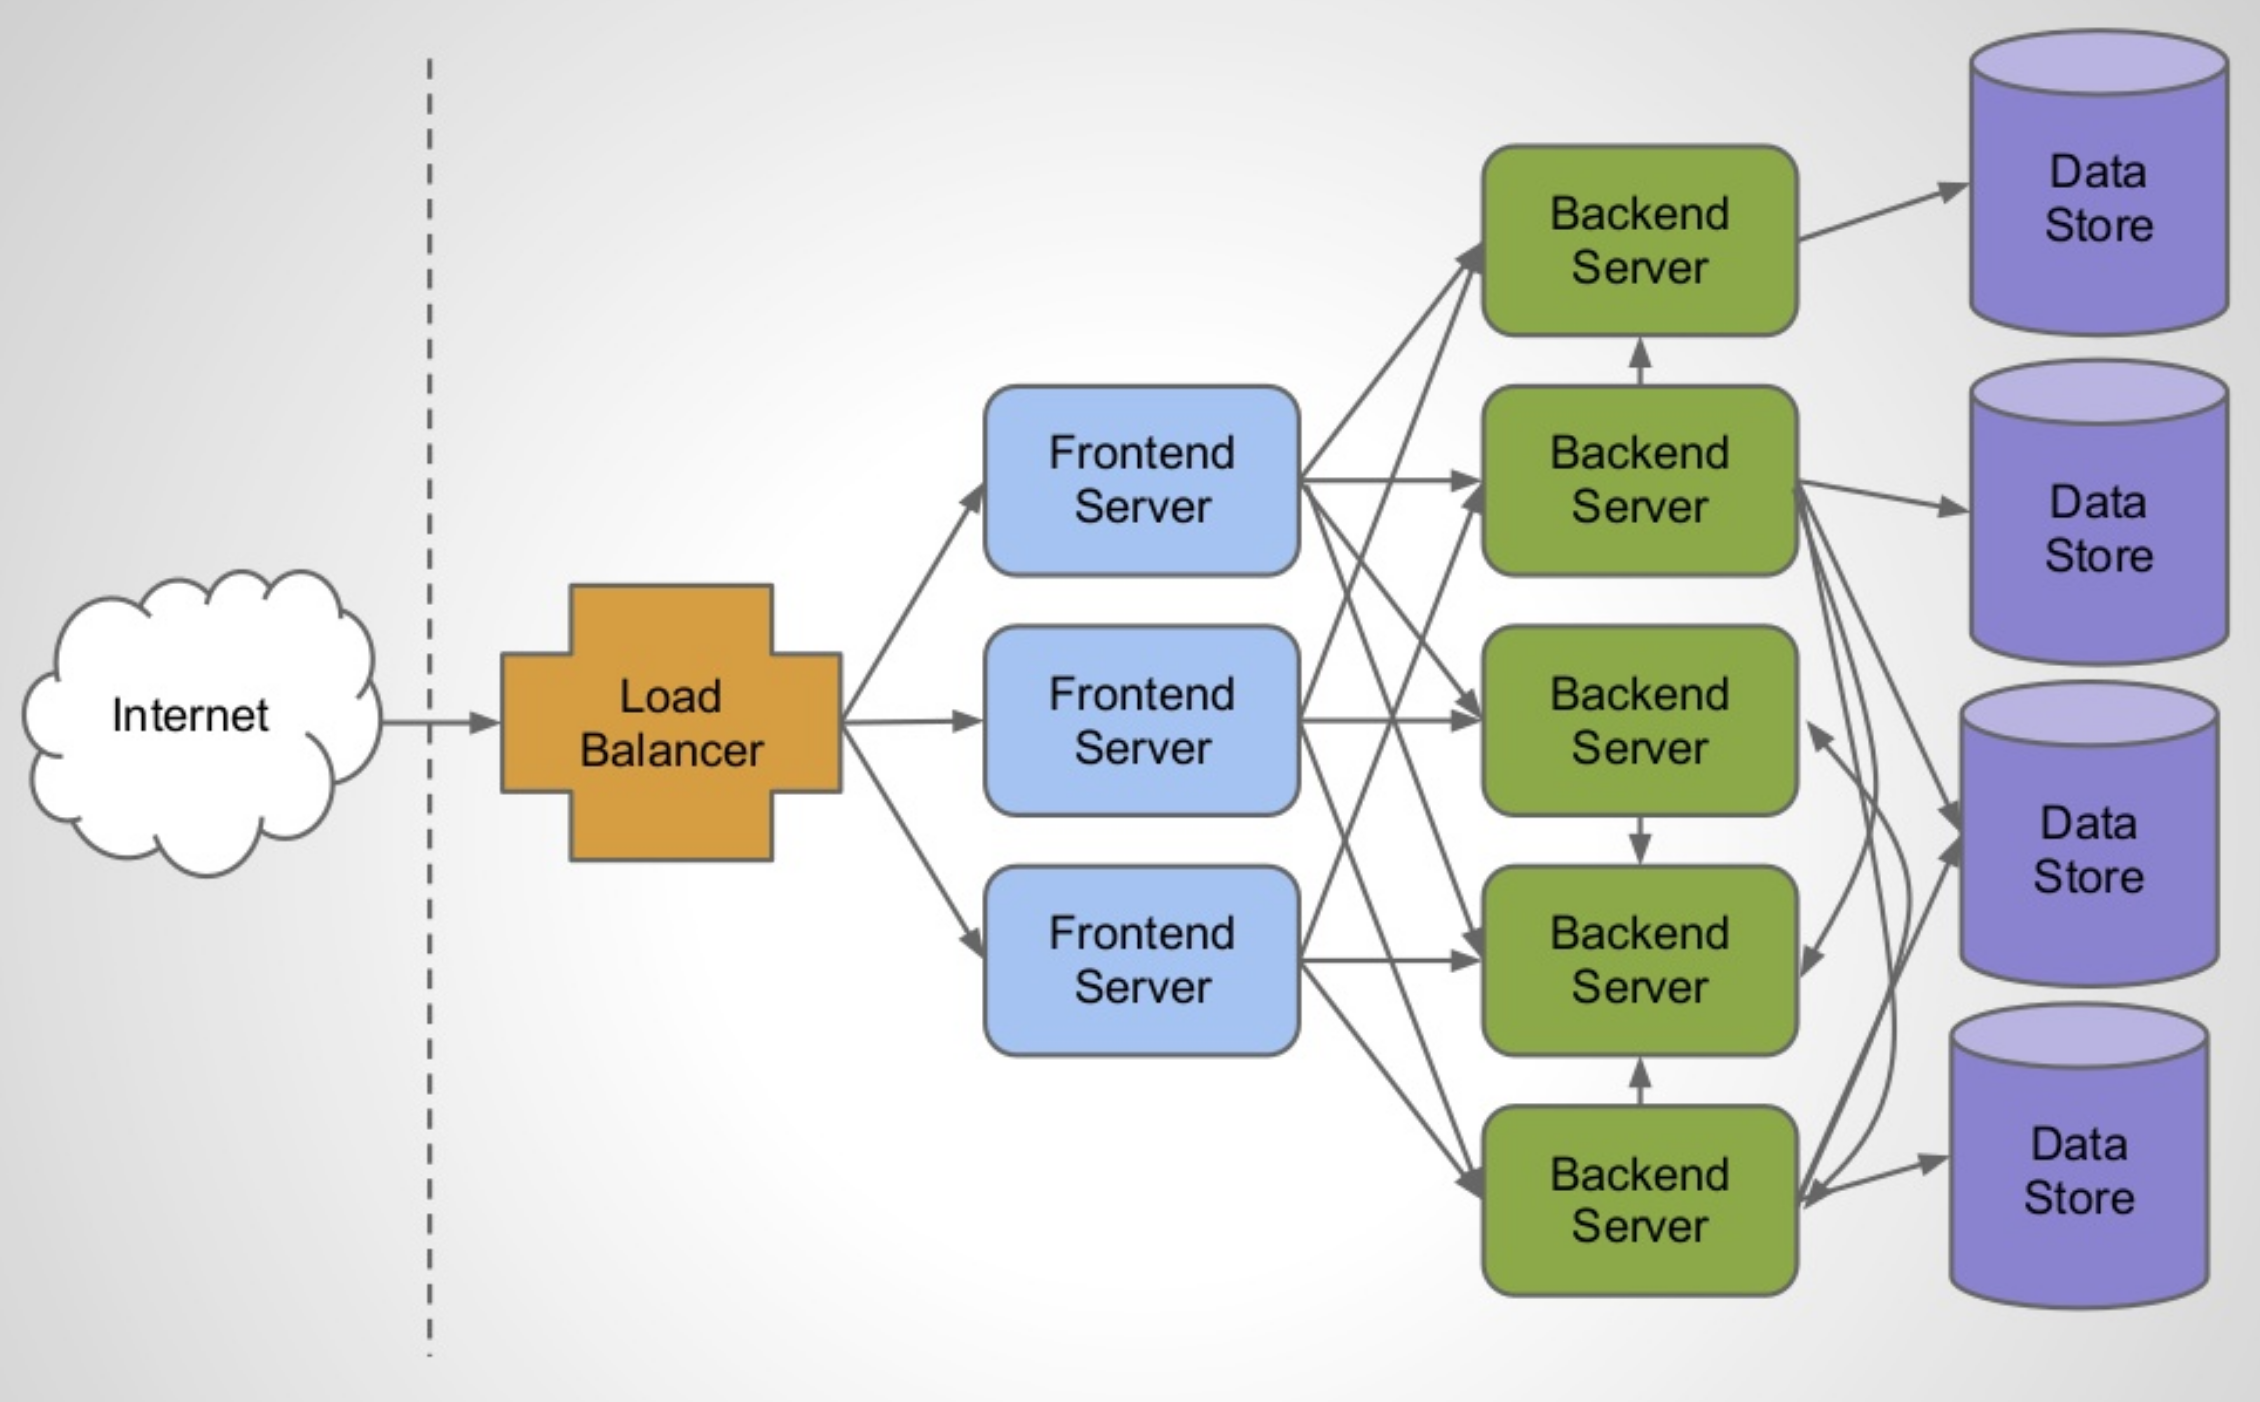
최근 서비스들은 아래의 그럼처럼 하나의 요청을 처리함에 있어 다른 서버로의 요청(Network I/O)이 많아졌습니다. 조금전 설명한 것처럼 비동기 서블릿을 사용하더라도 하나의 요청을 처리하는 동안 하나의 작업(워커) 스레드는 그 시간동안 대기상태에 빠지게 되어 결국에는 스레드 풀의 가용성이 떨어지게 됩니다. 이번 포스팅에서는 해당 문제를 해결해가는 과정을 다루고 있습니다.

service oriented architecture

Upgrade Client (For Load Test)

지난 번에 작성했던 Client를 조금 수정하도록 합니다. 기존의 Client는 100개의 스레드를 순차적으로 만들면서 서버로의 Request를 만들었던 문제가 있었습니다. 이제는 100개의 스레드를 만들고 CyclicBarrier를 이용해 100개의 스레드에서 동시에 Request를 만들도록 변경해보겠습니다.

1
2
3
4
5
6
7
8
9
10
11
12
13
14
15
16
17
18
19
20
21
22
23
24
25
26
27
28
29
30
31
32
33
34
35
36
37
38
39
40
41
42
43
44
45
@Slf4j
public class LoadTest {
static AtomicInteger counter = new AtomicInteger(0);

public static void main(String[] args) throws InterruptedException, BrokenBarrierException {
ExecutorService es = Executors.newFixedThreadPool(100);

RestTemplate rt = new RestTemplate();
String url = "http://localhost:8080/rest?idx={idx}";

CyclicBarrier barrier = new CyclicBarrier(101);

for (int i = 0; i < 100; i++) {
// submit이 받는 callable은 return을 가질 수 있으며, exception도 던질 수 있다.
es.submit(() -> {
int idx = counter.addAndGet(1);
log.info("Thread {}", idx);
barrier.await();

StopWatch sw = new StopWatch();
sw.start();

String res = rt.getForObject(url, String.class, idx);

sw.stop();
log.info("idx: {}, Elapsed: {} -> res: {}", idx, sw.getTotalTimeSeconds(), res);
// IDE가 funtional interface가 callable임을 인식할 수 있도록 의미없는 return을 넣어준다.
return null;
});
}

// await을 만난 스레드가 101번째가 될 때, 모든 스레드들도 await에서 풀려나 이후 로직을 수행한다.
// 메인 스레드 1개, Executors.newFixedThreadPool로 생성한 스레드 100개
barrier.await();
StopWatch main = new StopWatch();
main.start();

es.shutdown();
// 지정된 시간이 타임아웃 걸리기 전이라면 대기작업이 진행될 때까지 기다린다.
// (100초안에 작업이 끝날때까지 기다리거나, 100초가 초과되면 종료)
es.awaitTermination(100, TimeUnit.SECONDS);
main.stop();
log.info("Total: {}", main.getTotalTimeSeconds());
}
}

외부 서비스 호출 테스트

클라이언트의 요청을 받아 외부 서비스를 호출하고 해당 결과를 이용해서 응답을 돌려주는 테스트를 진행합니다. 테스트를 진행하기 위해서는 2개의 스프링 애플리케이션이 필요합니다. 2개의 스프링 애플리케이션의 설정은 다음과 같습니다.

  • Main Application
    • port: 8080
    • tomcat-max-thread-count: 1
  • Remote Application
    • port: 8081
    • tomcat-max-thread-count: 1000

Main Application

먼저 하나의 스프링 애플리케이션에 컨트롤러를 하나 준비합니다. 이 컨트롤러는 클라이언트로부터 요청을 받아 해당 요청으로부터 받은 값을 이용해 다른 외부 서비스(http://localhost:8081/service?req={req})를 호출합니다.

결국 해당 서블릿은 클라이언트 요청을 처리하면서 외부 서비스로의 Networking I/O 작업을 수행하기 때문에 외부 서비스로부터의 요청에 대한 응답을 받기 전까지는 blocking 상태가 됩니다.

1
2
3
4
5
6
7
8
9
10
11
12
13
14
15
16
17
18
19
20
@SpringBootApplication
@Slf4j
public class MainApplication {

@RestController
public static class MainController {
RestTemplate rt = new RestTemplate();

@GetMapping("/rest")
public String rest(int idx) {
String res = rt.getForObject("http://localhost:8081/service?req={req}",
String.class, "hello" + idx);
return res;
}
}

public static void main(String[] args) {
SpringApplication.run(MainApplication.class, args);
}
}

application.properties 파일에서 다음과 같이 Tomcat의 스레드 개수를 1개로 설정합니다.

1
server.tomcat.max-threads=1

Remote Application

다른 하나의 스프링 애플리케이션을 생성하고 이전에 만들었던 스프링 애플리케이션의 컨트롤러 내부에서 만들었던 요청을 받아 처리할 수 있도록 컨트롤러 추가합니다. 8080 포트가 아닌 8081 포트를 사용하고 tomcat 스레드를 1000개로 설정합니다. RemoteApplication은 application.properties의 값을 사용하게 하지 않고 직접 프로퍼티를 설정해줍니다.

아래와 같이 설정하면 Intellij를 이용해서 하나의 프로젝트에서 2개의 스프링 애플리케이션을 실행할 수 있습니다.

1
2
3
4
5
6
7
8
9
10
11
12
13
14
15
16
17
18
19
@SpringBootApplication
public class RemoteApplication {

@RestController
public static class RemoteController {
@GetMapping("/service")
public String service(String req) {
return req + "/service";
}
}

public static void main(String[] args) {
// 하나의 프로젝트에서 2개의 스프링 애플리케이션을 띄우기 위해 외부 서비스 역할을 하는 RemoteApplication은
// application.properties가 아닌 별도의 프로퍼티를 이용하도록 직접 설정한다.
System.setProperty("server.port", "8081");
System.setProperty("server.tomcat.max-threads", "1000");
SpringApplication.run(RemoteApplication.class, args);
}
}

결과 확인

MainApplication과 RemoteApplication을 각각 실행하고 Client를 이용한 테스트 결과는 다음과 같습니다.
100개의 클라이언트 요청을 처리하는데 0.4초 정도의 시간이 걸렸습니다.

1
2
3
4
5
6
7
8
9
10
11
12
13
14
15
16
17
18
19
...
...
...
01:54:27.539 [pool-1-thread-40] DEBUG org.springframework.web.client.RestTemplate - Response 200 OK
01:54:27.539 [pool-1-thread-40] DEBUG org.springframework.web.client.RestTemplate - Reading to [java.lang.String] as "text/plain;charset=UTF-8"
01:54:27.539 [pool-1-thread-40] INFO com.example.study.LoadTest - idx: 40, Elapsed: 0.4 -> res: hello40/service
01:54:27.541 [pool-1-thread-77] DEBUG org.springframework.web.client.RestTemplate - Response 200 OK
01:54:27.541 [pool-1-thread-77] DEBUG org.springframework.web.client.RestTemplate - Reading to [java.lang.String] as "text/plain;charset=UTF-8"
01:54:27.541 [pool-1-thread-77] INFO com.example.study.LoadTest - idx: 77, Elapsed: 0.401 -> res: hello77/service
01:54:27.543 [pool-1-thread-48] DEBUG org.springframework.web.client.RestTemplate - Response 200 OK
01:54:27.543 [pool-1-thread-48] DEBUG org.springframework.web.client.RestTemplate - Reading to [java.lang.String] as "text/plain;charset=UTF-8"
01:54:27.543 [pool-1-thread-48] INFO com.example.study.LoadTest - idx: 48, Elapsed: 0.403 -> res: hello48/service
01:54:27.545 [pool-1-thread-8] DEBUG org.springframework.web.client.RestTemplate - Response 200 OK
01:54:27.545 [pool-1-thread-8] DEBUG org.springframework.web.client.RestTemplate - Reading to [java.lang.String] as "text/plain;charset=UTF-8"
01:54:27.546 [pool-1-thread-8] INFO com.example.study.LoadTest - idx: 8, Elapsed: 0.407 -> res: hello8/service
01:54:27.548 [pool-1-thread-33] DEBUG org.springframework.web.client.RestTemplate - Response 200 OK
01:54:27.548 [pool-1-thread-33] DEBUG org.springframework.web.client.RestTemplate - Reading to [java.lang.String] as "text/plain;charset=UTF-8"
01:54:27.548 [pool-1-thread-33] INFO com.example.study.LoadTest - idx: 33, Elapsed: 0.409 -> res: hello33/service
01:54:27.548 [main] INFO com.example.study.LoadTest - Total: 0.407

이번에는 RemoteApplication의 요청 처리 부분에 2초간 Thread sleep을 주고 다시 한 번 클라이언트를 이용해 테스트를 진행해봅니다.

1
2
3
4
5
6
7
8
9
10
// RemoteApplication

@RestController
public static class RemoteController {
@GetMapping("/service")
public String service(String req) throws InterruptedException {
Thread.sleep(2000);
return req + "/service";
}
}

Thread sleep을 추가하고 다시 테스트를 해보면 결과는 다음과 같습니다. 100개의 요청을 약 0.4초만에 모두 처리하던 이전과 달리 매 요청을 처리하는데 약 2초의 시간이 증가하고 있습니다. 결국 마지막 요청은 약 2 * 100 = 200초 후에서야 응답을 받을 수 있기 때문에 모든 요청에 대한 처리는 200초 정도 걸릴 것 입니다.

1
2
3
4
5
6
7
8
9
10
11
12
13
14
15
16
17
18
19
20
21
02:25:22.056 [pool-1-thread-32] DEBUG org.springframework.web.client.RestTemplate - Response 200 OK
02:25:22.058 [pool-1-thread-32] DEBUG org.springframework.web.client.RestTemplate - Reading to [java.lang.String] as "text/plain;charset=UTF-8"
02:25:22.061 [pool-1-thread-32] INFO com.example.study.LoadTest - idx: 32, Elapsed: 2.233 -> res: hello32/service
02:25:24.060 [pool-1-thread-56] DEBUG org.springframework.web.client.RestTemplate - Response 200 OK
02:25:24.060 [pool-1-thread-56] DEBUG org.springframework.web.client.RestTemplate - Reading to [java.lang.String] as "text/plain;charset=UTF-8"
02:25:24.060 [pool-1-thread-56] INFO com.example.study.LoadTest - idx: 56, Elapsed: 4.231 -> res: hello56/service
02:25:26.068 [pool-1-thread-93] DEBUG org.springframework.web.client.RestTemplate - Response 200 OK
02:25:26.068 [pool-1-thread-93] DEBUG org.springframework.web.client.RestTemplate - Reading to [java.lang.String] as "text/plain;charset=UTF-8"
02:25:26.068 [pool-1-thread-93] INFO com.example.study.LoadTest - idx: 93, Elapsed: 6.238 -> res: hello93/service
02:25:28.077 [pool-1-thread-31] DEBUG org.springframework.web.client.RestTemplate - Response 200 OK
02:25:28.077 [pool-1-thread-31] DEBUG org.springframework.web.client.RestTemplate - Reading to [java.lang.String] as "text/plain;charset=UTF-8"
02:25:28.077 [pool-1-thread-31] INFO com.example.study.LoadTest - idx: 31, Elapsed: 8.249 -> res: hello31/service
02:25:30.081 [pool-1-thread-20] DEBUG org.springframework.web.client.RestTemplate - Response 200 OK
02:25:30.082 [pool-1-thread-20] DEBUG org.springframework.web.client.RestTemplate - Reading to [java.lang.String] as "text/plain;charset=UTF-8"
02:25:30.082 [pool-1-thread-20] INFO com.example.study.LoadTest - idx: 20, Elapsed: 10.254 -> res: hello20/service
02:25:32.089 [pool-1-thread-46] DEBUG org.springframework.web.client.RestTemplate - Response 200 OK
02:25:32.089 [pool-1-thread-46] DEBUG org.springframework.web.client.RestTemplate - Reading to [java.lang.String] as "text/plain;charset=UTF-8"
02:25:32.089 [pool-1-thread-46] INFO com.example.study.LoadTest - idx: 46, Elapsed: 12.26 -> res: hello46/service
...
...
...

이런 결과가 나오게 된 이유는 클라이언트로부터의 요청을 받아 처리하는 Main Application의 tomcat thread가 1개이고, 1개의 서블릿 스레드를 이용해 클라이언트의 요청을 처리하는 과정에서 Remote Application에 대한 요청(Network I/O)에서 응답을 받기까지 약 2초간 스레드가 block되기 때문입니다.

AsyncRestTemplate

위의 문제는 MainApplication의 tomcat 스레드는 클라이언트의 요청을 처리하며 외부 서비스(RemoteApplication)로 요청(Network I/O)을 보낸 후, 응답이 올 때까지 대기하고 있는 상태라는 점입니다. 해당 시간동안 CPU는 아무 일을 처리하지 않기때문에 자원이 소모되고 있습니다.

이 문제를 해결하기 위해서는 API를 호출하는 작업을 비동기적으로 바꿔야합니다. tomcat 스레드는 요청에 대한 작업을 다 끝내기 전에 반환을 해서 바로 다음 요청을 처리하도록 사용합니다. 그리고 외부 서비스로부터 실제 결과를 받고 클라이언트의 요청에 응답을 보내기 위해서는 새로운 스레드를 할당 받아 사용합니다. (외부 서비스로부터 실제 결과를 받고 클라이언트에 응답을 보내기 위해서는 새로운 스레드를 할당 받아야 하지만, 외부 API를 호출하는 동안은 스레드(tomcat) 자원을 낭비하고 싶지 않다는 것이 목적이다.)

스프링 3.x 버전에서는 이 문제를 간단히 해결하기 어려웠지만 스프링 4 부터 제공하는 AsyncRestTemplate을 사용하면 이 문제를 쉽게 해결할 수 있습니다. AsyncRestTemplate은 비동기 클라이언트를 제공하는 클래스이며 ListenableFuture를 반환합니다. 스프링은 컨트롤러에서 ListenableFuture를 리턴하면 해당 스레드는 즉시 반납하고, 스프링 MVC가 자동으로 등록해준 콜백에 의해 결과가 처리됩니다.

1
2
3
4
5
6
7
8
9
10
11
12
13
14
15
16
17
18
19
20
@SpringBootApplication
@Slf4j
public class MainApplication {

@RestController
public static class MainController {
// asynchronous
AsyncRestTemplate rt = new AsyncRestTemplate();

@GetMapping("/rest")
public ListenableFuture<ResponseEntity<String>> rest(int idx) {
return rt.getForEntity("http://localhost:8081/service?req={req}",
String.class, "hello" + idx);
}
}

public static void main(String[] args) {
SpringApplication.run(MainApplication.class, args);
}
}

실행 결과를 살펴보면 100개의 요청을 동시에 처리하는데 약 2.6초의 시간이 걸렸습니다.

1
2
3
4
5
6
7
8
9
10
11
12
13
14
15
16
17
18
19
20
21
22
23
24
25
26
27
28
...
...
...
16:55:49.088 [pool-1-thread-4] DEBUG org.springframework.web.client.RestTemplate - Response 200 OK
16:55:49.089 [pool-1-thread-4] DEBUG org.springframework.web.client.RestTemplate - Reading to [java.lang.String] as "text/plain;charset=UTF-8"
16:55:49.089 [pool-1-thread-4] INFO com.example.study.LoadTest - idx: 4, Elapsed: 2.658 -> res: hello4/service
16:55:49.090 [pool-1-thread-44] DEBUG org.springframework.web.client.RestTemplate - Response 200 OK
16:55:49.090 [pool-1-thread-44] DEBUG org.springframework.web.client.RestTemplate - Reading to [java.lang.String] as "text/plain;charset=UTF-8"
16:55:49.090 [pool-1-thread-44] INFO com.example.study.LoadTest - idx: 44, Elapsed: 2.659 -> res: hello44/service
16:55:49.091 [pool-1-thread-93] DEBUG org.springframework.web.client.RestTemplate - Response 200 OK
16:55:49.091 [pool-1-thread-93] DEBUG org.springframework.web.client.RestTemplate - Reading to [java.lang.String] as "text/plain;charset=UTF-8"
16:55:49.091 [pool-1-thread-93] INFO com.example.study.LoadTest - idx: 93, Elapsed: 2.658 -> res: hello93/service
16:55:49.095 [pool-1-thread-66] DEBUG org.springframework.web.client.RestTemplate - Response 200 OK
16:55:49.096 [pool-1-thread-66] DEBUG org.springframework.web.client.RestTemplate - Reading to [java.lang.String] as "text/plain;charset=UTF-8"
16:55:49.096 [pool-1-thread-66] INFO com.example.study.LoadTest - idx: 66, Elapsed: 2.664 -> res: hello66/service
16:55:49.098 [pool-1-thread-16] DEBUG org.springframework.web.client.RestTemplate - Response 200 OK
16:55:49.098 [pool-1-thread-16] DEBUG org.springframework.web.client.RestTemplate - Reading to [java.lang.String] as "text/plain;charset=UTF-8"
16:55:49.098 [pool-1-thread-16] INFO com.example.study.LoadTest - idx: 16, Elapsed: 2.667 -> res: hello16/service
16:55:49.101 [pool-1-thread-57] DEBUG org.springframework.web.client.RestTemplate - Response 200 OK
16:55:49.101 [pool-1-thread-57] DEBUG org.springframework.web.client.RestTemplate - Reading to [java.lang.String] as "text/plain;charset=UTF-8"
16:55:49.101 [pool-1-thread-57] INFO com.example.study.LoadTest - idx: 57, Elapsed: 2.669 -> res: hello57/service
16:55:49.104 [pool-1-thread-2] DEBUG org.springframework.web.client.RestTemplate - Response 200 OK
16:55:49.104 [pool-1-thread-2] DEBUG org.springframework.web.client.RestTemplate - Reading to [java.lang.String] as "text/plain;charset=UTF-8"
16:55:49.105 [pool-1-thread-2] INFO com.example.study.LoadTest - idx: 2, Elapsed: 2.674 -> res: hello2/service
16:55:49.105 [pool-1-thread-15] DEBUG org.springframework.web.client.RestTemplate - Response 200 OK
16:55:49.105 [pool-1-thread-15] DEBUG org.springframework.web.client.RestTemplate - Reading to [java.lang.String] as "text/plain;charset=UTF-8"
16:55:49.105 [pool-1-thread-15] INFO com.example.study.LoadTest - idx: 15, Elapsed: 2.674 -> res: hello15/service
16:55:49.106 [main] INFO com.example.study.LoadTest - Total: 2.673

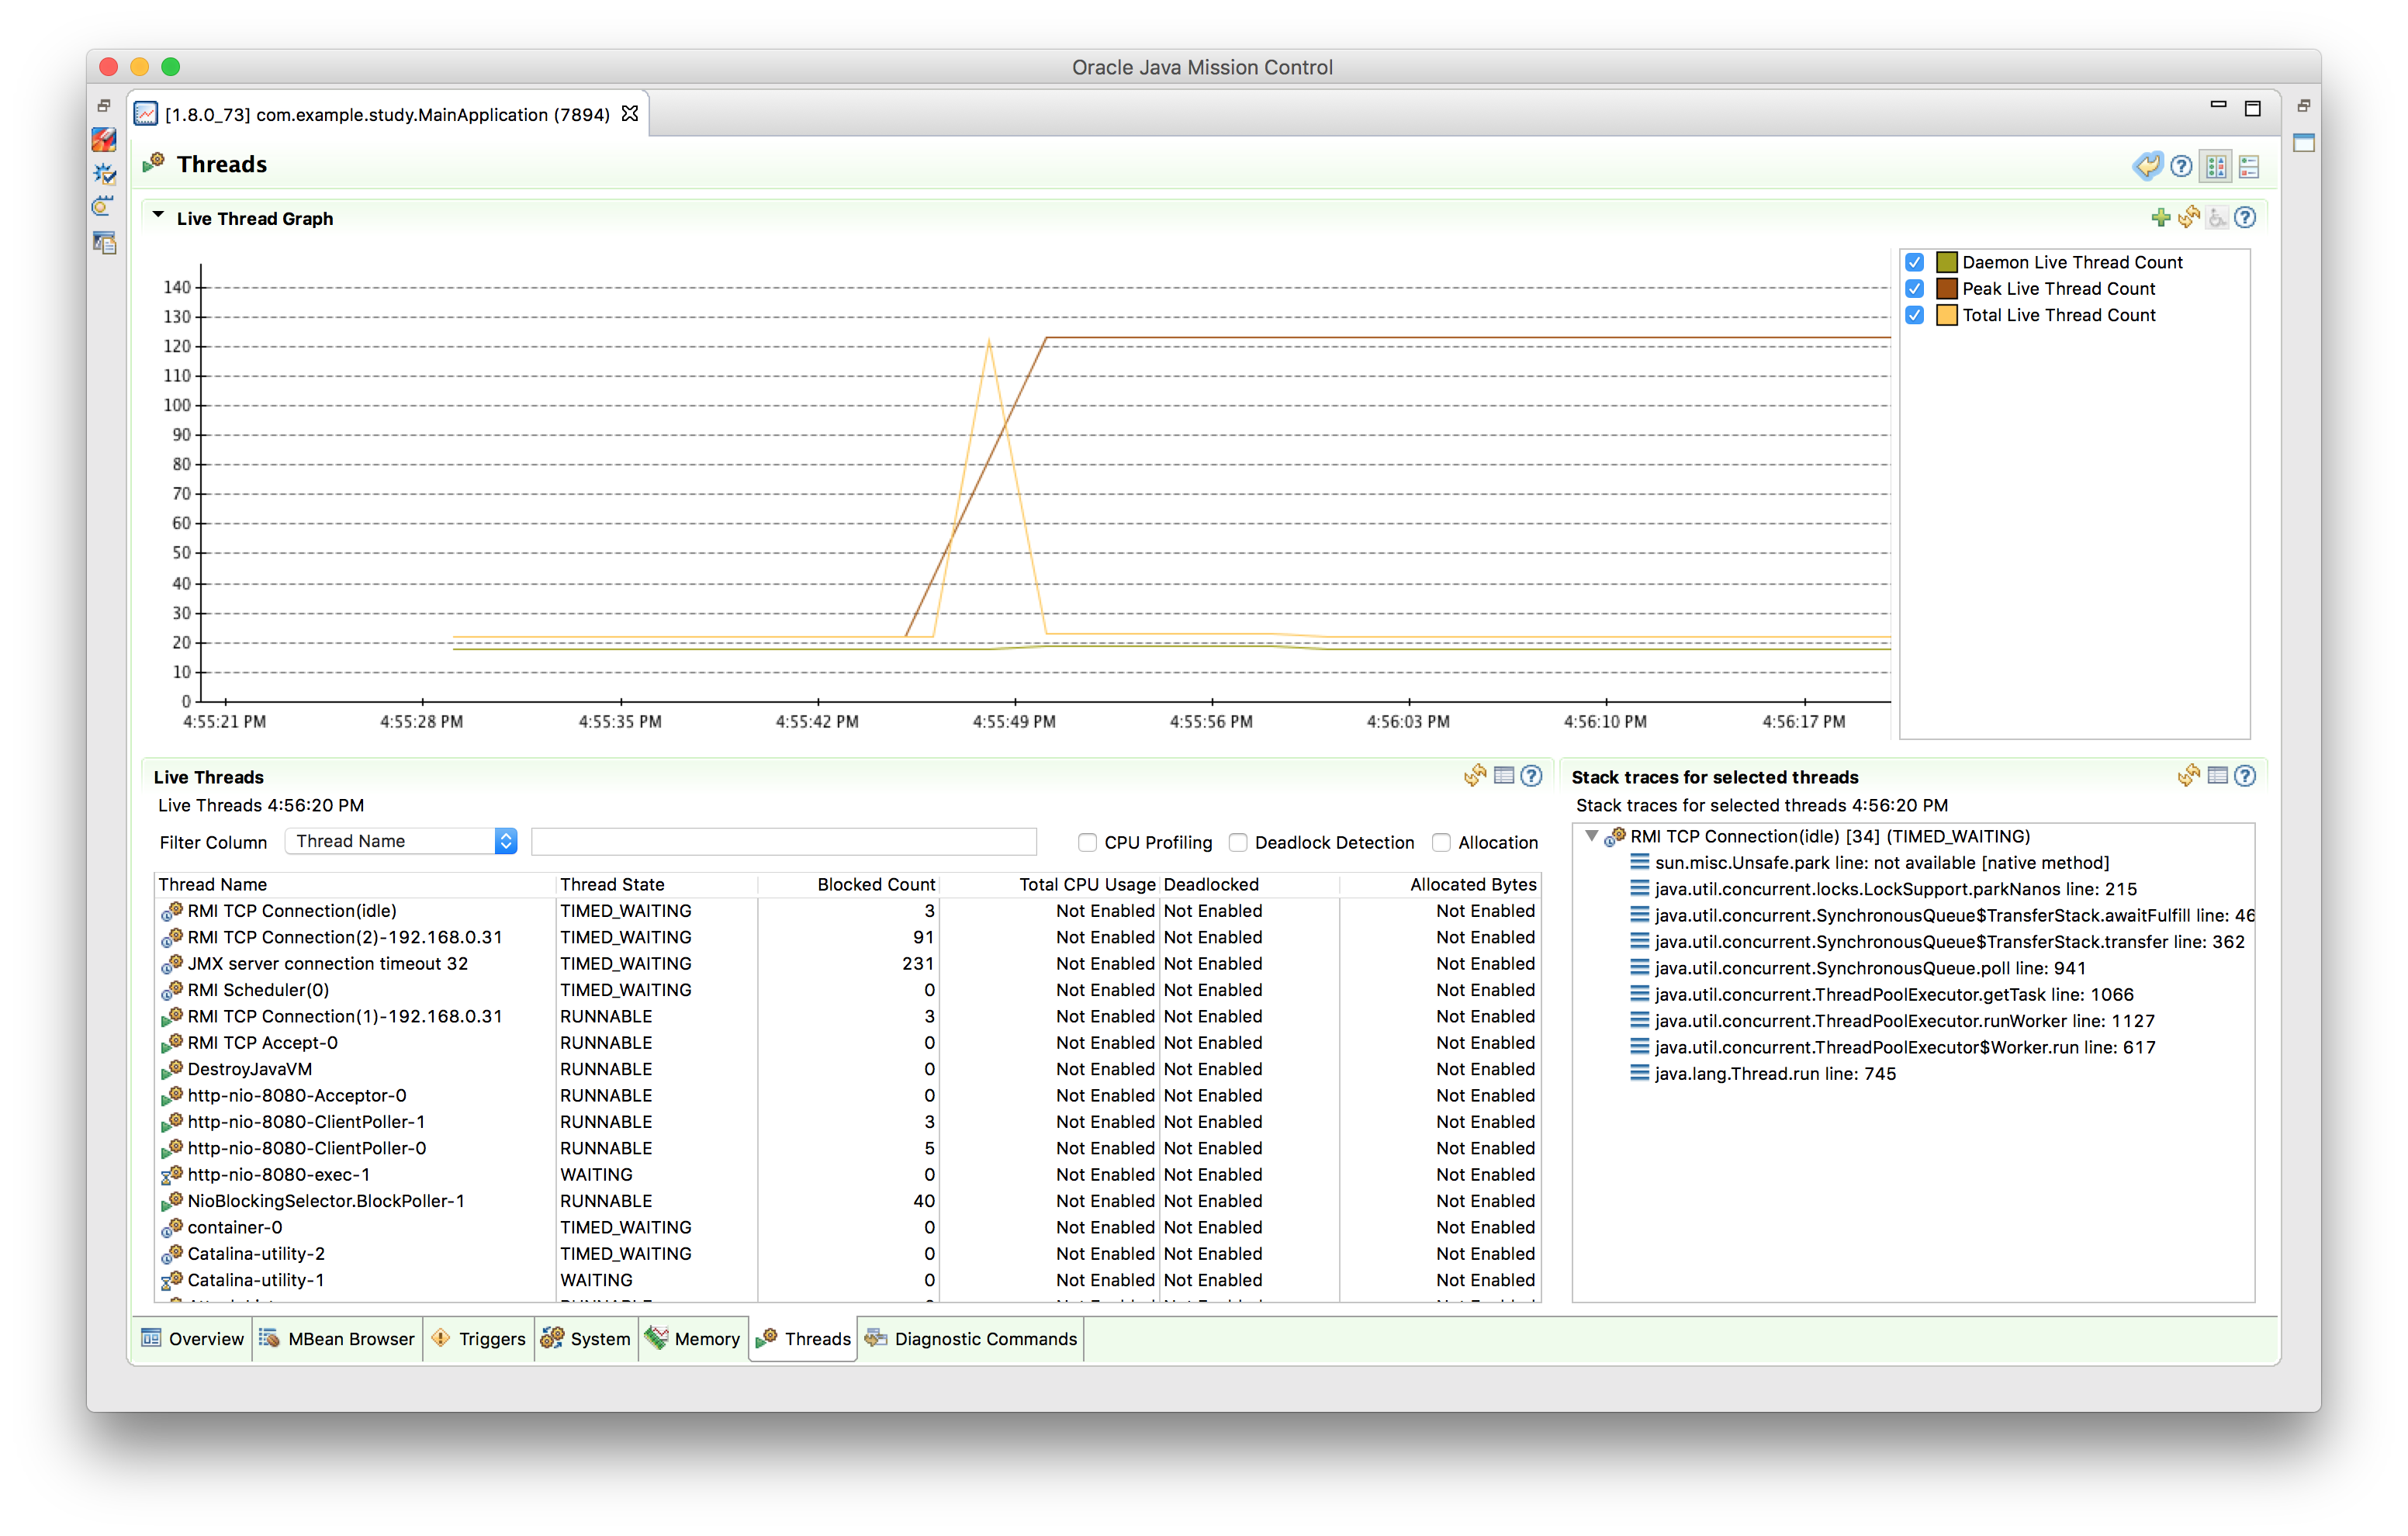
클라이언트의 요청이 들어 올 때, MainApplication의 스레드 상태를 살펴보면, tomcat 스레드는 그대로 1개 입니다.(http-nio-8080-exec-1) 그러나 비동기 작업을 처리하기 위해서 순간적으로 백그라운드에 100개의 스레드 새로 생성되는것을 확인할 수 있습니다.
async rest template result

Netty non-blocking I/O

지금까지 Tomcat의 스레드가 1개이지만 요청을 비동기적으로 처리함으로써 Tomcat의 스레드는 바로 반환이되어 다시 그 후의 요청에 Tomcat의 스레드를 이용해 요청을 받을 수 있었습니다. 그러나 결과적으로는 실제 비동기 요청을 처리하는 스레드는 요청의 수 만큼 계속 생성되는 것을 확인할 수 있었습니다.

이번에는 이렇게 비동기 요청을 처리하는 스레드의 수도 Netty의 non blocking I/O를 이용함으로써 비동기 요청을 처리하는 스레드도 줄여보고자 합니다. 그러면 결과적으로 tomcat의 스레드 1개, netty의 non blocking I/O를 이용하기위한 필요한 스레드의 수만큼만 생성되어 클라이언트의 요청을 모두 처리할 수 있을 것 입니다.

먼저 netty의 dependency를 build.gradle 혹은 pom.xml에 추가합니다. 저는 build.gradle에 의존성을 추가해 주었습니다.

1
2
3
4
5
dependencies {
...
implementation 'io.netty:netty-all:4.0.4.Final'
...
}

AsyncRestTemplate이 netty의 Netty4ClientHttpRequestFactory를 이용할 수 있도록 다음과 같이 설정합니다.

1
2
3
4
5
6
7
8
9
10
11
12
13
14
15
16
17
18
19
20
@SpringBootApplication
@Slf4j
public class MainApplication {

@RestController
public static class MainController {
// asynchronous + netty non-blocking
AsyncRestTemplate rt = new AsyncRestTemplate(new Netty4ClientHttpRequestFactory(new NioEventLoopGroup(1)));

@GetMapping("/rest")
public ListenableFuture<ResponseEntity<String>> rest(int idx) {
return rt.getForEntity("http://localhost:8081/service?req={req}",
String.class, "hello" + idx);
}
}

public static void main(String[] args) {
SpringApplication.run(MainApplication.class, args);
}
}

다시 서버를 띄우고 테스트를 해보면 클라이언트의 요청을 전부 처리하는데 걸린 시간은 약 2.7초로 이전과 큰 차이가 없습니다.

1
2
3
4
5
6
7
8
9
10
11
12
13
14
15
16
17
18
19
20
21
22
23
24
25
...
...
...
18:24:49.958 [pool-1-thread-65] DEBUG org.springframework.web.client.RestTemplate - Response 200 OK
18:24:49.958 [pool-1-thread-65] DEBUG org.springframework.web.client.RestTemplate - Reading to [java.lang.String] as "text/plain;charset=UTF-8"
18:24:49.958 [pool-1-thread-65] INFO com.example.study.LoadTest - idx: 65, Elapsed: 2.744 -> res: hello65/service
18:24:49.964 [pool-1-thread-59] DEBUG org.springframework.web.client.RestTemplate - Response 200 OK
18:24:49.964 [pool-1-thread-59] DEBUG org.springframework.web.client.RestTemplate - Reading to [java.lang.String] as "text/plain;charset=UTF-8"
18:24:49.964 [pool-1-thread-59] INFO com.example.study.LoadTest - idx: 59, Elapsed: 2.751 -> res: hello59/service
18:24:49.964 [pool-1-thread-14] DEBUG org.springframework.web.client.RestTemplate - Response 200 OK
18:24:49.965 [pool-1-thread-14] DEBUG org.springframework.web.client.RestTemplate - Reading to [java.lang.String] as "text/plain;charset=UTF-8"
18:24:49.965 [pool-1-thread-14] INFO com.example.study.LoadTest - idx: 14, Elapsed: 2.752 -> res: hello14/service
18:24:49.968 [pool-1-thread-31] DEBUG org.springframework.web.client.RestTemplate - Response 200 OK
18:24:49.968 [pool-1-thread-31] DEBUG org.springframework.web.client.RestTemplate - Reading to [java.lang.String] as "text/plain;charset=UTF-8"
18:24:49.968 [pool-1-thread-31] INFO com.example.study.LoadTest - idx: 31, Elapsed: 2.754 -> res: hello31/service
18:24:49.969 [pool-1-thread-63] DEBUG org.springframework.web.client.RestTemplate - Response 200 OK
18:24:49.969 [pool-1-thread-63] DEBUG org.springframework.web.client.RestTemplate - Reading to [java.lang.String] as "text/plain;charset=UTF-8"
18:24:49.969 [pool-1-thread-63] INFO com.example.study.LoadTest - idx: 63, Elapsed: 2.755 -> res: hello63/service
18:24:49.969 [pool-1-thread-19] DEBUG org.springframework.web.client.RestTemplate - Response 200 OK
18:24:49.969 [pool-1-thread-19] DEBUG org.springframework.web.client.RestTemplate - Reading to [java.lang.String] as "text/plain;charset=UTF-8"
18:24:49.969 [pool-1-thread-19] INFO com.example.study.LoadTest - idx: 19, Elapsed: 2.755 -> res: hello19/service
18:24:49.970 [pool-1-thread-62] DEBUG org.springframework.web.client.RestTemplate - Response 200 OK
18:24:49.970 [pool-1-thread-62] DEBUG org.springframework.web.client.RestTemplate - Reading to [java.lang.String] as "text/plain;charset=UTF-8"
18:24:49.970 [pool-1-thread-62] INFO com.example.study.LoadTest - idx: 62, Elapsed: 2.756 -> res: hello62/service
18:24:49.970 [main] INFO com.example.study.LoadTest - Total: 2.755

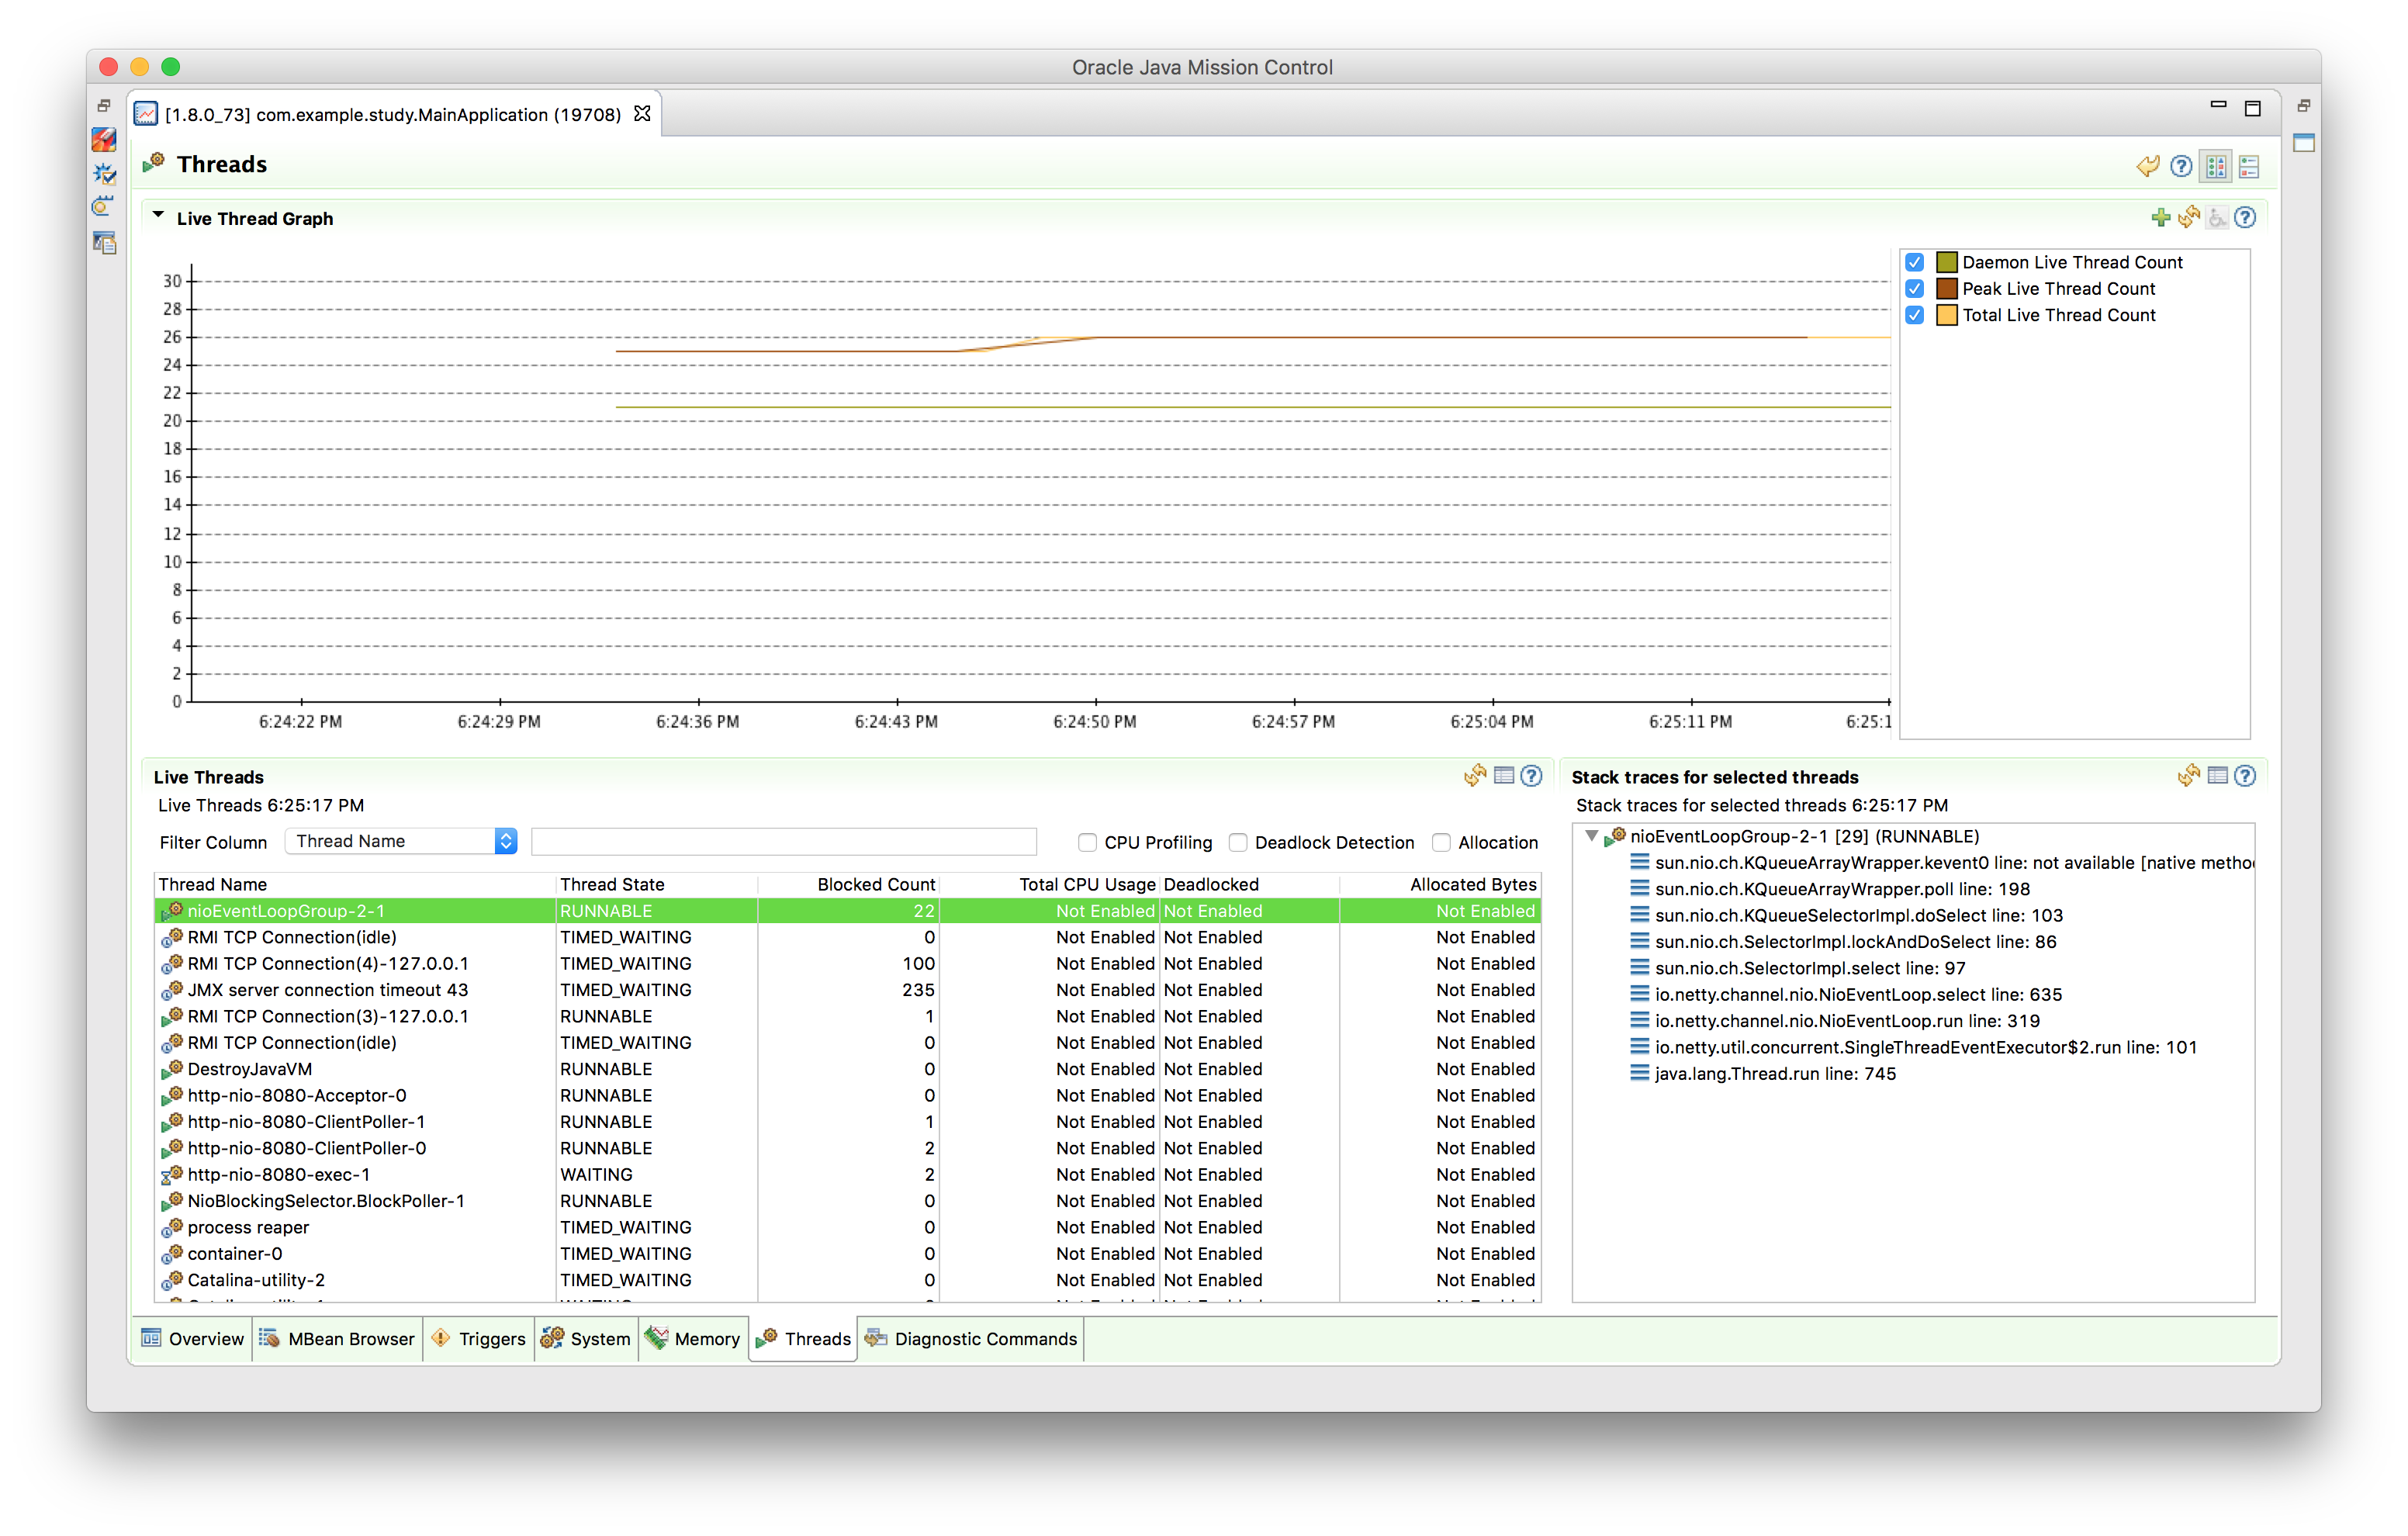
스레드를 확인해보면 다음과 같이 tomcat 스레드 1개, netty가 non blocking I/O를 사용하는데 필요로 하는 몇개의 스레드가 추가된 것 말고는 스레드 수가 크게 증가하지 않은것을 확인할 수 있습니다.
async rest template result

DeferredResult

이전 포스팅에서 살펴 보았던 DeferredResult를 사용하면 AsyncRestTemplate을 사용하여 외부 서비스를 호출한 후, 그 결과를 다시 이용해 클라이언트의 요청에 응답하는 추가 로직 부분을 작성할 수 있습니다.

컨트롤러에서 DeferredResult 오브젝트를 반환하는 시점에는 바로 응답이 가지 않고, 추후 해당 DeferredResult 오브젝트에 값을 set(setResult, setErrorResult) 해줄 때, 클라이언트에게 응답이 가게 됩니다. 이를 이용하려면 ListenableFuture에 콜백을 추가해 해당 콜백 로직 안에서 결과를 이용해 DeferredResult 오브젝트의 set 메서드를 호출하면 됩니다.

1
2
3
4
5
6
7
8
9
10
11
12
13
14
15
16
17
18
19
20
21
22
23
24
25
26
27
28
29
30
31
32
@SpringBootApplication
@Slf4j
public class MainApplication {

@RestController
public static class MainController {
// asynchronous + netty non-blocking
AsyncRestTemplate rt = new AsyncRestTemplate(new Netty4ClientHttpRequestFactory(new NioEventLoopGroup(1)));

@GetMapping("/rest")
public DeferredResult<String> rest(int idx) {
// 오브젝트를 만들어서 컨트롤러에서 리턴하면 언제가 될지 모르지만 언제인가 DeferredResult에 값을 써주면
// 그 값을 응답으로 사용
DeferredResult<String> dr = new DeferredResult<>();

ListenableFuture<ResponseEntity<String>> f1 = rt.getForEntity("http://localhost:8081/service?req={req}",
String.class, "hello" + idx);
f1.addCallback(s -> {
dr.setResult(s.getBody() + "/work");
}, e -> {
dr.setErrorResult(e.getMessage());
});

return dr;
}

}

public static void main(String[] args) {
SpringApplication.run(MainApplication.class, args);
}
}

외부 서비스의 응답을 받아 “/work” 문자열이 추가되어 클라이언트에 전달된것을 확인할 수 있습니다.

1
2
3
4
5
6
7
8
9
10
11
12
13
14
15
16
17
18
19
20
21
22
...
...
...
18:38:23.514 [pool-1-thread-33] DEBUG org.springframework.web.client.RestTemplate - Response 200 OK
18:38:23.514 [pool-1-thread-33] DEBUG org.springframework.web.client.RestTemplate - Reading to [java.lang.String] as "text/plain;charset=UTF-8"
18:38:23.514 [pool-1-thread-33] INFO com.example.study.LoadTest - idx: 33, Elapsed: 2.345 -> res: hello33/service/work
18:38:23.515 [pool-1-thread-79] DEBUG org.springframework.web.client.RestTemplate - Response 200 OK
18:38:23.515 [pool-1-thread-79] DEBUG org.springframework.web.client.RestTemplate - Reading to [java.lang.String] as "text/plain;charset=UTF-8"
18:38:23.515 [pool-1-thread-79] INFO com.example.study.LoadTest - idx: 79, Elapsed: 2.345 -> res: hello79/service/work
18:38:23.515 [pool-1-thread-80] DEBUG org.springframework.web.client.RestTemplate - Response 200 OK
18:38:23.515 [pool-1-thread-80] DEBUG org.springframework.web.client.RestTemplate - Reading to [java.lang.String] as "text/plain;charset=UTF-8"
18:38:23.515 [pool-1-thread-80] INFO com.example.study.LoadTest - idx: 80, Elapsed: 2.345 -> res: hello80/service/work
18:38:23.516 [pool-1-thread-9] DEBUG org.springframework.web.client.RestTemplate - Response 200 OK
18:38:23.516 [pool-1-thread-9] DEBUG org.springframework.web.client.RestTemplate - Reading to [java.lang.String] as "text/plain;charset=UTF-8"
18:38:23.516 [pool-1-thread-9] INFO com.example.study.LoadTest - idx: 9, Elapsed: 2.347 -> res: hello9/service/work
18:38:23.517 [pool-1-thread-60] DEBUG org.springframework.web.client.RestTemplate - Response 200 OK
18:38:23.517 [pool-1-thread-60] DEBUG org.springframework.web.client.RestTemplate - Reading to [java.lang.String] as "text/plain;charset=UTF-8"
18:38:23.517 [pool-1-thread-60] INFO com.example.study.LoadTest - idx: 60, Elapsed: 2.347 -> res: hello60/service/work
18:38:23.517 [pool-1-thread-98] DEBUG org.springframework.web.client.RestTemplate - Response 200 OK
18:38:23.517 [pool-1-thread-98] DEBUG org.springframework.web.client.RestTemplate - Reading to [java.lang.String] as "text/plain;charset=UTF-8"
18:38:23.518 [pool-1-thread-98] INFO com.example.study.LoadTest - idx: 98, Elapsed: 2.347 -> res: hello98/service/work
18:38:23.518 [main] INFO com.example.study.LoadTest - Total: 2.346

중첩된 Remote Service 사용

이번에는 외부 서비스를 하나 더 추가해보겠습니다. 외부 서비스의 요청에 대한 결과를 다시 다른 서비스를 호출하는 요청의 파라미터로 사용하면서 콜백의 구조가 복잡해지는 문제가 생기게 되었습니다. 이런 문제를 콜백 헬이라고 합니다.

다음번 포스팅에서는 콜백 헬을 해결할 수 있는 방법에 대해서 알아보도록 하겠습니다.

Remote Application

“/service2”를 추가합니다.

1
2
3
4
5
6
7
8
9
10
11
12
13
14
15
16
17
18
19
20
21
22
23
24
25
26
@SpringBootApplication
public class RemoteApplication {

@RestController
public static class RemoteController {
@GetMapping("/service")
public String service(String req) throws InterruptedException {
Thread.sleep(2000);
return req + "/service1";
}

@GetMapping("/service2")
public String service2(String req) throws InterruptedException {
Thread.sleep(2000);
return req + "/service2";
}
}

public static void main(String[] args) {
// 하나의 프로젝트에서 2개의 스프링 애플리케이션을 띄우기 위해 외부 서비스 역할을 하는 RemoteApplication은
// application.properties가 아닌 별도의 프로퍼티를 이용하도록 직접 설정한다.
System.setProperty("server.port", "8081");
System.setProperty("server.tomcat.max-threads", "1000");
SpringApplication.run(RemoteApplication.class, args);
}
}

Main Application

“/service”를 호출한 결과를 이용해 “/service2”를 호출하도록 합니다.

1
2
3
4
5
6
7
8
9
10
11
12
13
14
15
16
17
18
19
20
21
22
23
24
25
26
27
28
29
30
31
32
33
34
35
36
37
@SpringBootApplication
@Slf4j
public class MainApplication {

@RestController
public static class MainController {
// asynchronous + netty non-blocking
AsyncRestTemplate rt = new AsyncRestTemplate(new Netty4ClientHttpRequestFactory(new NioEventLoopGroup(1)));

@GetMapping("/rest")
public DeferredResult<String> rest(int idx) {
// 오브젝트를 만들어서 컨트롤러에서 리턴하면 언제가 될지 모르지만 언제인가 DeferredResult에 값을 써주면
// 그 값을 응답으로 사용
DeferredResult<String> dr = new DeferredResult<>();

ListenableFuture<ResponseEntity<String>> f1 = rt.getForEntity("http://localhost:8081/service?req={req}", String.class, "hello" + idx);
f1.addCallback(s -> {
ListenableFuture<ResponseEntity<String>> f2 = rt.getForEntity("http://localhost:8081/service2?req={req}", String.class, s.getBody());
f2.addCallback(s2 -> {
dr.setResult(s2.getBody());
}, e -> {
dr.setErrorResult(e.getMessage());
});

}, e -> {
dr.setErrorResult(e.getMessage());
});

return dr;
}

}

public static void main(String[] args) {
SpringApplication.run(MainApplication.class, args);
}
}

결과 확인

100개의 클라이언트 요청을 처리하는데 약 4.3초의 시간이 걸렸습니다.

1
2
3
4
5
6
7
8
9
10
11
12
13
14
15
16
17
18
19
20
21
22
23
24
25
26
27
28
...
...
...
19:25:19.904 [pool-1-thread-17] DEBUG org.springframework.web.client.RestTemplate - Response 200 OK
19:25:19.904 [pool-1-thread-17] DEBUG org.springframework.web.client.RestTemplate - Reading to [java.lang.String] as "text/plain;charset=UTF-8"
19:25:19.905 [pool-1-thread-17] INFO com.example.study.LoadTest - idx: 17, Elapsed: 4.338 -> res: hello17/service1/service2
19:25:19.905 [pool-1-thread-87] DEBUG org.springframework.web.client.RestTemplate - Response 200 OK
19:25:19.905 [pool-1-thread-87] DEBUG org.springframework.web.client.RestTemplate - Reading to [java.lang.String] as "text/plain;charset=UTF-8"
19:25:19.905 [pool-1-thread-87] INFO com.example.study.LoadTest - idx: 87, Elapsed: 4.337 -> res: hello87/service1/service2
19:25:19.905 [pool-1-thread-14] DEBUG org.springframework.web.client.RestTemplate - Response 200 OK
19:25:19.906 [pool-1-thread-14] DEBUG org.springframework.web.client.RestTemplate - Reading to [java.lang.String] as "text/plain;charset=UTF-8"
19:25:19.906 [pool-1-thread-14] INFO com.example.study.LoadTest - idx: 14, Elapsed: 4.339 -> res: hello14/service1/service2
19:25:19.906 [pool-1-thread-74] DEBUG org.springframework.web.client.RestTemplate - Response 200 OK
19:25:19.906 [pool-1-thread-74] DEBUG org.springframework.web.client.RestTemplate - Reading to [java.lang.String] as "text/plain;charset=UTF-8"
19:25:19.906 [pool-1-thread-74] INFO com.example.study.LoadTest - idx: 74, Elapsed: 4.338 -> res: hello74/service1/service2
19:25:19.907 [pool-1-thread-60] DEBUG org.springframework.web.client.RestTemplate - Response 200 OK
19:25:19.907 [pool-1-thread-60] DEBUG org.springframework.web.client.RestTemplate - Reading to [java.lang.String] as "text/plain;charset=UTF-8"
19:25:19.907 [pool-1-thread-60] INFO com.example.study.LoadTest - idx: 60, Elapsed: 4.339 -> res: hello60/service1/service2
19:25:19.907 [pool-1-thread-38] DEBUG org.springframework.web.client.RestTemplate - Response 200 OK
19:25:19.907 [pool-1-thread-38] DEBUG org.springframework.web.client.RestTemplate - Reading to [java.lang.String] as "text/plain;charset=UTF-8"
19:25:19.907 [pool-1-thread-38] INFO com.example.study.LoadTest - idx: 38, Elapsed: 4.34 -> res: hello38/service1/service2
19:25:19.907 [pool-1-thread-78] DEBUG org.springframework.web.client.RestTemplate - Response 200 OK
19:25:19.908 [pool-1-thread-78] DEBUG org.springframework.web.client.RestTemplate - Reading to [java.lang.String] as "text/plain;charset=UTF-8"
19:25:19.908 [pool-1-thread-78] INFO com.example.study.LoadTest - idx: 78, Elapsed: 4.34 -> res: hello78/service1/service2
19:25:19.908 [pool-1-thread-5] DEBUG org.springframework.web.client.RestTemplate - Response 200 OK
19:25:19.908 [pool-1-thread-5] DEBUG org.springframework.web.client.RestTemplate - Reading to [java.lang.String] as "text/plain;charset=UTF-8"
19:25:19.909 [pool-1-thread-5] INFO com.example.study.LoadTest - idx: 5, Elapsed: 4.342 -> res: hello5/service1/service2
19:25:19.909 [main] INFO com.example.study.LoadTest - Total: 4.338

자바와 스프링의 비동기 기술

해당 포스팅은 토비님의 토비의 봄 TV 8회 스프링 리액티브 프로그래밍 (4) 자바와 스프링의 비동기 기술 라이브 코딩을 보며 따라했던 실습 내용을 바탕으로 정리한 글입니다.

실습 코드들은 IntelliJ를 이용해 SpringBoot 2.1.3.RELEASE 버전 기반으로 프로젝트를 생성 후(web, lombok 포함) 진행했습니다.

자바의 비동기 기술

ExecutorService

**ExecutorService**는 쉽게 비동기로 작업을 실행할 수 있도록 도와주는 JDK(1.5부터)에서 제공하는 interface입니다. 일반적으로 ExecutorService는 작업 할당을 위한 스레드 풀과 API를 제공합니다.

1
2
3
4
5
6
7
8
9
10
11
12
13
14
15
16
17
18
19
@Slf4j
public class FutureEx {
public static void main(String[] args) {
ExecutorService es = Executors.newCachedThreadPool();

es.execute(() -> {
try {
Thread.sleep(2000);
} catch (InterruptedException e) {}
log.info("Async");
});

log.info("Exit");
}
}

// 결과
20:35:53.892 [main] INFO com.example.study.FutureEx - Exit
20:35:55.888 [pool-1-thread-1] INFO com.example.study.FutureEx - Async

Future

Future는 자바 1.5에서 등장한 비동기 계산의 결과를 나타내는 Interface 입니다.

비동기적인 작업을 수행한다는 것은 현재 진행하고 있는 스레드가 아닌 별도의 스레드에서 작업을 수행하는 것을 말합니다. 같은 스레드에서 메서드를 호출할 때는 결과를 리턴 값을 받지만, 비동기적으로 작업을 수행할 때는 결과값을 전달받을 수 있는 무언가의 interface가 필요한데 Future가 그 역할을 합니다.

비동기 작업에서 결과를 반환하고 싶을 때는 runnable대신 callable interface를 이용하면 결과 값을 return 할 수 있습니다. 또한 예외가 발생했을 때 해당 예외를 비동기 코드를 처리하는 스레드 안에서 처리하지 않고 밖으로 던질 수 있습니다.

1
2
3
4
5
6
7
8
9
10
11
12
13
14
15
16
17
18
19
20
@Slf4j
public class FutureEx {
public static void main(String[] args) throws ExecutionException, InterruptedException {
ExecutorService es = Executors.newCachedThreadPool();

Future<String> f = es.submit(() -> {
Thread.sleep(2000);
log.info("Async");
return "Hello";
});

log.info(f.get());
log.info("Exit");
}
}

// 결과
20:43:11.704 [pool-1-thread-1] INFO com.example.study.FutureEx - Async
20:43:11.706 [main] INFO com.example.study.FutureEx - Hello
20:43:11.706 [main] INFO com.example.study.FutureEx - Exit

Future를 통해서 비동기 결과의 값을 가져올 때는 get 메서드를 사용합니다. 그러나 get 메서드를 호출하게 되면 비동기 작업이 완료될 때까지 해당 스레드가 blocking됩니다.

Future는 비동기적인 연산 혹은 작업을 수행하고 그 결과를 갖고 있으며, 완료를 기다리고 계산 결과를 반환(get)하는 메소드와 그 외에도 해당 연산이 완료되었는지 확인하는(isDone) 메소드를 제공합니다.

1
2
3
4
5
6
7
8
9
10
11
12
13
14
15
16
17
18
19
20
21
22
23
24
25
@Slf4j
public class FutureEx {
public static void main(String[] args) throws ExecutionException, InterruptedException {
ExecutorService es = Executors.newCachedThreadPool();

Future<String> f = es.submit(() -> {
Thread.sleep(2000);
log.info("Async");
return "Hello";
});

log.info(String.valueOf(f.isDone()));
Thread.sleep(2000);
log.info("Exit");
log.info(String.valueOf(f.isDone()));
log.info(f.get());
}
}

// 결과
00:26:00.501 [main] INFO com.example.study.FutureEx - false
00:26:02.502 [pool-1-thread-1] INFO com.example.study.FutureEx - Async
00:26:02.509 [main] INFO com.example.study.FutureEx - Exit
00:26:02.509 [main] INFO com.example.study.FutureEx - true
00:26:02.509 [main] INFO com.example.study.FutureEx - Hello

FutureTask

**FutureTask**는 비동기 작업을 생성합니다. 지금까지 위의 코드는 비동기 작업 생성과 실행을 동시에 했다면 FutureTask는 비동기 작업 생성과 실행을 분리하여 진행할 수 있습니다.

1
2
3
4
5
6
7
8
9
10
11
12
13
14
15
16
17
18
19
20
21
22
23
24
25
26
27
@Slf4j
public class FutureEx {
public static void main(String[] args) throws ExecutionException, InterruptedException {
ExecutorService es = Executors.newCachedThreadPool();

FutureTask<String> f = new FutureTask<>(() -> {
Thread.sleep(2000);
log.info("Async");
return "Hello";
});

es.execute(f);

log.info(String.valueOf(f.isDone()));
Thread.sleep(2000);
log.info("Exit");
log.info(String.valueOf(f.isDone()));
log.info(f.get());
}
}

// 결과
00:28:39.459 [main] INFO com.example.study.FutureEx - false
00:28:41.461 [pool-1-thread-1] INFO com.example.study.FutureEx - Async
00:28:41.467 [main] INFO com.example.study.FutureEx - Exit
00:28:41.467 [main] INFO com.example.study.FutureEx - true
00:28:41.467 [main] INFO com.example.study.FutureEx - Hello

비동기 작업의 결과를 가져오는 방법은 Future와 같은 결과를 다루는 handler를 이용하거나 callback을 이용하는 2가지 방법이 있습니다.
아래의 예시 코드는 FutureTask의 비동기 작업이 완료될 경우 호출되는 done() 메서드를 재정의하여 callback을 이용하는 방법입니다.

1
2
3
4
5
6
7
8
9
10
11
12
13
14
15
16
17
18
19
20
21
22
23
24
25
26
27
28
29
30
31
32
33
34
@Slf4j
public class FutureEx {
public static void main(String[] args) {
ExecutorService es = Executors.newCachedThreadPool();

FutureTask<String> f = new FutureTask<String>(() -> {
Thread.sleep(2000);
log.info("Async");
return "Hello";
}) {
@Override
protected void done() {
super.done();
try {
log.info(get());
} catch (InterruptedException e) {
e.printStackTrace();
} catch (ExecutionException e) {
e.printStackTrace();
}
}
};

es.execute(f);
es.shutdown();

log.info("EXIT");
}
}

// 결과
01:03:04.153 [main] INFO com.example.study.FutureEx - EXIT
01:03:06.153 [pool-1-thread-1] INFO com.example.study.FutureEx - Async
01:03:06.153 [pool-1-thread-1] INFO com.example.study.FutureEx - Hello

위 예시 코드의 callback 관련 부분을 FutureTask를 상속받아 done() 메서드를 재정의함으로써, 비동기 코드와 그 결과를 갖고 작업을 수행하는 callback을 좀 더 가독성이 좋게 작성할 수 있습니다.

1
2
3
4
5
6
7
8
9
10
11
12
13
14
15
16
17
18
19
20
21
22
23
24
25
26
27
28
29
30
31
32
33
34
35
36
37
38
39
40
41
42
43
44
45
@Slf4j
public class FutureEx {
interface SuccessCallback {
void onSuccess(String result);
}

public static class CallbackFutureTask extends FutureTask<String> {
SuccessCallback sc;

public CallbackFutureTask(Callable<String> callable, SuccessCallback sc) {
super(callable);
this.sc = Objects.requireNonNull(sc);
}

@Override
protected void done() {
super.done();
try {
this.sc.onSuccess(get());
} catch (InterruptedException e) {
e.printStackTrace();
} catch (ExecutionException e) {
e.printStackTrace();
}
}
}

public static void main(String[] args) {
ExecutorService es = Executors.newCachedThreadPool();

CallbackFutureTask f = new CallbackFutureTask(() -> {
Thread.sleep(2000);
log.info("Async");
return "Hello";
}, log::info);

es.execute(f);
es.shutdown();
}
}

// 결과
01:05:01.978 [main] INFO com.example.study.FutureEx - EXIT
01:05:03.977 [pool-1-thread-1] INFO com.example.study.FutureEx - Async
01:05:03.978 [pool-1-thread-1] INFO com.example.study.FutureEx - Hello

위 예시 코드에 SuccessCallback을 추가한 것처럼 ExceptionCallback을 추가하여 비동기 코드에서 예외가 발생할 경우, 해당 예외를 처리하는 callback도 추가할 수 있습니다.

1
2
3
4
5
6
7
8
9
10
11
12
13
14
15
16
17
18
19
20
21
22
23
24
25
26
27
28
29
30
31
32
33
34
35
36
37
38
39
40
41
42
43
44
45
46
47
48
49
50
51
52
53
54
55
56
57
58
59
60
@Slf4j
public class FutureEx {
interface SuccessCallback {
void onSuccess(String result);
}

interface ExceptionCallback {
void onError(Throwable t);
}

public static class CallbackFutureTask extends FutureTask<String> {
SuccessCallback sc;
ExceptionCallback ec;

public CallbackFutureTask(Callable<String> callable, SuccessCallback sc, ExceptionCallback ec) {
super(callable);
this.sc = Objects.requireNonNull(sc);
this.ec = Objects.requireNonNull(ec);
}

@Override
protected void done() {
super.done();
try {
this.sc.onSuccess(get());
/*
InterruptedException은 예외긴 예외이지만, 현재 작업을 수행하지 말고 중단해라 라고 메시지를 보내는 용도이다.
따라서 현재 스레드에 interrupt를 체크하고 종료한다.
*/
} catch (InterruptedException e) {
Thread.currentThread().interrupt();
} catch (ExecutionException e) {
// 래핑된 에러를 빼내어 전달한다.
ec.onError(e.getCause());
}
}
}

public static void main(String[] args) {
ExecutorService es = Executors.newCachedThreadPool();

CallbackFutureTask f = new CallbackFutureTask(() -> {
Thread.sleep(2000);
if (1 == 1) throw new RuntimeException("Async ERROR!!!");
log.info("Async");
return "Hello";
},
s -> log.info("Result: {}", s),
e -> log.info("Error: {}", e.getMessage()));

es.execute(f);
es.shutdown();

log.info("EXIT");
}
}

// 결과
01:11:53.460 [main] INFO com.example.study.FutureEx - EXIT
01:11:55.463 [pool-1-thread-1] INFO com.example.study.FutureEx - Error: Async ERROR!!!

스프링의 비동기 기술

@Async

Spring MVC 3.2 부터 Servlet 3.0 기반의 비동기 요청 처리가 가능해졌습니다. @Async 어노테이션을 추가해 해당 메서드를 비동기적으로 호출할 수 있습니다. 해당 메서드를 호출한 호출자(caller)는 즉시 리턴하고 메소드의 실제 실행은 Spring TaskExecutor에 의해서 실행됩니다. 비동기로 실행되는 메서드는 Future 형식의 값을 리턴하고, 호출자는 해당 Future의 get() 메서드를 호출하기 전에 다른 작업을 수행할 수 있습니다.

1
2
3
4
5
6
7
8
9
10
11
12
13
14
15
16
17
18
19
20
21
22
23
24
25
26
27
28
29
30
31
32
33
34
35
36
37
38
39
40
41
42
43
44
45
46
47
48
49
50
51
52
@SpringBootApplication
@EnableAsync
@Slf4j
public class StudyApplication {

@Service
public static class MyService {
/*
내부적으로 AOP를 이용해 복잡한 로직이 실행된다.
비동기 작업은 return값으로 바로 결과를 줄 수 없다. (Future 혹은 Callback을 이용해야 한다.)
*/
@Async
public Future<String> hello() throws InterruptedException {
log.info("hello()");
Thread.sleep(1000);
return new AsyncResult<>("Hello");
}
}

public static void main(String[] args) {
// try with resource 블록을 이용해 빈이 다 준비된 후 종료되도록 설정
try (ConfigurableApplicationContext c = SpringApplication.run(StudyApplication.class, args)) {
}
}

@Autowired
MyService myService;

// 모든 빈이 다 준비된 후 실행됨 (현재는 일종의 컨트롤러라고 생각)
@Bean
ApplicationRunner run() {
return args -> {
log.info("run()");
Future<String> res = myService.hello();
log.info("exit: {}", res.isDone());
log.info("result: {}", res.get());
};
}
}


// 결과
2019-04-04 23:29:31.960 INFO 41618 --- [ main] o.a.c.c.C.[Tomcat].[localhost].[/] : Initializing Spring embedded WebApplicationContext
2019-04-04 23:29:31.960 INFO 41618 --- [ main] o.s.web.context.ContextLoader : Root WebApplicationContext: initialization completed in 928 ms
2019-04-04 23:29:32.161 INFO 41618 --- [ main] o.s.s.concurrent.ThreadPoolTaskExecutor : Initializing ExecutorService 'applicationTaskExecutor'
2019-04-04 23:29:32.337 INFO 41618 --- [ main] o.s.b.w.embedded.tomcat.TomcatWebServer : Tomcat started on port(s): 8080 (http) with context path ''
2019-04-04 23:29:32.341 INFO 41618 --- [ main] com.example.study.StudyApplication : Started StudyApplication in 1.631 seconds (JVM running for 2.101)
2019-04-04 23:29:32.343 INFO 41618 --- [ main] com.example.study.StudyApplication : run()
2019-04-04 23:29:32.346 INFO 41618 --- [ main] com.example.study.StudyApplication : exit: false
2019-04-04 23:29:32.350 INFO 41618 --- [ task-1] com.example.study.StudyApplication : hello()
2019-04-04 23:29:33.351 INFO 41618 --- [ main] com.example.study.StudyApplication : result: Hello
2019-04-04 23:29:33.354 INFO 41618 --- [ main] o.s.s.concurrent.ThreadPoolTaskExecutor : Shutting down ExecutorService 'applicationTaskExecutor'

ListenableFuture

스프링 4.0 부터 제공하는 Future 인터페이스를 확장한 ListenableFuture를 이용하면 비동기 처리의 결과 값을 사용할 수 있는 callback을 추가할 수 있습니다.
@Async 어노테이션을 사용하는 메서드에서 스프링 4.1 부터 제공하는 ListenableFuture 인터페이스를 구현한 AsyncResult를 반환하면 됩니다.

1
2
3
4
5
6
7
8
9
10
11
12
13
14
15
16
17
18
19
20
21
22
23
24
25
26
27
28
29
30
31
32
33
34
35
36
37
38
39
40
41
42
43
44
45
46
47
48
49
@SpringBootApplication
@EnableAsync
@Slf4j
public class StudyApplication {

@Service
public static class MyService {
@Async
public ListenableFuture<String> hello() throws InterruptedException {
log.info("hello()");
Thread.sleep(1000);
return new AsyncResult<>("Hello");
}
}

public static void main(String[] args) {
// try with resource 블록을 이용해 빈이 다 준비된 후 종료되도록 설정
try (ConfigurableApplicationContext c = SpringApplication.run(StudyApplication.class, args)) {
}
}

@Autowired
MyService myService;

@Bean
ApplicationRunner run() {
return args -> {
log.info("run()");
ListenableFuture<String> f = myService.hello();
f.addCallback(s -> log.info(s), e-> log.info(e.getMessage()));
log.info("exit");

Thread.sleep(2000);
};
}
}


// 결과
2019-04-04 23:42:46.348 INFO 44559 --- [ main] o.a.c.c.C.[Tomcat].[localhost].[/] : Initializing Spring embedded WebApplicationContext
2019-04-04 23:42:46.348 INFO 44559 --- [ main] o.s.web.context.ContextLoader : Root WebApplicationContext: initialization completed in 959 ms
2019-04-04 23:42:46.557 INFO 44559 --- [ main] o.s.s.concurrent.ThreadPoolTaskExecutor : Initializing ExecutorService 'applicationTaskExecutor'
2019-04-04 23:42:46.736 INFO 44559 --- [ main] o.s.b.w.embedded.tomcat.TomcatWebServer : Tomcat started on port(s): 8080 (http) with context path ''
2019-04-04 23:42:46.740 INFO 44559 --- [ main] com.example.study.StudyApplication : Started StudyApplication in 1.779 seconds (JVM running for 2.306)
2019-04-04 23:42:46.742 INFO 44559 --- [ main] com.example.study.StudyApplication : run()
2019-04-04 23:42:46.748 INFO 44559 --- [ main] com.example.study.StudyApplication : exit
2019-04-04 23:42:46.751 INFO 44559 --- [ task-1] com.example.study.StudyApplication : hello()
2019-04-04 23:42:47.752 INFO 44559 --- [ task-1] com.example.study.StudyApplication : Hello
2019-04-04 23:42:48.757 INFO 44559 --- [ main] o.s.s.concurrent.ThreadPoolTaskExecutor : Shutting down ExecutorService 'applicationTaskExecutor'

ThreadPoolTaskExecutor

@Async 어노테이션을 사용해 해당 메서드를 비동기적으로 호출할 경우 ThreadPool을 명시적으로 선언하지 않으면, 기본적으로 SimpleAsyncTaskExecutor를 사용합니다. SimpleAsyncTaskExecutor는 각 비동기 호출마다 계속 새로운 스레드를 만들어 사용하기 때문에 비효율적입니다. 이 경우 ThreadPoolTaskExecutor를 직접 만들어 사용하는게 효율적입니다.

ThreadPoolTaskExecutor는 CorePool, QueueCapacity, MaxPoolSize를 직접 설정할 수 있습니다. 각 값에 대한 설명은 코드에 추가했습니다.

1
2
3
4
5
6
7
8
9
10
11
12
13
14
15
16
17
18
19
20
21
22
23
24
25
26
27
28
29
30
31
32
33
34
35
36
37
38
39
40
41
42
43
44
45
46
47
48
49
50
51
52
53
54
55
56
57
58
59
60
61
62
63
64
65
66
@SpringBootApplication
@EnableAsync
@Slf4j
public class StudyApplication {

@Service
public static class MyService {
/*
기본적으로 SimpleAsyncTaskExecutor를 사용한다. 스레드를 계속 새로 만들어 사용하기 때문에 비효율적이다.
*/
@Async
// @Async("tp") ThreadPool이 여러개일 경우 직접 지정 가능하다.
public ListenableFuture<String> hello() throws InterruptedException {
log.info("hello()");
Thread.sleep(1000);
return new AsyncResult<>("Hello");
}
}

@Bean
ThreadPoolTaskExecutor tp() {
ThreadPoolTaskExecutor te = new ThreadPoolTaskExecutor();
// 1) 스레드 풀을 해당 개수까지 기본적으로 생성함. 처음 요청이 들어올 때 poll size만큼 생성한다.
te.setCorePoolSize(10);
// 2) 지금 당장은 Core 스레드를 모두 사용중일때, 큐에 만들어 대기시킨다.
te.setQueueCapacity(50);
// 3) 대기하는 작업이 큐에 꽉 찰 경우, 풀을 해당 개수까지 더 생성한다.
te.setMaxPoolSize(100);
te.setThreadNamePrefix("myThread");
return te;
}

public static void main(String[] args) {
// try with resource 블록을 이용해 빈이 다 준비된 후 종료되도록 설정
try (ConfigurableApplicationContext c = SpringApplication.run(StudyApplication.class, args)) {
}
}

@Autowired
MyService myService;

// 모든 빈이 다 준비된 후 실행됨 (현재는 일종의 컨트롤러라고 생각)
@Bean
ApplicationRunner run() {
return args -> {
log.info("run()");
ListenableFuture<String> f = myService.hello();
f.addCallback(s -> log.info(s), e-> log.info(e.getMessage()));
log.info("exit");

Thread.sleep(2000);
};
}
}


// 결과
2019-04-05 00:03:11.304 INFO 47863 --- [ main] o.a.c.c.C.[Tomcat].[localhost].[/] : Initializing Spring embedded WebApplicationContext
2019-04-05 00:03:11.304 INFO 47863 --- [ main] o.s.web.context.ContextLoader : Root WebApplicationContext: initialization completed in 1061 ms
2019-04-05 00:03:11.367 INFO 47863 --- [ main] o.s.s.concurrent.ThreadPoolTaskExecutor : Initializing ExecutorService 'tp'
2019-04-05 00:03:11.677 INFO 47863 --- [ main] o.s.b.w.embedded.tomcat.TomcatWebServer : Tomcat started on port(s): 8080 (http) with context path ''
2019-04-05 00:03:11.680 INFO 47863 --- [ main] com.example.study.StudyApplication : Started StudyApplication in 1.751 seconds (JVM running for 2.208)
2019-04-05 00:03:11.681 INFO 47863 --- [ main] com.example.study.StudyApplication : run()
2019-04-05 00:03:11.686 INFO 47863 --- [ main] com.example.study.StudyApplication : exit
2019-04-05 00:03:11.687 INFO 47863 --- [ myThread1] com.example.study.StudyApplication : hello()
2019-04-05 00:03:12.691 INFO 47863 --- [ myThread1] com.example.study.StudyApplication : Hello

Servlet Async

@Async 어노테이션을 설명할 때 말했던 것처럼, Spring MVC 3.2 부터 Servlet 3.0 기반의 비동기 요청 처리가 가능해졌습니다. 기존 Controller 메서드를 Callable로 변경함으로써 비동기로 만들 수 있습니다.
Controller 메서드를 비동기로 변경해도 해당 처리가 서블릿 스레드가 아닌 다른 스레드에서 발생한다는 점을 제외하면 기존 Controller 메서드의 동작 방식과는 큰 차이가 없습니다.
(참고 : Spring MVC 3.2 Preview: Making a Controller Method Asynchronous)

Servlet 3.0 & 3.1

  • Servlet 3.0: 비동기 서블릿
    • HTTP connection은 이미 논블록킹 IO
    • 서블릿 요청 읽기, 응답 쓰기는 블록킹
    • 비동기 작업 시작 즉시 서블릿 스레드 반납
    • 비동기 작업이 완료되면 서블릿 스레드 재할당
    • 비동기 서블릿 컨텍스트 이용 (AsyncContext)
  • Servlet 3.1: 논블록킹 IO
    • 논블록킹 서블릿 요청, 응답 처리
    • Callback

      스레드가 블록되는 상황은 CPU와 메모리 자원을 많이 소모합니다. 컨텍스트 스위칭이 일어나기 때문입니다. 기본적으로 스레드가 블로킹되면 wating 상태로 변경되면서 컨텍스트 스위칭이 일어나고 추후 I/O 작업이 끝나 running 상태로 변경되면서 다시 컨텍스트 스위칭이 일어나 총 2번의 컨텍스트 스위칭이 일어납니다.
      Java InputStream과 OutputStream은 블록킹 방식이다. RequestHttpServletRequest, RequestHttpServletResponse는 InputSream과 OutputStream을 사용하기 때문에 서블릿은 기본적으로 블로킹 IO 방식이다.

1
2
3
4
5
6
7
8
9
10
11
12
13
14
15
16
17
18
19
20
21
22
23
24
25
26
27
28
29
30
31
32
33
34
35
@SpringBootApplication
@EnableAsync
@Slf4j
public class StudyApplication {

@RestController
public static class MyController {
@GetMapping("/callable")
public Callable<String> callable() {
log.info("callable");
return () -> {
log.info("async");
Thread.sleep(2000);
return "hello";
};
}
}

public static void main(String[] args) {
SpringApplication.run(StudyApplication.class, args);
}
}


// 결과
2019-04-06 01:12:41.761 INFO 69216 --- [ main] o.a.c.c.C.[Tomcat].[localhost].[/] : Initializing Spring embedded WebApplicationContext
2019-04-06 01:12:41.762 INFO 69216 --- [ main] o.s.web.context.ContextLoader : Root WebApplicationContext: initialization completed in 1206 ms
2019-04-06 01:12:41.993 INFO 69216 --- [ main] o.s.s.concurrent.ThreadPoolTaskExecutor : Initializing ExecutorService 'applicationTaskExecutor'
2019-04-06 01:12:42.182 INFO 69216 --- [ main] o.s.b.w.embedded.tomcat.TomcatWebServer : Tomcat started on port(s): 8080 (http) with context path ''
2019-04-06 01:12:42.186 INFO 69216 --- [ main] com.example.study.StudyApplication : Started StudyApplication in 2.073 seconds (JVM running for 2.807)
2019-04-06 01:12:44.161 INFO 69216 --- [nio-8080-exec-1] o.a.c.c.C.[Tomcat].[localhost].[/] : Initializing Spring DispatcherServlet 'dispatcherServlet'
2019-04-06 01:12:44.162 INFO 69216 --- [nio-8080-exec-1] o.s.web.servlet.DispatcherServlet : Initializing Servlet 'dispatcherServlet'
2019-04-06 01:12:44.169 INFO 69216 --- [nio-8080-exec-1] o.s.web.servlet.DispatcherServlet : Completed initialization in 7 ms
2019-04-06 01:12:44.190 INFO 69216 --- [nio-8080-exec-1] com.example.study.StudyApplication : callable
2019-04-06 01:12:44.198 INFO 69216 --- [ task-1] com.example.study.StudyApplication : async

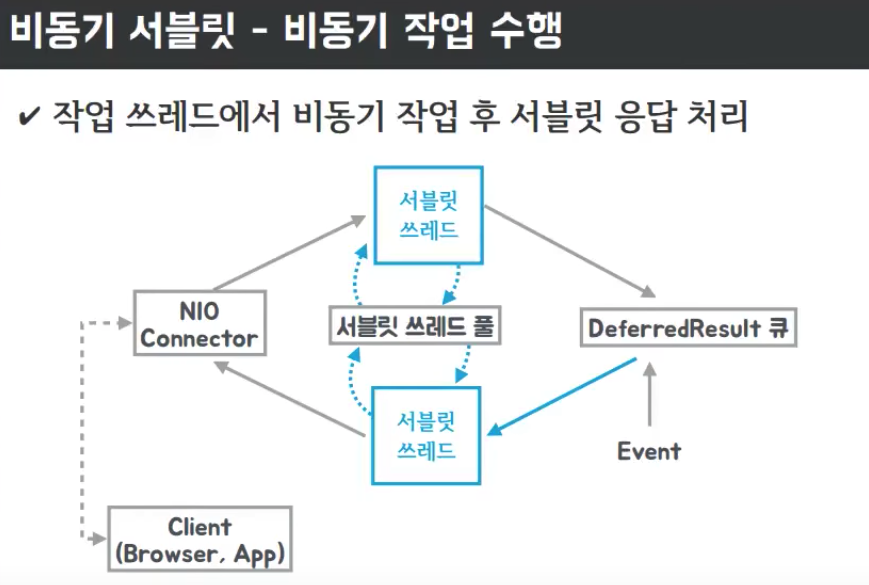
실제로 비동기 서블릿은 아래의 그림처럼 동작합니다.
비동기 서블릿 구조

Client (For Load Test)

지금부터는 Spring에서 Sync Servlet을 이용할 때와 Async Servlet을 이용했을 때의 차이점을 알아보기 위해 테스트를 할 수 있도록, 먼저 여러 Request를 동시에 생성하는 Client를 작성해봅니다.
Spring에서 제공하는 RestTemplate을 이용해 100개의 Request를 동시에 호출합니다.

1
2
3
4
5
6
7
8
9
10
11
12
13
14
15
16
17
18
19
20
21
22
23
24
25
26
27
28
29
30
31
32
33
34
35
36
@Slf4j
public class LoadTest {
private static AtomicInteger counter = new AtomicInteger(0);

public static void main(String[] args) throws InterruptedException {
ExecutorService es = Executors.newFixedThreadPool(100);

RestTemplate rt = new RestTemplate();
String url = "http://localhost:8080/callable";

StopWatch main = new StopWatch();
main.start();

for (int i = 0; i < 100; i++) {
es.execute(() -> {
int idx = counter.addAndGet(1);
log.info("Thread {}", idx);

StopWatch sw = new StopWatch();
sw.start();

rt.getForObject(url, String.class);

sw.stop();
log.info("Elapsed: {} -> {}", idx, sw.getTotalTimeSeconds());
});
}

es.shutdown();
// 지정된 시간이 타임아웃 걸리기 전이라면 대기작업이 진행될 때까지 기다린다.
// (100초안에 작업이 끝날때까지 기다리거나, 100초가 초과되면 종료)
es.awaitTermination(100, TimeUnit.SECONDS);
main.stop();
log.info("Total: {}", main.getTotalTimeSeconds());
}
}

Change Tomcat Thread Count

위의 비동기 서블릿 그림에서 볼 수 있듯이, Async Servlet은 클라이언트로부터 요청을 받은 후 실제 작업은 작업 스레드 풀에 위임하고 현재의 서블릿 스레드는 서블릿 스레드 풀에 반환 후, 다음 요청이 들어올 경우 사용할 수 있도록 합니다. 이에 반해, Sync Servlet은 요청을 받은 서블릿 스레드에서 실제 작업까지 전부 진행하기 때문에 요청에 대한 응답을 반환하기 전까지는 새로운 요청을 처리할 수 없는 상태입니다.

실제 이처럼 동작하는지 확인하기 위해서 application.properties 파일에서 다음과 같이 Tomcat의 스레드 개수를 1개로 설정합니다.

1
server.tomcat.max-threads=1

Sync vs Async

Sync

먼저 아래와 같이 Sync Servlet을 이용해 서버를 띄운 후 위의 Client 코드를 이용해 테스트를 진행합니다.

1
2
3
4
5
6
7
8
9
10
11
12
13
14
15
16
17
18
19
@SpringBootApplication
@EnableAsync
@Slf4j
public class StudyApplication {

@RestController
public static class MyController {
@GetMapping("/callable")
public String callable() throws InterruptedException {
log.info("sync");
Thread.sleep(2000);
return "hello";
}
}

public static void main(String[] args) {
SpringApplication.run(StudyApplication.class, args);
}
}

해당 서버를 띄우고 Client(LoadTest) 코드를 사용해 테스트를 진행하면 결과는 다음과 같습니다. Tomcat의 스레드가 하나이며 Sync 방식으로 동작하기 때문에 한 번에 하나의 클라이언트 요청만 처리할 수 있습니다. 서버 로그를 확인하면 nio-8080-exec-1 라는 이름을 가진 한개의 스레드가 요청을 처리하고 있습니다.
동기 서블릿 테스트 결과

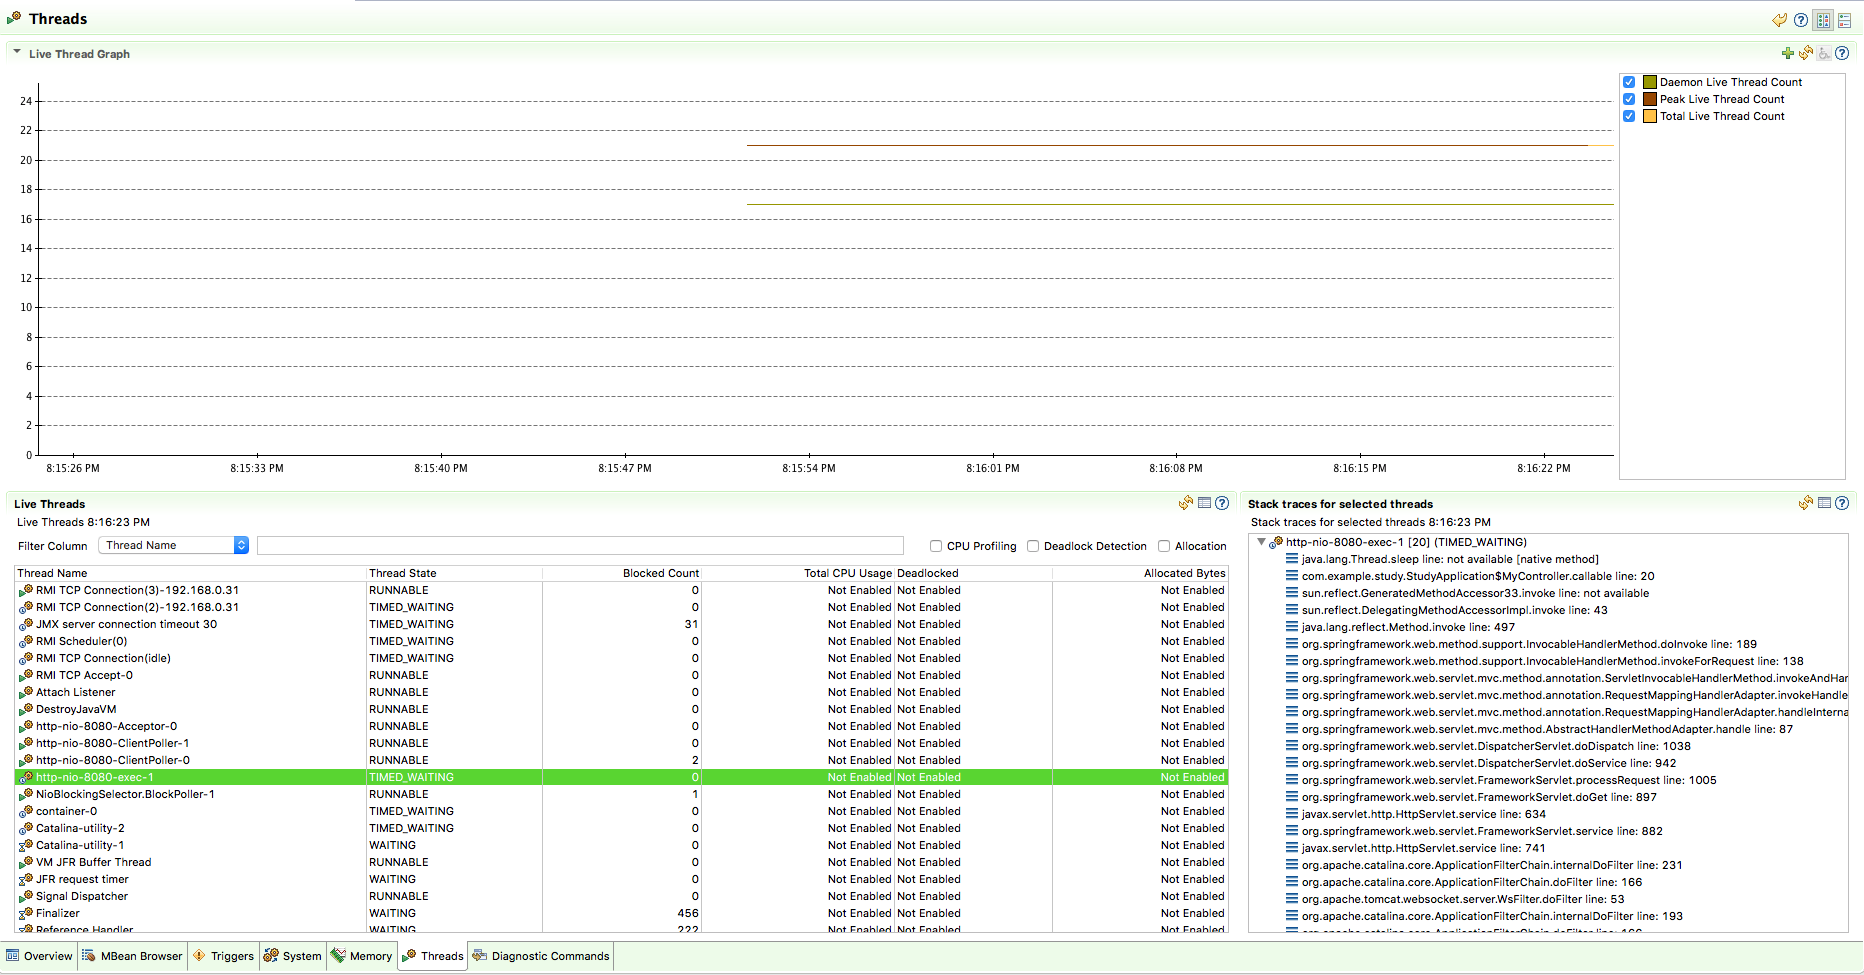
이번에는 JMC(Java Mission Control)를 이용해 실제 서버의 스레드 상황을 살펴보겠습니다.

JMC를 이용하기 위해서는 서버를 실행할 때 다음과 같은 JVM 옵션을 추가합니다.

1
2
3
4
5
6
-XX:+UnlockCommercialFeatures
-XX:+FlightRecorder
-Dcom.sun.management.jmxremote
-Dcom.sun.management.jmxremote.authenticate=false
-Dcom.sun.management.jmxremote.ssl=false
-Djava.rmi.server.hostname=localhost

JMC를 이용해 클라이언트 요청이 들어올 때, Thread 상태를 보면 다음과 같습니다. 동시에 100개의 클라이언트 요청이 들어왔지만, 스레드 수는 그대로 유지되고 있으며, 여러 스레드 목록 중에 nio-8080-exec-1 스레드가 존재하고 있는것을 확인할 수 있습니다.
동기 서블릿 테스트 결과 - 스레드

Async

이번에는 서버 코드를 아래와 같이 Async Servlet을 이용하도록 수정한 후 서버를 띄워 Client 코드를 이용해 테스트를 진행합니다. (작업 스레드 풀은 WebMvcConfigurer를 통해 설정해줍니다.)

1
2
3
4
5
6
7
8
9
10
11
12
13
14
15
16
17
18
19
20
21
22
23
24
25
26
27
28
29
30
31
32
33
34
35
36
37
38
@SpringBootApplication
@EnableAsync
@Slf4j
public class StudyApplication {

@RestController
public static class MyController {
@GetMapping("/callable")
public Callable<String> callable() {
return () -> {
log.info("async");
Thread.sleep(2000);
return "hello";
};
}
}

@Bean
WebMvcConfigurer configurer() {
return new WebMvcConfigurer() {
// 워커 스레드 풀 설정
@Override
public void configureAsyncSupport(AsyncSupportConfigurer configurer) {
ThreadPoolTaskExecutor te = new ThreadPoolTaskExecutor();
te.setCorePoolSize(100);
te.setQueueCapacity(50);
te.setMaxPoolSize(200);
te.setThreadNamePrefix("workThread");
te.initialize();
configurer.setTaskExecutor(te);
}
};
}

public static void main(String[] args) {
SpringApplication.run(StudyApplication.class, args);
}
}

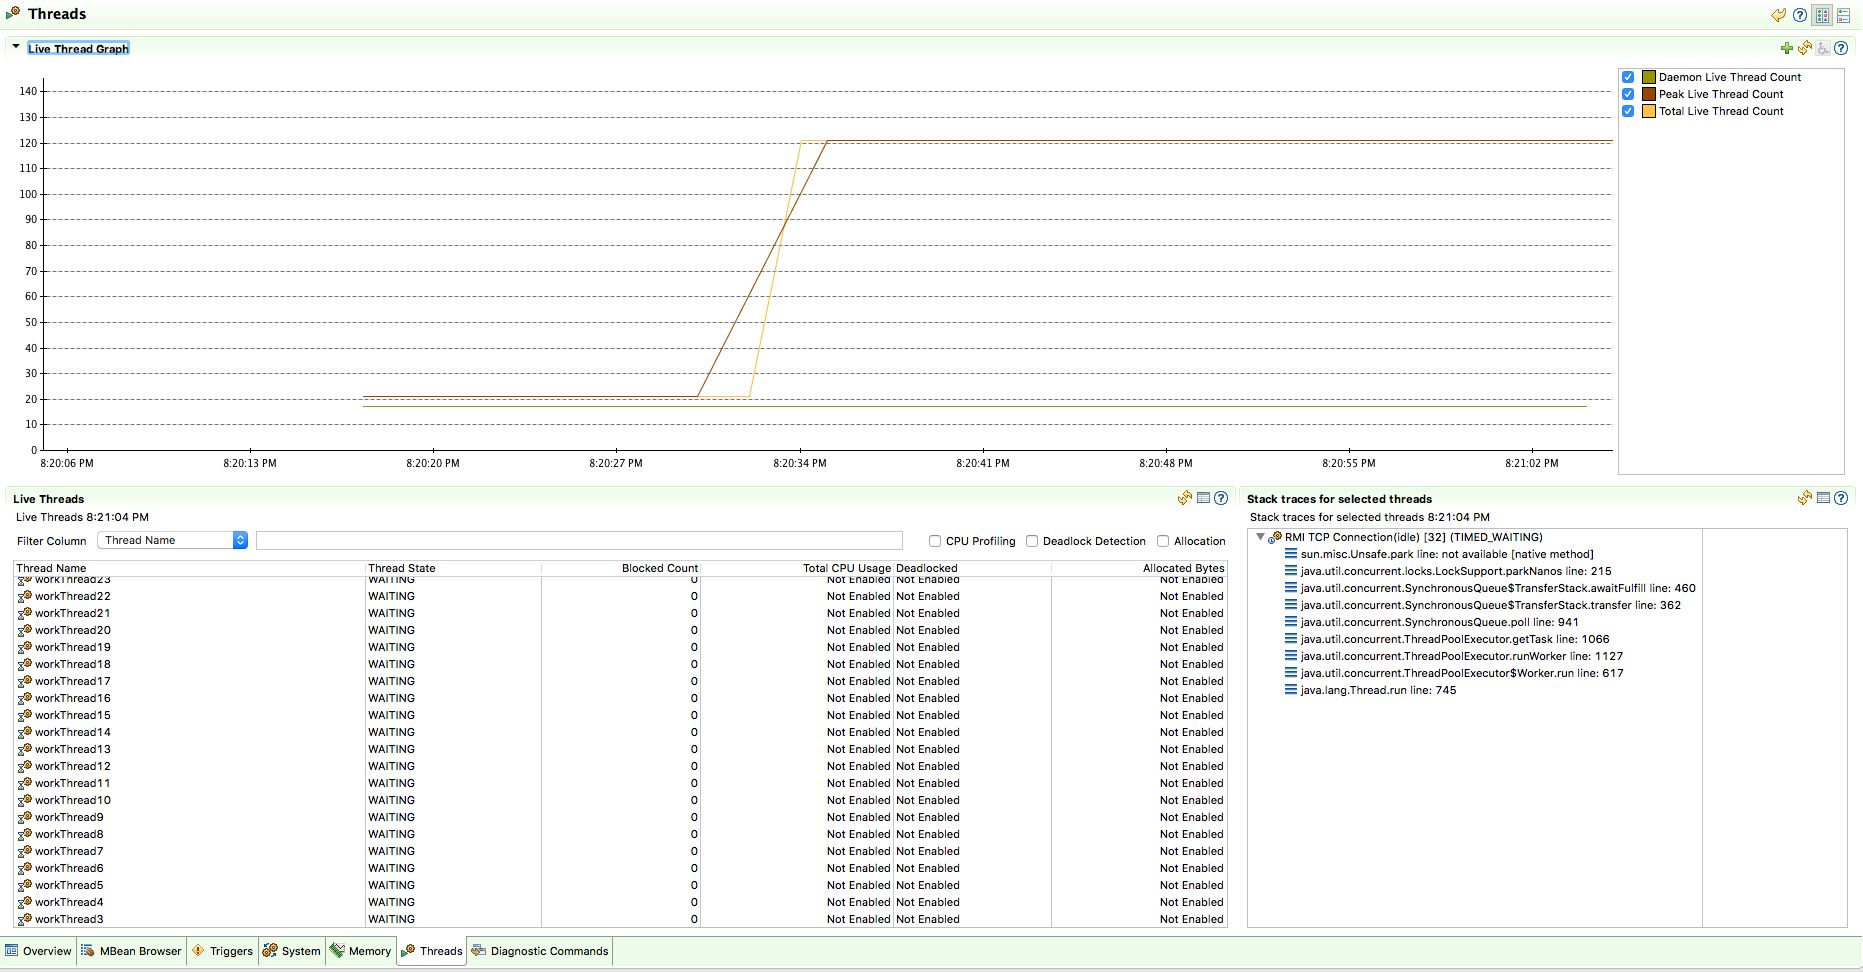
Client(LoadTest) 코드를 사용해 테스트를 진행하면 결과는 다음과 같습니다. Tomcat의 스레드가 하나이지만 Async 방식으로 동작하기 때문에 해당 요청에 대한 실제 처리는 워커 스레드 풀에서 사용되고 있지 않은 스레드를 이용해 처리합니다. 서버 로그를 확인하면 nio-8080-exec-1 라는 이름을 가진 한개의 Tomcat 스레드와 workThreadX라는 이름을 가진 100개의 워커 스레드를 확인할 수 있습니다.
비동기 서블릿 테스트 결과

이번에도 역시 JMC(Java Mission Control)를 이용해 실제 서버의 스레드 상황을 살펴보겠습니다.

nio-8080-exec-1 라는 이름을 가진 한개의 Tomcat 스레드와 workThreadX라는 이름을 가진 100개의 워커 스레드를 확인할 수 있습니다.
비동기 서블릿 테스트 결과 - 스레드

DeferredResult

DeferredResult는 Spring 3.2 부터 사용 가능합니다. 비동기 요청 처리를 위해 사용하는 Callable의 대안을 제공합니다. “지연된 결과”를 의미하며 외부의 이벤트 혹은 클라이언트 요청에 의해서 지연되어 있는 HTTP 요청에 대한 응답을 나중에 써줄 수 있는 기술입니다. 별도로 워커 스레드를 만들어 대기하지 않고도 처리가 가능합니다.

DeferredResult 구조

1
2
3
4
5
6
7
8
9
10
11
12
13
14
15
16
17
18
19
20
21
22
23
24
25
26
27
28
29
30
31
32
33
34
35
36
@SpringBootApplication
@EnableAsync
@Slf4j
public class StudyApplication {

@RestController
public static class MyController {
Queue<DeferredResult<String>> results = new ConcurrentLinkedQueue<>();

@GetMapping("/dr")
public DeferredResult<String> dr() {
log.info("dr");
DeferredResult<String> dr = new DeferredResult<>();
results.add(dr);
return dr;
}

@GetMapping("/dr/count")
public String drCount() {
return String.valueOf(results.size());
}

@GetMapping("/dr/event")
public String drEvent(String msg) {
for (DeferredResult<String> dr : results) {
dr.setResult("Hello " + msg);
results.remove(dr);
}
return "OK";
}
}

public static void main(String[] args) {
SpringApplication.run(StudyApplication.class, args);
}
}

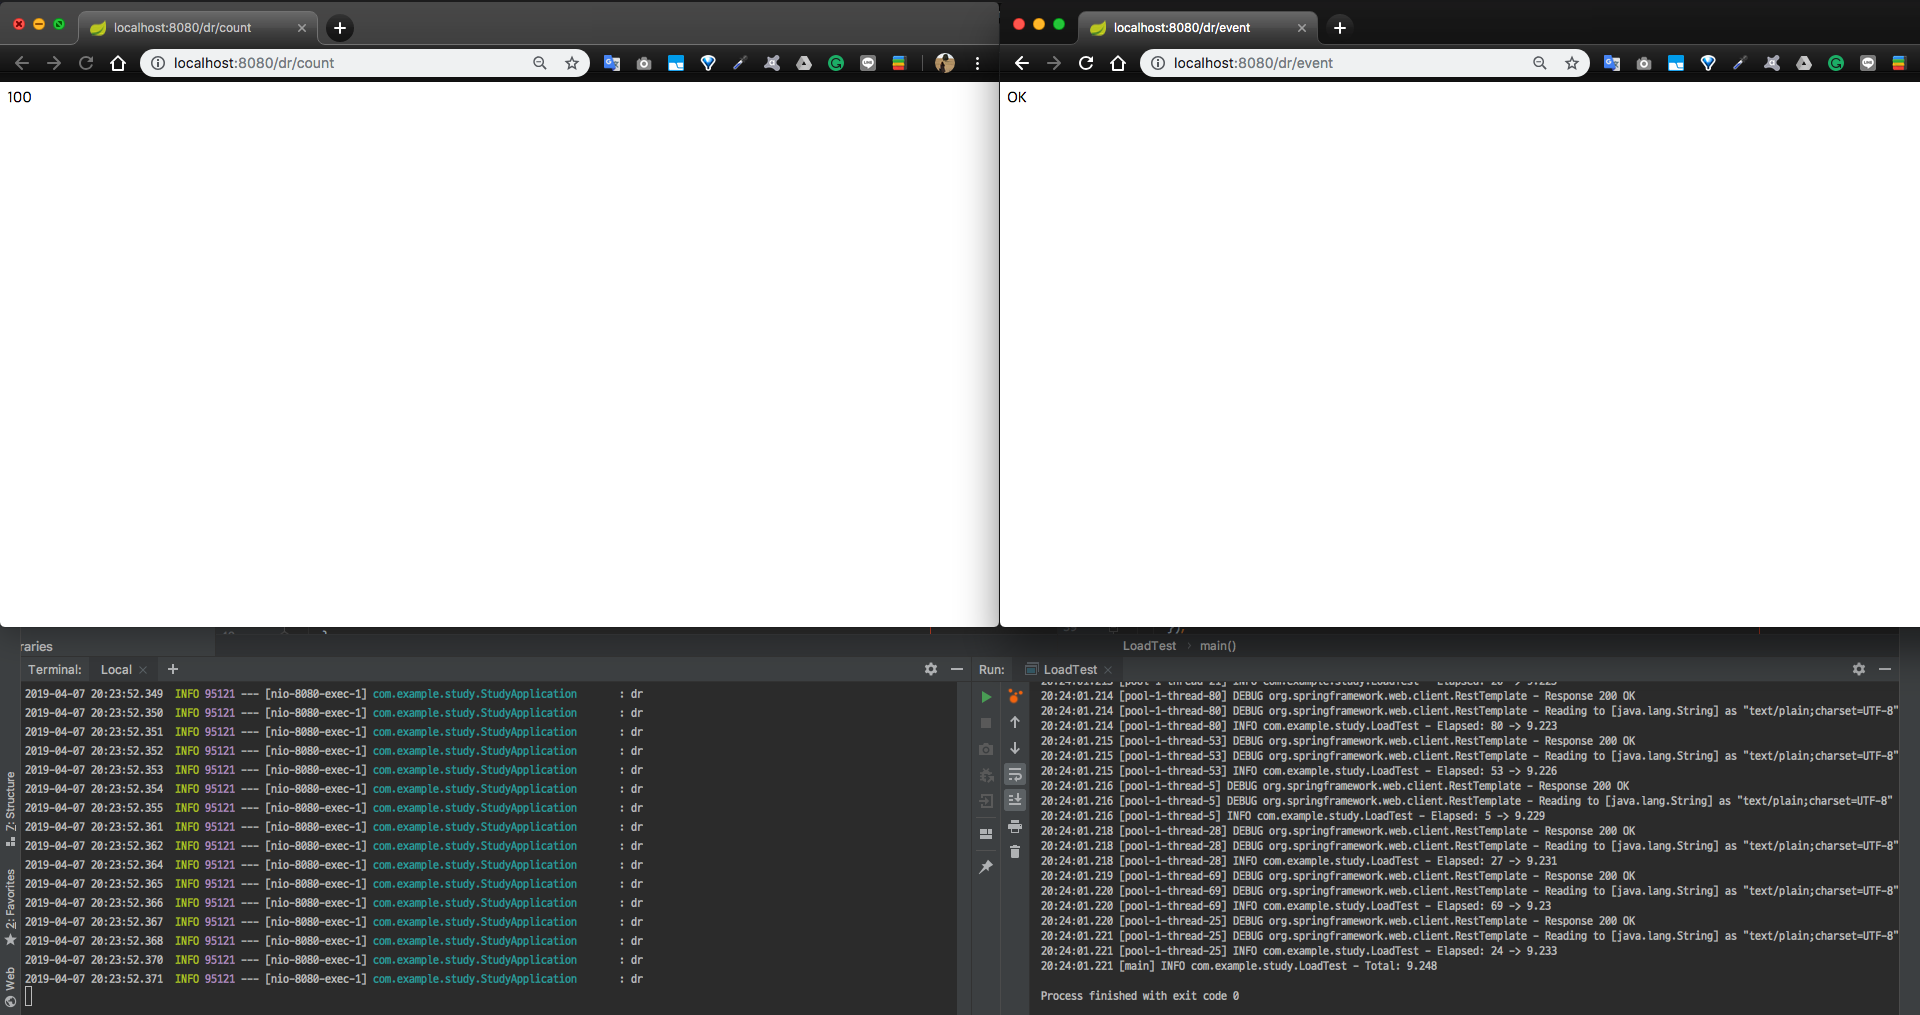
LoadTest 코드를 이용해 /dr로 100개의 요청을 보내고, 크롬에서 /dr/count로 DeferredResult가 담겨있는 큐의 사이즈를 확인해봅니다. 그리고 마지막으로 /dr/event로 큐에 담긴 DeferredResult 객체에 setResult로 결과를 반환합니다.
100개의 요청이 동시에 완료되는 것을 확인할 수 있습니다.
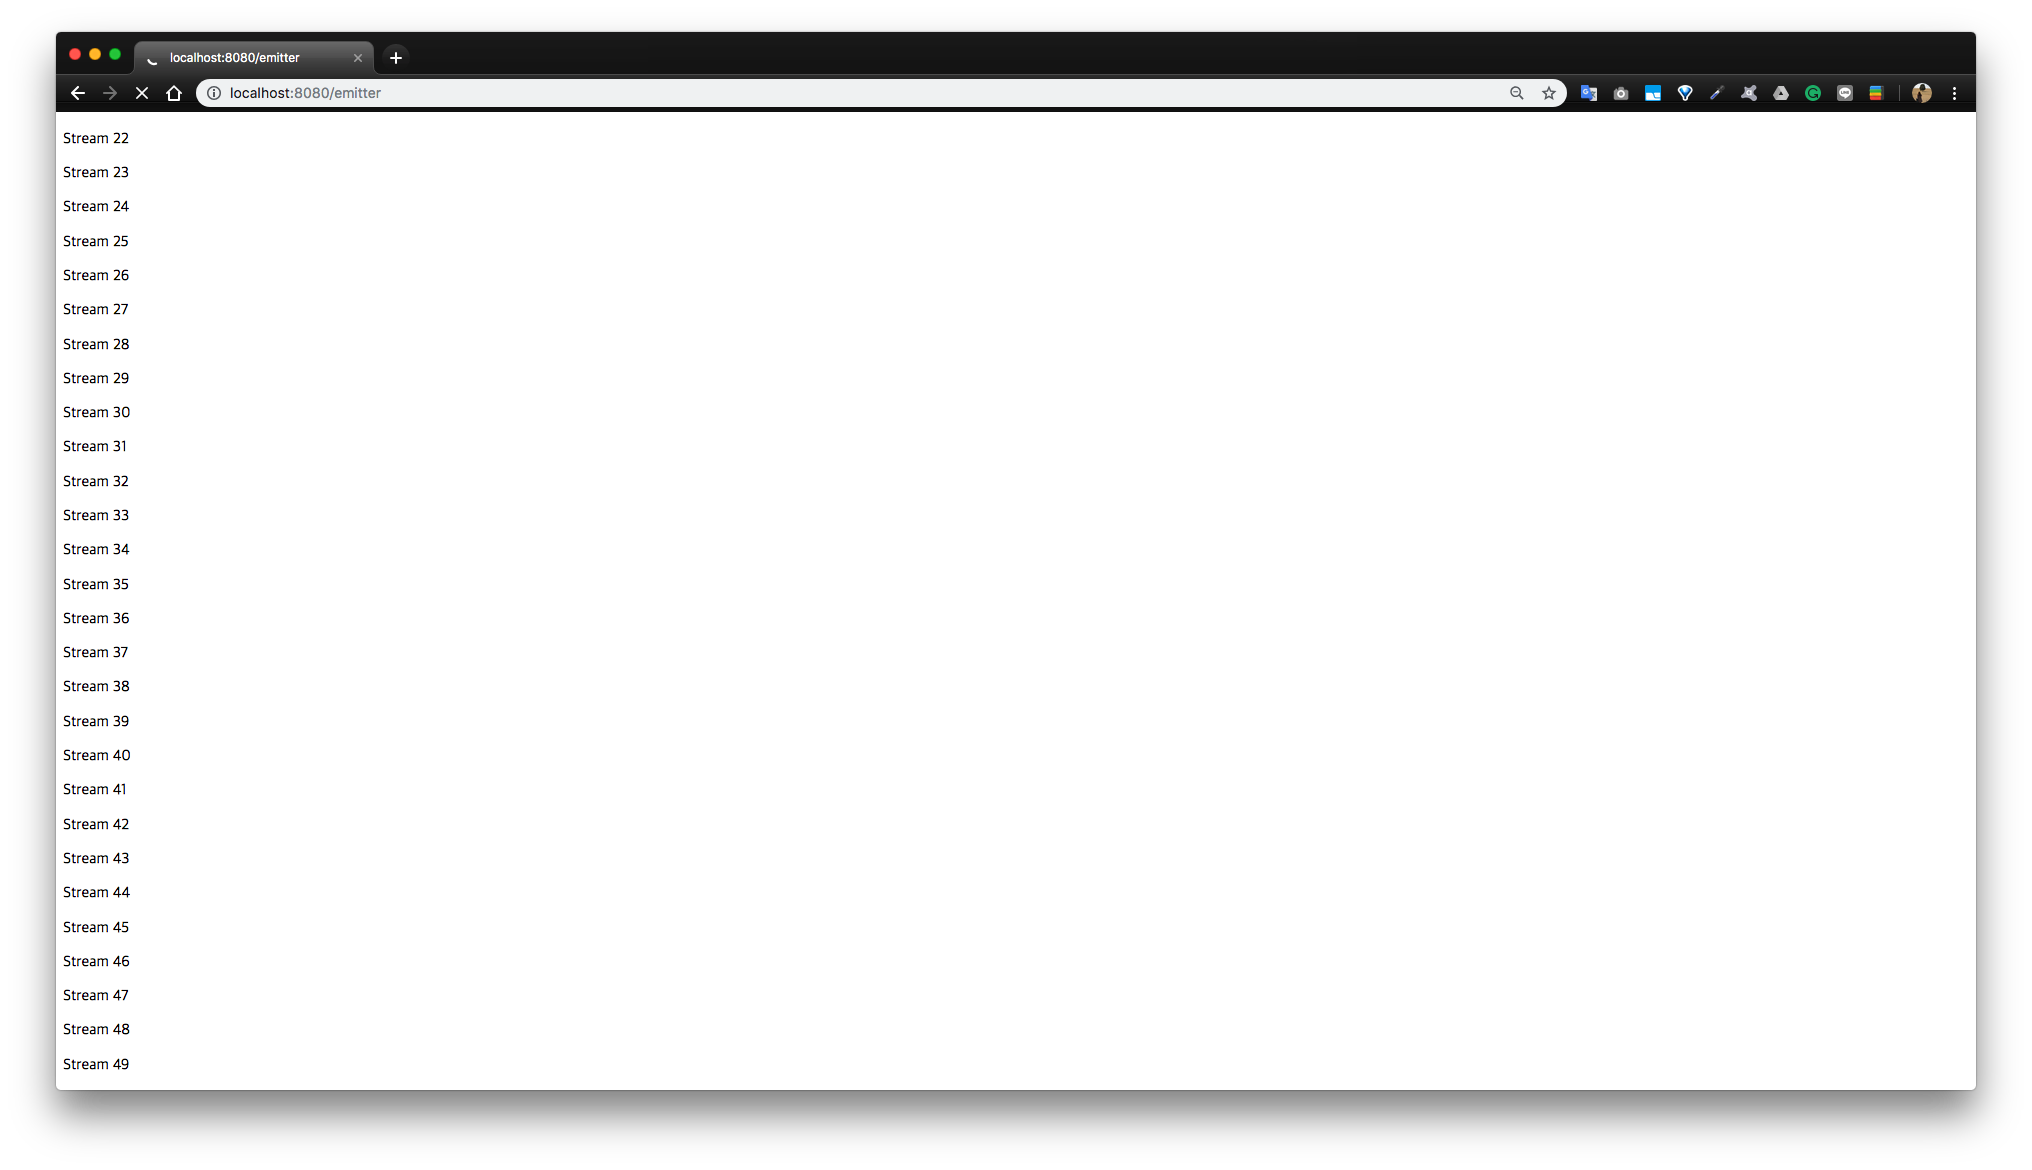
DeferredResult 결과

ResponseBodyEmitter

ResponseBodyEmitter는 Spring 4.2 부터 사용 가능합니다. 비동기 요청 처리의 결과로 하나 이상의 응답을 위해 사용되는 리턴 값 Type 입니다. DeferredResult가 하나의 결과를 생성해 요청을 처리했다면, ResponseBodyEmitter는 여러개의 결과를 만들어 요청을 처리할 수 있습니다.

1
2
3
4
5
6
7
8
9
10
11
12
13
14
15
16
17
18
19
20
21
22
23
24
25
26
27
28
29
30
@SpringBootApplication
@EnableAsync
@Slf4j
public class StudyApplication {

@RestController
public static class MyController {

@GetMapping("/emitter")
public ResponseBodyEmitter emitter() {
ResponseBodyEmitter emitter = new ResponseBodyEmitter();

Executors.newSingleThreadExecutor().submit(() -> {
try {
for (int i = 0; i < 50; i++) {
emitter.send("<p>Stream " + i + "</p>");
Thread.sleep(100);
}
} catch (Exception e) {
}
});

return emitter;
}
}

public static void main(String[] args) {
SpringApplication.run(StudyApplication.class, args);
}
}

ResponseBodyEmitter 결과_1
ResponseBodyEmitter 결과_2

후기

우하한형제들 - 스프링 리액티브 프로그래밍 세미나를 다녀온 후 토비의 봄 TV 스프링 리액티브 프로그래밍 시리즈를 전부 보고있습니다.

토비님은 매 라이브 코딩마다 말씀하시길 단순히 코드를 보는 것과 실행 후 결과를 실제로 확인해보는 것은 또 다른 차이가 있을 수 있다고 말씀하십니다. 매우 공감합니다!

위의 내용들은 모두 라이브 코딩에 포함되어 있는 내용이지만 실제로 따라해보면서 해당 내용들을 정리하는 차원으로 작성해보았습니다. 따라하며 토비님이 라이브 코딩을 진행하셨을 때와 달라진 몇 가지를 수정한 부분도 있고, 서버의 스레드를 직접 확인해보고자 처음에는 VisualVM을 사용하려 했지만 계속 실패해 JMC을 이용해 진행했습니다.

라이브 코딩을 보며 자바와 스프링의 비동기 기술에 대해 개인적으로 궁금했던 부분들이 많이 해소되었습니다!! 앞으로 남은 내용들도 따라하며 정리해 보도록 하겠습니다.