classServerimplementsRunnable{ publicvoidrun(){ try { ServerSocket ss = new ServerSocket(PORT); while (!Thread.interrupted()) new Thread(new Handler(ss.accept())).start(); // or, single-threaded, or a thread pool } catch (IOException ex) { } } } classHandlerimplementsRunnable{ final Socket socket; Handler(Socket s) { socket = s; } publicvoidrun(){ try { byte[] input = newbyte[MAX_INPUT]; socket.getInputStream().read(input); byte[] output = process(input); socket.getOutputStream().write(output); } catch (IOException ex) { } } privatebyte[] process(byte[] cmd) { } }
요청마다 처리를 위해 이벤트 리스너를 별도의 스레드로 만들어 사용하는 것의 단점은 컨텍스트 전환(context switching)의 오버 헤드가 크다는 것입니다. 최악의 경우, 데이터를 자주 읽거나 쓰지 않는 이벤트 리스너를 처리하는 일부 스레드는 유용한 작업을 하지 않고 주기적으로 컨텍스트를 전환할 것입니다. 스케줄러가 이러한 스레드를 CPU에 디스패치(dispatch) 할 때마다 I/O 이벤트가 발생할 때까지 스레드는 차단되어 I/O 이벤트를 기다리는 데 소비되는 모든 시간이 낭비됩니다.
위의 코드에서 ss.accept()는 클라이언트가 연결될 때까지 서버 스레드를 차단하는 블로킹 호출입니다. 서버 스레드는 ss.accept() 호출이 반환 될 때까지 이벤트 리스너를 위한 새로운 스레드의 start() 메서드를 호출 할 수 없습니다. 불필요한 컨텍스트 전환으로 인한 CPU 시간 낭비를 줄이기 위해 non-blocking I/O 개념이 탄생했습니다.
**Reactor Pattern**은 이 문제를 해결하기 위한 이벤트 처리(event handling) 디자인 패턴입니다. 하나의 Reactor가 계속 이벤트를 찾고 이벤트가 발생(trigger)하면 해당 이벤트 처리기(event handler)에게 이를 알립니다.
자바는 non-blocking 시스템을 설계하는 데 사용할 수 있는 **표준 API (java.nio)**를 제공합니다. 클라이언트가 서버로 이름(데이터)을 보내면 서버는 Hello 메시지로 응답하는 간단한 예제를 통해 Reactor 패턴에 대해서 알아보겠습니다.
Reactor 패턴의 아키텍처에는 두 가지 중요한 참여자가 있습니다.
Reactor : Reactor는 별도의 스레드에서 실행되며 발생한 I/O 이벤트는 dispatching되어 해당 이벤트 처리기로 보내 처리합니다.
Handlers : Handler는 Reactor로부터 I/O 이벤트를 받아 실제 작업을 수행합니다.
java.nio 패키지를 이용해서 Reactor 패턴을 구현할 것이기 때문에 nio 패키지에 속한 몇가지 class에 대한 이해가 필요합니다.
Channels : 소켓을 통해 non-blocking read를 할 수 있도록 지원하는 connection.
Buffers : 채널에 의해 직접 read되거나 write될 수 있는 배열과 같은 객체.
Selectors : Selector 는 어느 channel set 이 IO event 를 가지고 있는지를 알려준다. Selector.select() 는 I/O 이벤트가 발생한 채널 set을 return한다. return할 channel이 없다면 계속 기다리게(block) 된다. 이 block된 것을 바로 return 시켜주는 것이 Selector.wakeup()이다. Selector.selectedKeys()는 Selection Key 를 return 해 준다. Reactor는 이 Selection Key를 보고 어떤 handler로 넘겨줄 지를 결정한다.
Selection Keys : Selector와 Channel간의 관계를 표현해주는 객체이다. Selector가 제공한 Selection Key를 이용해 Reactor는 채널에서 발생하는 I/O 이벤트로 수행할 작업을 선택할 수 있다. ServerSocketChannel에 selector를 등록하면 key를 준다. 이 key가 SelectionKey 이다.
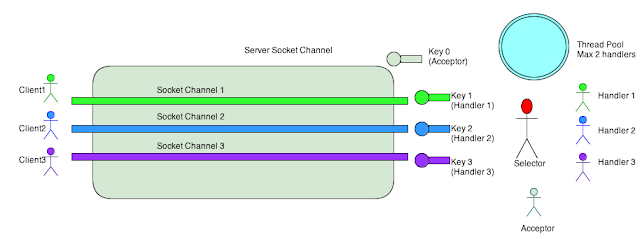
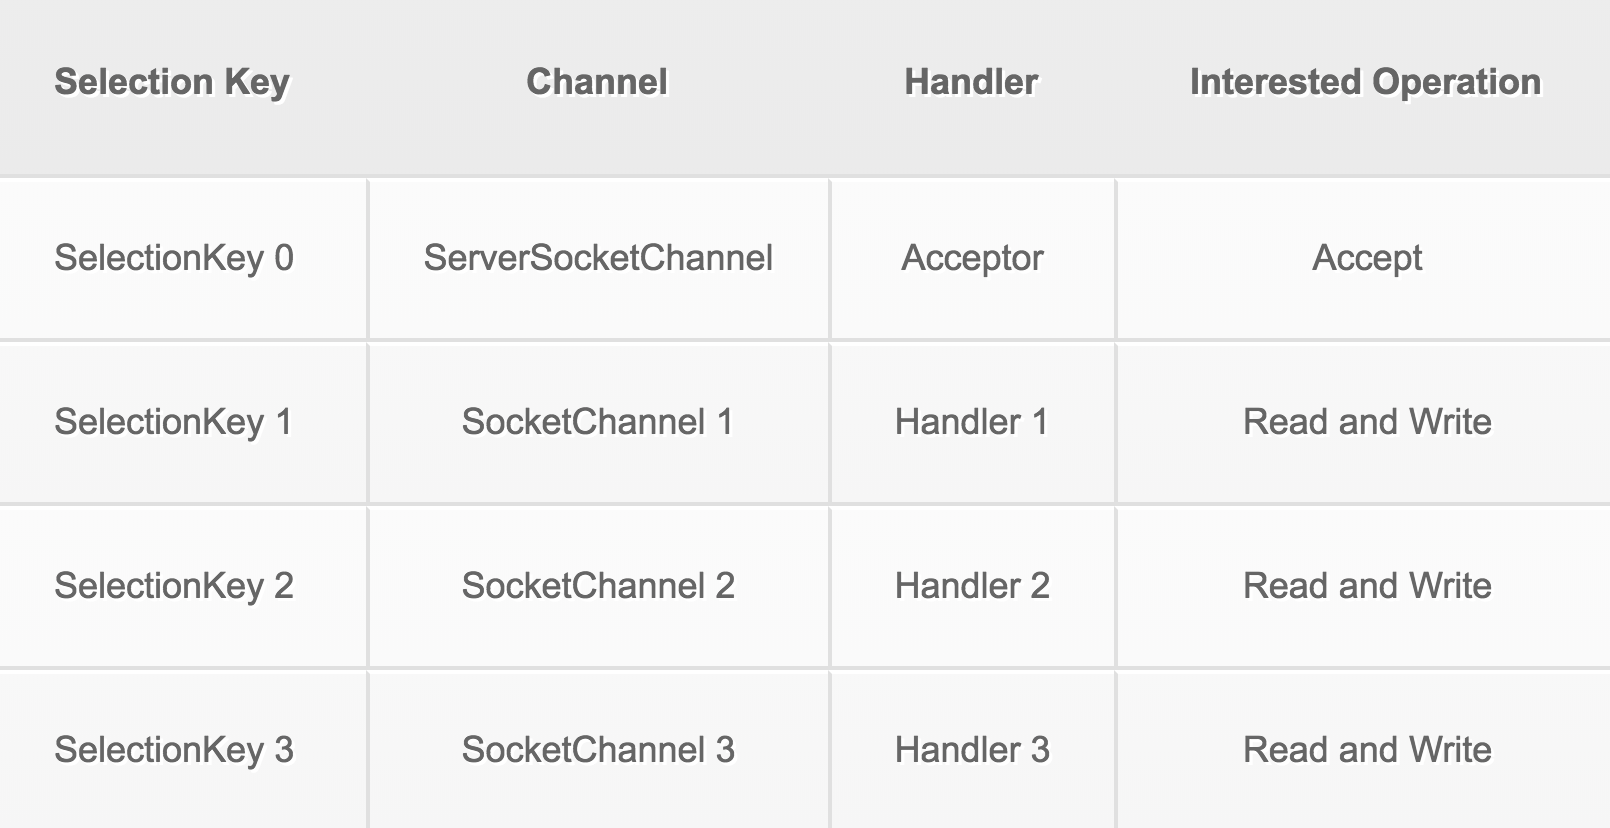
Selector는 계속해서 I/O 이벤트가 발생하기를 대기합니다. Reactor가 Selector.select() 메소드를 호출하면 Selector는 등록된 채널에 대해서 발생한 이벤트 정보가 들어있는 SelectionKey Set을 반환합니다. (SelectionKey는 해당 채널과 Selector와의 관계에 대한 모든 정보를 갖고 있습니다. 또한 Handler에 대한 정보도 갖고 있습니다.)
Selector에 등록된 하나의 ServerSocketChannel이 있습니다. ServerSocketChannel은 클라이언트에서 들어오는 연결 요청으로부터 이벤트를 수신해야합니다. 클라이언트가 연결을 요청할 때, ServerSocketChhannel은 I/O 이벤트를 받아 클라이언트에 SocketChannel을 할당해야 합니다. SelectionKey0은 ServerSocketChannel을 가지고 무엇을 해야하는지에 대한 이벤트 정보를 갖고 있습니다. SocketChhannel을 만들기 위해서는 Reactor가 SelectionKey0의 이벤트를 Acceptor에 전달해 Acceptor가 클라이언트와의 연결 요청을 수락하고 SocketChannel을 만들도록 해야합니다.
Acceptor가 클라이언트1의 연결을 수락하면 클라이언트1에 대한 SocketChannel이 생성됩니다. 이 SocketChannel역시 Selector에 등록되고 해당 채널에서 이벤트가 발생하면 해당 이벤트에 대한 정보를 포함한 SelectionKey1을 반환합니다. 이 SelectionKey1을 이용해서 해당 채널로부터 데이터를 읽고 쓸 수 있습니다. 따라서 SelectionKey1은 읽기와 쓰기를 처리하는 Handler1 객체에 바인딩 됩니다.
이후로 Reactor가 Selector.selector()를 호출했을 때 반환된 SelectionKey Set에 SelectionKey1이 있으면 SocketChannel1이 이벤트와 함께 트리거됨을 의미합니다. 이제 SelectionKey1을 보면, Reactor는 Handler1이 SelectionKey1에 바인딩되어 있으므로 Handler1에 이벤트를 전달해야한다는 것을 알고 있습니다. 반환 된 SelectionKey Set에 SelectionKey0이 있으면 ServerSocketChannel이 다른 클라이언트에서 이벤트를 수신했으며 SelectionKey0을 보고 Reactor는 해당 이벤트를 다시 Acceptor에 전달해야 함을 알고 있습니다. 이벤트가 Acceptor에 전달되면 클라이언트2에 대해 SocketChannel2를 만들고 SelectionKey2로 Selector로 SocketChannel2를 등록합니다.
따라서 이 시나리오에서는 3가지 유형의 이벤트에 관심이 있습니다.
accept 해야하는 ServerSocketChannel에서 트리거되는 연결 요청 이벤트.
클라이언트로 부터 송신된 데이터를 수신할 수 있을 때, SocketChannel로부터 트리거 되는 이벤트.
서버에서 클라이언트로 데이터를 송신할 때, 송신할 수 있는 준비가 되면 SocketChannel로부터 트리거 되는 이벤트.
그럼 스레드 풀은 이 작업과 어떤 관련이 있을까요? non-blocking 아키텍처의 장점은 클라이언트의 모든 요청을 처리하는 동시에 단일 스레드에서 실행되도록 서버를 작성할 수 있다는 것입니다. 서버를 설계하는 데 동시성 개념을 적용하지 않으면 이벤트에 대한 반응성이 떨어집니다. 단일 스레드일 때는 reactor가 이벤트를 handler에 전달해 처리될 때 까지는 다른 이벤트에 응답할 수 없기 때문입니다. 왜냐하면 하나의 스레드를 사용하여 모든 이벤트를 처리하기 때문입니다.
위의 아키텍처에 동시성을 추가해서 시스템의 응답 속도를 향상시킬 수 있습니다. Reactor가 이벤트를 Handler에 전달하고 새로운 Thread에서 Handler를 이용해 이벤트를 처리하면 Reacgtor는 계속해서 다른 이벤트에 응답할 수 있습니다. 또한 스레드 풀을 이용하면 시스템의 스레드 수를 제한하면서 더 효율적으로 사용할 수 있을 것 입니다.
Part 2
간단한 Reactor 패턴의 예시를 살펴보겠습니다. 클라이언트는 서버로 이름을 넣은 메시지를 전송하고 서버는 클라이언트에 Hello 메시지로 응답합니다. 스레드 풀은 Part3에서 살펴보겠습니다.
클라이언트는 java.nio를 사용하여 Socket을 생성하지 않고 java.net.Socket을 사용합니다.
publicvoidrunClient()throws IOException { Socket clientSocket = null; PrintWriter out = null; BufferedReader in = null;
try { clientSocket = new Socket(hostIp, hostPort); out = new PrintWriter(clientSocket.getOutputStream(), true); in = new BufferedReader(new InputStreamReader(clientSocket.getInputStream())); } catch (UnknownHostException e) { System.err.println("Unknown host: " + hostIp); System.exit(1); } catch (IOException e) { System.err.println("Couldn't connect to: " + hostIp); System.exit(1); }
BufferedReader stdIn = new BufferedReader(new InputStreamReader(System.in)); String userInput;
System.out.println("Client connected to host : " + hostIp + " port: " + hostPort); System.out.println("Type (\"Bye\" to quit)"); System.out.println("Tell what your name is to the Server.....");
while ((userInput = stdIn.readLine()) != null) {
out.println(userInput);
// Break when client says Bye. if (userInput.equalsIgnoreCase("Bye")) break;
publicvoidrun(){ System.out.println("Server listening to port: " + serverSocketChannel.socket().getLocalPort()); try { while (!Thread.interrupted()) { selector.select(); Set selected = selector.selectedKeys(); Iterator it = selected.iterator(); while (it.hasNext()) { dispatch((SelectionKey) (it.next())); } selected.clear(); } } catch (IOException ex) { ex.printStackTrace(); } }
voiddispatch(SelectionKey k){ Runnable r = (Runnable) (k.attachment()); if (r != null) { r.run(); } }
classAcceptorimplementsRunnable{ publicvoidrun(){ try { SocketChannel socketChannel = serverSocketChannel.accept(); if (socketChannel != null) { if (isWithThreadPool) new HandlerWithThreadPool(selector, socketChannel); else new Handler(selector, socketChannel); } System.out.println("Connection Accepted by Reactor"); } catch (IOException ex) { ex.printStackTrace(); } } } }
Reactor는 Runnable을 구현하고 있으며, run() 메서드에서는 while 루프를 돌며 selector.select()를 호출하여 처리할 수 있는 이벤트 정보가 담긴 SelectionKey Set을 가져옵니다. SelectionKey에 바인드 되어있는 Handler를 가져와 dispatch합니다.
Handler에는 READING, SENDING 2가지 상태가 있습니다. 채널은 한 번에 하나의 작업만 지원하기 때문에 동시에 처리할 수 없습니다. Handler가 SelectionKey에 어떻게 attach 되는지와 관심있는 연산이 OP_READ로 설정되는 부분에 유의해야합니다. Selector는 Read 이벤트가 발생할 때만 SelectionKey를 select해야 합니다. READ 프로세스가 완료되면 Handler는 상태를 SENDING으로 변경하고 관심 대상 연산을 OP_WRITE로 변경합니다. 이제 Selector는 채널이 데이터를 전송할 준비가 되었을 때 SelectionKey를 select 합니다. Write 이벤트가 Handler에 dispatch될 때, 상태가 SENDING이므로 Hello 메시지를 출력 버퍼에 씁니다. 전송이 완료되면 관심있는 작업을 OP_READ로 다시 변경하면서 Handler의 상태가 READING으로 변경됩니다.
결과적으로 서버는 단일 스레드에서 실행되지만 서버에 연결하는 클라이언트 수에 상관없이 응답합니다.
Part 3
이번 파트에서는 Handler의 스레드 풀에 대해서 설명합니다. HandlerWithThreadPool은 Handler 클래스의 확장 버전입니다.
voidread()throws IOException { int readCount = socketChannel.read(input); if (readCount > 0) { state = PROCESSING; pool.execute(new Processer(readCount)); } // We are interested in writing back to the client soon after read processing is done. selectionKey.interestOps(SelectionKey.OP_WRITE); }
// Start processing in a new Processer Thread and Hand off to the reactor thread. synchronizedvoidprocessAndHandOff(int readCount){ readProcess(readCount); // Read processing done. Now the server is ready to send a message to the client. state = SENDING; }
PROCESSING이 새로 도입되었으며 read() 메서드가 override 되었습니다. 이제 Read 이벤트가 Handler에 dispatch되면 데이터를 읽지만 상태를 SENDING으로 변경하지는 않습니다. 메시지를 처리하고 스레드 풀의 다른 스레드에서 실행하고 관련 작업을 OP_WRITE로 설정하는 Processer를 생성합니다. 이 시점에서 채널에 Write 준비가 되어 있더라도 Handler는 아직 PROCESSING 상태이기 때문에 write하지 않습니다.