신입사원 프로젝트로 간만에 안드로이드 개발을 하게됐습니다. 서버와 통신하기위해 Square에서 만든 Retrofit 라이브러리를 사용했는데, 기존에 사용하던 버전(1.x)과 변경된 부분이 많아 새롭게 사용법을 알아보고자 합니다.API 테스트 사이트 를 통해서 Fake data를 가져오는 실습을 해보겠습니다. 해당 글의 대부분은 Retrofit 2.0 Example 을 참고했습니다.
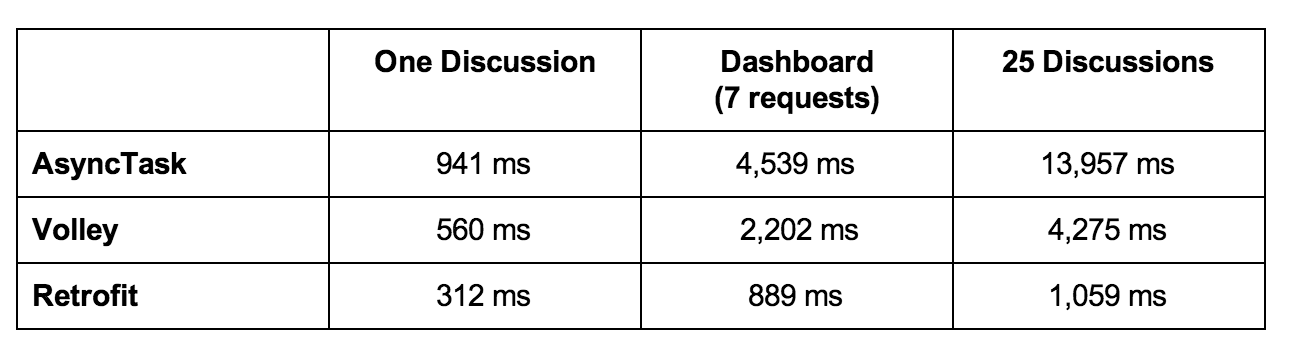
Retrofit2 Retrofit 의외에 다른 라이브러리도 있지만, Retrofit을 사용하기로 한 이유는 성능과 간단한 구현방법 때문입니다. 아래 보시는것과 같이 응답속도가 매우 빠른것으로 나와있습니다. 더 자세한 비교는 Android Async HTTP Clients: Volley vs Retrofit 에서 볼 수 있습니다.
Retrofit2는 기본적으로 OkHttp를 네트워킹 계층으로 활용하며 그 위에 구축됩니다.
Retrofit은 자동적으로 JSON 응답을 사전에 정의된 POJO를 통해 직렬화 할 수 있습니다. JSON을 직렬화 하기 위해서는 먼저 Gson converter가 필요합니다. **build.gradle**에 다음의 dependencies를 추가합니다.
1
2
3
compile 'com.squareup.retrofit2:retrofit:2.3.0' compile 'com.google.code.gson:gson:2.8.0' compile 'com.squareup.retrofit2:converter-gson:2.1.0'
OkHttp는 이미 Retrofit2 모듈의 종속성에 포함되어 있어, 별도의 OkHttp 설정이 필요하다면 다음과 같이 Retrofit2에서 OkHttp 종속성을 제외해야 합니다.
1
2
3
4
5
6
7
8
compile ('com.squareup.retrofit2:retrofit:2.3.0' ) { exclude module: 'okhttp' } compile 'com.google.code.gson:gson:2.8.0' compile 'com.squareup.retrofit2:converter-gson:2.1.0' compile 'com.squareup.okhttp3:okhttp:3.9.1' compile 'com.squareup.okhttp3:logging-interceptor:3.9.1'
네트워크 사용을 위해서 **AndroidManifest.xml**에서 Internet Permission을 추가합니다.
1 2 3 <manifest xmlns:android ="http://schemas.android.com/apk/res/android" > <uses-permission android:name ="android.permission.INTERNET" /> </manifest >
OkHttp Interceptors **Interceptor**는 OkHttp에 있는 강력한 메커니즘으로 호출을 모니터, 재 작성 및 재 시도를 할 수 있습니다. Interceptor는 크게 두 가지 카테고리로 분류할 수 있습니다.
Application Interceptors : Application Interceptor를 등록하려면 OkHttpClient.Builder에서 addInterceptor()를 호출해야 합니다.Network Interceptors : Network Interceptor를 등록하려면 addInterceptor() 대신 addNetworkInterceptor()를 추가해야 합니다.
Retrofit Interface 설정 APIClient.java 1 2 3 4 5 6 7 8 9 10 11 12 13 14 15 16 17 18 19 20 21 22 23 24 25 package com.journaldev.retrofitintro;import okhttp3.OkHttpClient;import okhttp3.logging.HttpLoggingInterceptor;import retrofit2.Retrofit;import retrofit2.converter.gson.GsonConverterFactory;class APIClient private static Retrofit retrofit = null ; static Retrofit getClient () HttpLoggingInterceptor interceptor = new HttpLoggingInterceptor(); interceptor.setLevel(HttpLoggingInterceptor.Level.BODY); OkHttpClient client = new OkHttpClient.Builder().addInterceptor(interceptor).build(); retrofit = new Retrofit.Builder() .baseUrl("https://reqres.in/" ) .addConverterFactory(GsonConverterFactory.create()) .client(client) .build(); return retrofit; } }
getClient() 메서드는 Retrofit 인터페이스를 설정할 때마다 호출됩니다. Retrofit은 **@GET, @POST, @PUT, @DELETE, @PATCH or @HEAD**와 같은 annotation 을 통해 HTTP method를 이용합니다.
APIInterface.java 1 2 3 4 5 6 7 8 9 10 11 12 13 14 15 16 17 18 19 20 21 22 23 24 25 26 27 28 29 package com.journaldev.retrofitintro;import com.journaldev.retrofitintro.pojo.MultipleResource;import com.journaldev.retrofitintro.pojo.User;import com.journaldev.retrofitintro.pojo.UserList;import retrofit2.Call;import retrofit2.http.Body;import retrofit2.http.Field;import retrofit2.http.FormUrlEncoded;import retrofit2.http.GET;import retrofit2.http.POST;import retrofit2.http.Query;interface APIInterface @GET("api/unknown") Call<MultipleResource> doGetListResources () ; @POST("api/users") Call<User> createUser (@Body User user) ; @GET("api/users?") Call<UserList> doGetUserList (@Query("page") String page) ; @FormUrlEncoded @POST("api/users?") Call<UserList> doCreateUserWithField (@Field("name") String name, @Field("job") String job) ; }
위의 클래스에서 Annotation을 통해 테스트 HTTP request를 작성했습니다. 해당 API로 이곳 을 통해 테스트 할 것입니다.
@GET("api/unknown")은 doGetListResources()를 호출합니다.doGetListResources()은 메서드 이름입니다. MultipleResource.java는 응답 객체의 Model POJO 클래스로서 Response parameter를 각각의 변수에 매핑하는 데 사용됩니다. 이러한 POJO 클래스는 메소드 리턴 유형으로 동작합니다.
MultipleResources.java 1 2 3 4 5 6 7 8 9 10 11 12 13 14 15 16 17 18 19 20 21 22 23 24 25 26 27 28 29 30 31 32 33 package com.journaldev.retrofitintro.pojo;import com.google.gson.annotations.SerializedName;import java.util.ArrayList;import java.util.List;public class MultipleResource @SerializedName("page") public Integer page; @SerializedName("per_page") public Integer perPage; @SerializedName("total") public Integer total; @SerializedName("total_pages") public Integer totalPages; @SerializedName("data") public List<Datum> data = null ; public class Datum @SerializedName("id") public Integer id; @SerializedName("name") public String name; @SerializedName("year") public Integer year; @SerializedName("pantone_value") public String pantoneValue; } }
@SerializedName 어노테이션은 JSON 응답에서 각각의 필드를 구분하기 위해 사용합니다.
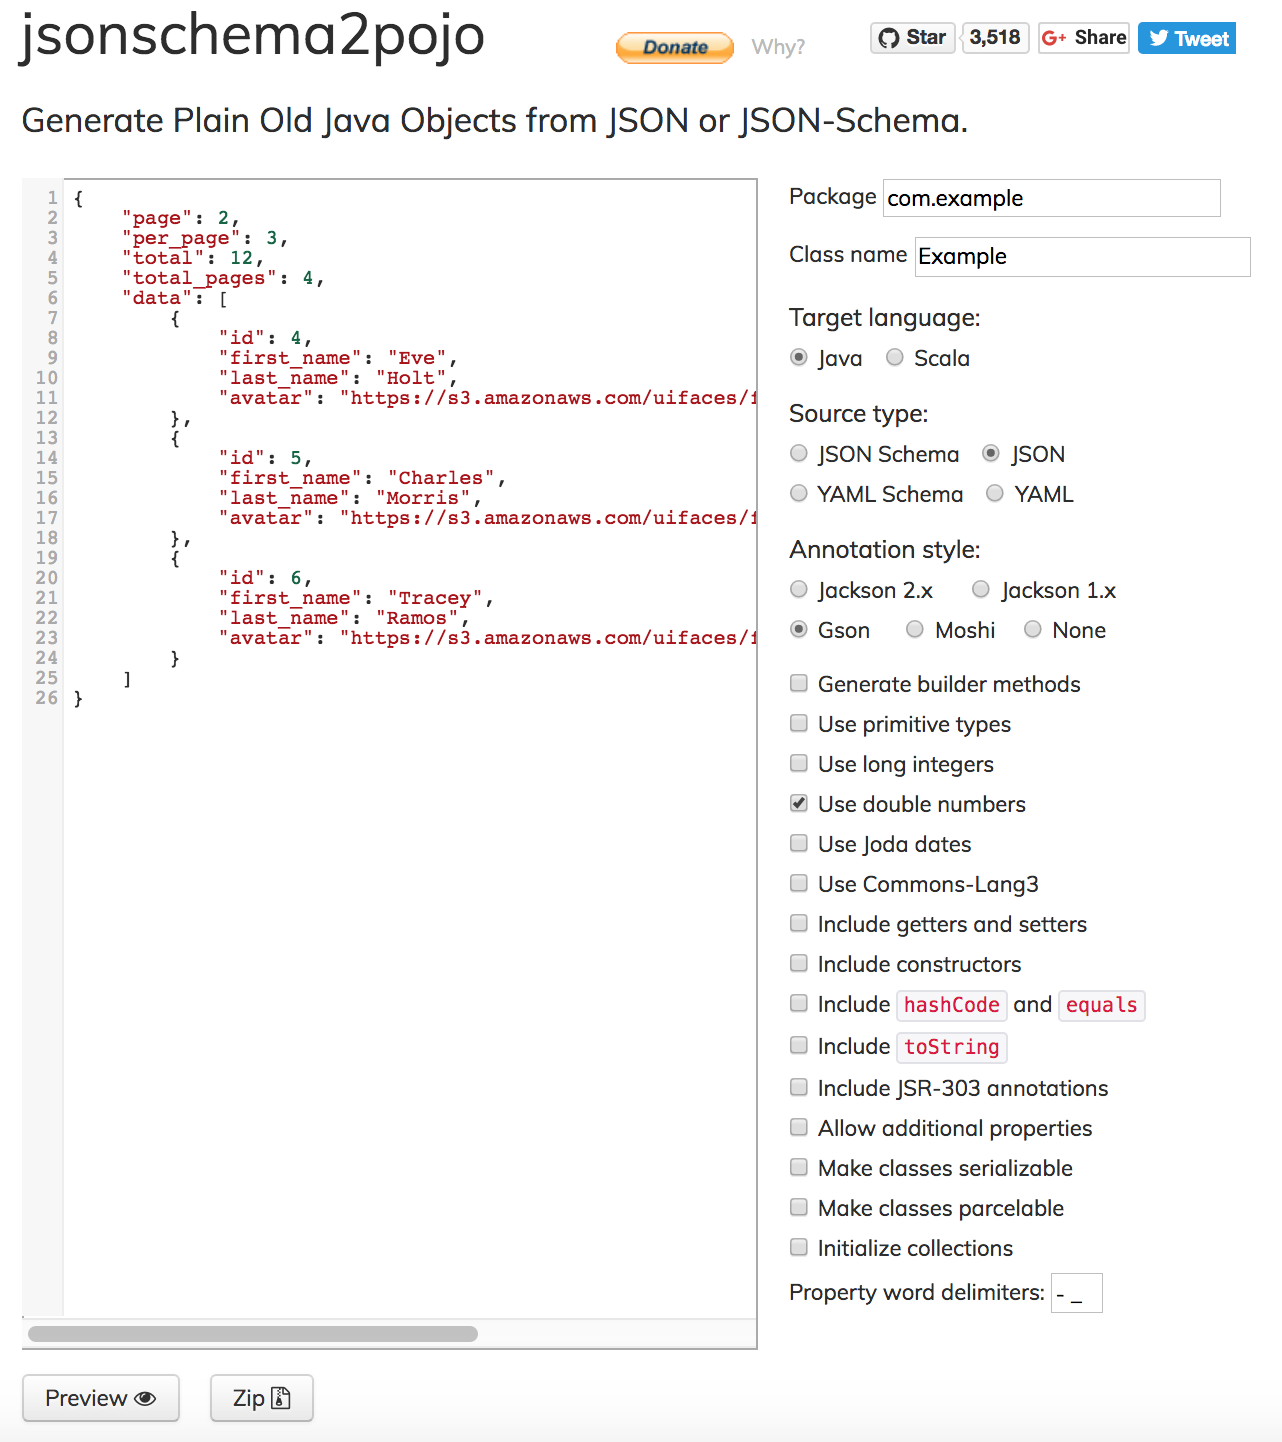
# Tip) jsonschema2pojo 에서 json 응답의 구조를 바탕으로 해당 응답에 대한 POJO 클래스를 쉽게 만들 수 있습니다.
POJO 클래스는 Retrofit Call 클래스로 래핑됩니다. (JSONArray는 POJO 클래스의 객체 목록으로 직렬화됩니다.)
Method Parameters : 메서드 내에서 전달할 수 있는 다양한 매개 변수 옵션이 있습니다.
@Body - request body로 Java 객체를 전달합니다.@Url - 동적인 URL이 필요할때 사용합니다.@Query - 쿼리를 추가할 수 있으며, 쿼리를 URL 인코딩하려면 다음과 같이 작성합니다.@Field - POST에서만 동작하며 form-urlencoded로 데이터를 전송합니다. 이 메소드에는 @FormUrlEncoded 어노테이션이 추가되어야 합니다.
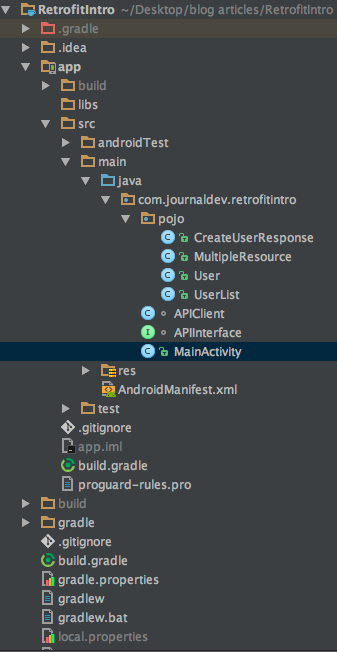
Android Retrofit 예제 프로젝트 구조
pojo 패키지는 APIInterface.java 클래스에 정의된 각각의 API 요청 응답에 대한 4가지 모델 클래스를 정의하고 있습니다.
User.java 1 2 3 4 5 6 7 8 9 10 11 12 13 14 15 16 17 18 19 20 package com.journaldev.retrofitintro.pojo;import com.google.gson.annotations.SerializedName;public class User @SerializedName("name") public String name; @SerializedName("job") public String job; @SerializedName("id") public String id; @SerializedName("createdAt") public String createdAt; public User (String name, String job) this .name = name; this .job = job; } }
위 클래스는 createUser() 메서드에 대한 응답을 위해 사용합니다.
UserList.java 1 2 3 4 5 6 7 8 9 10 11 12 13 14 15 16 17 18 19 20 21 22 23 24 25 26 27 28 29 30 31 32 33 package com.journaldev.retrofitintro.pojo;import com.google.gson.annotations.SerializedName;import java.util.ArrayList;import java.util.List;public class UserList @SerializedName("page") public Integer page; @SerializedName("per_page") public Integer perPage; @SerializedName("total") public Integer total; @SerializedName("total_pages") public Integer totalPages; @SerializedName("data") public List<Datum> data = new ArrayList(); public class Datum @SerializedName("id") public Integer id; @SerializedName("first_name") public String first_name; @SerializedName("last_name") public String last_name; @SerializedName("avatar") public String avatar; } }
CreateUserResponse.java 1 2 3 4 5 6 7 8 9 10 11 12 13 14 15 package com.journaldev.retrofitintro.pojo;import com.google.gson.annotations.SerializedName;public class CreateUserResponse @SerializedName("name") public String name; @SerializedName("job") public String job; @SerializedName("id") public String id; @SerializedName("createdAt") public String createdAt; }
MainActivity.java **MainActivity.java**는 Interface 클래스에 정의된 각각의 API를 호출하고 그 결과를 Toast와 TextView를 통해 표시하고 있습니다.
1 2 3 4 5 6 7 8 9 10 11 12 13 14 15 16 17 18 19 20 21 22 23 24 25 26 27 28 29 30 31 32 33 34 35 36 37 38 39 40 41 42 43 44 45 46 47 48 49 50 51 52 53 54 55 56 57 58 59 60 61 62 63 64 65 66 67 68 69 70 71 72 73 74 75 76 77 78 79 80 81 82 83 84 85 86 87 88 89 90 91 92 93 94 95 96 97 98 99 100 101 102 103 104 105 106 107 108 109 110 111 112 113 114 115 116 117 118 119 120 121 122 123 124 125 126 127 128 129 130 131 132 133 134 135 136 137 138 139 140 141 142 143 144 package com.journaldev.retrofitintro;import android.support.v7.app.AppCompatActivity;import android.os.Bundle;import android.util.Log;import android.widget.TextView;import android.widget.Toast;import com.journaldev.retrofitintro.pojo.CreateUserResponse;import com.journaldev.retrofitintro.pojo.MultipleResource;import com.journaldev.retrofitintro.pojo.User;import com.journaldev.retrofitintro.pojo.UserList;import java.util.List;import retrofit2.Call;import retrofit2.Callback;import retrofit2.Response;public class MainActivity extends AppCompatActivity TextView responseText; APIInterface apiInterface; @Override protected void onCreate (Bundle savedInstanceState) super .onCreate(savedInstanceState); setContentView(R.layout.activity_main); responseText = (TextView) findViewById(R.id.responseText); apiInterface = APIClient.getClient().create(APIInterface.class); Call<MultipleResource> call = apiInterface.doGetListResources(); call.enqueue(new Callback<MultipleResource>() { @Override public void onResponse (Call<MultipleResource> call, Response<MultipleResource> response) Log.d("TAG" ,response.code()+"" ); String displayResponse = "" ; MultipleResource resource = response.body(); Integer text = resource.page; Integer total = resource.total; Integer totalPages = resource.totalPages; List<MultipleResource.Datum> datumList = resource.data; displayResponse += text + " Page\n" + total + " Total\n" + totalPages + " Total Pages\n" ; for (MultipleResource.Datum datum : datumList) { displayResponse += datum.id + " " + datum.name + " " + datum.pantoneValue + " " + datum.year + "\n" ; } responseText.setText(displayResponse); } @Override public void onFailure (Call<MultipleResource> call, Throwable t) call.cancel(); } }); User user = new User("morpheus" , "leader" ); Call<User> call1 = apiInterface.createUser(user); call1.enqueue(new Callback<User>() { @Override public void onResponse (Call<User> call, Response<User> response) User user1 = response.body(); Toast.makeText(getApplicationContext(), user1.name + " " + user1.job + " " + user1.id + " " + user1.createdAt, Toast.LENGTH_SHORT).show(); } @Override public void onFailure (Call<User> call, Throwable t) call.cancel(); } }); Call<UserList> call2 = apiInterface.doGetUserList("2" ); call2.enqueue(new Callback<UserList>() { @Override public void onResponse (Call<UserList> call, Response<UserList> response) UserList userList = response.body(); Integer text = userList.page; Integer total = userList.total; Integer totalPages = userList.totalPages; List<UserList.Datum> datumList = userList.data; Toast.makeText(getApplicationContext(), text + " page\n" + total + " total\n" + totalPages + " totalPages\n" , Toast.LENGTH_SHORT).show(); for (UserList.Datum datum : datumList) { Toast.makeText(getApplicationContext(), "id : " + datum.id + " name: " + datum.first_name + " " + datum.last_name + " avatar: " + datum.avatar, Toast.LENGTH_SHORT).show(); } } @Override public void onFailure (Call<UserList> call, Throwable t) call.cancel(); } }); Call<UserList> call3 = apiInterface.doCreateUserWithField("morpheus" ,"leader" ); call3.enqueue(new Callback<UserList>() { @Override public void onResponse (Call<UserList> call, Response<UserList> response) UserList userList = response.body(); Integer text = userList.page; Integer total = userList.total; Integer totalPages = userList.totalPages; List<UserList.Datum> datumList = userList.data; Toast.makeText(getApplicationContext(), text + " page\n" + total + " total\n" + totalPages + " totalPages\n" , Toast.LENGTH_SHORT).show(); for (UserList.Datum datum : datumList) { Toast.makeText(getApplicationContext(), "id : " + datum.id + " name: " + datum.first_name + " " + datum.last_name + " avatar: " + datum.avatar, Toast.LENGTH_SHORT).show(); } } @Override public void onFailure (Call<UserList> call, Throwable t) call.cancel(); } }); } }
apiInterface = APIClient.getClient().create(APIInterface.class);는 APIClient를 인스턴스화 하기위해 사용됩니다.MultipleResource resource = response.body();
이제 앱을 실행하면 각 API를 호출하고 이에 따라 토스트 메시지를 표시합니다.
참고