Reactive Streams (3)

Reactive Streams란 non-blocking과 back pressure를 이용한 asynchronous 스트림 처리의 표준이다.” 라고 지난 글에서 이야기 했다.

이번에는 asynchronous(비동기 처리)에 대해서 이야기해보자.

먼저 아래 간단한 코드를 실행해보자.

1
2
3
4
5
6
7
8
9
10
11
12
13
14
15
16
17
18
19
20
21
22
23
24
25
26
27
28
29
30
31
32
33
34
35
36
37
38
39
40
41
42
43
44
45
46
47
48
49
50
51
52
53
54
55
56
57
58
59
60
61
62
63
64
@Slf4j
public class SchedulerEx {
public static void main(String[] args) {
Publisher<Integer> pub = new Publisher<Integer>() {
@Override
public void subscribe(Subscriber<? super Integer> sub) {
sub.onSubscribe(new Subscription() {
@Override
public void request(long n) {
sub.onNext(1);
sub.onNext(2);
sub.onNext(3);
sub.onNext(4);
sub.onNext(5);
sub.onComplete();
}

@Override
public void cancel() {

}
});
}
};

Subscriber<Integer> sub = new Subscriber<Integer>() {
@Override
public void onSubscribe(Subscription s) {
log.info("onSubscribe");
s.request(Long.MAX_VALUE);
}

@Override
public void onNext(Integer integer) {
log.info("onNext: {}", integer);
}

@Override
public void onError(Throwable t) {
log.info("onError", t);
}

@Override
public void onComplete() {
log.info("onComplete");
}
};

pub.subscribe(sub);

log.info("Exit)";
}
}

- 실행결과
23:27:45.475 [main] INFO com.jongmin.reactive.practice.SchedulerEx - onSubscribe
23:27:45.480 [main] INFO com.jongmin.reactive.practice.SchedulerEx - request: 9223372036854775807
23:27:45.484 [main] INFO com.jongmin.reactive.practice.SchedulerEx - onNext: 1
23:27:45.484 [main] INFO com.jongmin.reactive.practice.SchedulerEx - onNext: 2
23:27:45.484 [main] INFO com.jongmin.reactive.practice.SchedulerEx - onNext: 3
23:27:45.484 [main] INFO com.jongmin.reactive.practice.SchedulerEx - onNext: 4
23:27:45.484 [main] INFO com.jongmin.reactive.practice.SchedulerEx - onNext: 5
23:27:45.484 [main] INFO com.jongmin.reactive.practice.SchedulerEx - onComplete
23:27:45.484 [main] INFO com.jongmin.reactive.practice.SchedulerEx - exit

subscriber를 publisher에 등록(subscribe)하고 처리(onSubscribe -> request -> next)가 끝나면 exit 로그를 마지막으로 종료된다. 이때 subscriber와 publisher의 진행은 모두 main 스레드에서 진행된다.
즉, subscriber를 등록 후 publisher가 데이터를 push하고 처리할 때까지 main 스레드를 붙잡고 있게 된다.
만약 publisher 혹은 subscriber의 처리가 지연된다면 main 스레드는 더욱 오래 사용해야 할 것이다.

결국 publisher에 subscriber를 등록하면 별도의 스레드에서 진행하고 main 스레드는 계속해서 다른 작업을 진행하기를 원하는 것이다.

publishOn

먼저 publisher가 main 스레드가 아닌 별도의 스레드에서 동작하도록 만들어보자.

1
2
3
4
5
6
7
8
9
10
private static Publisher<Integer> publishOn(Publisher<Integer> pub) {
return new Publisher<Integer>() {
@Override
public void subscribe(Subscriber<? super Integer> sub) {
Executors.newSingleThreadExecutor().execute(() -> {
pub.subscribe(sub);
});
}
};
}

파라미터로 전달받은 publisher의 subscribe 메서드를 별도의 스레드에서 실행하도록 하는 publisher를 새로 만들어서 반환한다. publishOn 메서드를 기존의 publisher에 적용해 실행하면 다음과 같이 실행결과를 확인할 수 있다.

1
2
3
4
5
6
7
8
9
10
- 실행결과
23:55:57.820 [main] INFO com.jongmin.reactive.practice.SchedulerEx - exit
23:55:57.820 [pool-1-thread-1] INFO com.jongmin.reactive.practice.SchedulerEx - onSubscribe
23:55:57.824 [pool-1-thread-1] INFO com.jongmin.reactive.practice.SchedulerEx - request: 9223372036854775807
23:55:57.827 [pool-1-thread-1] INFO com.jongmin.reactive.practice.SchedulerEx - onNext: 1
23:55:57.827 [pool-1-thread-1] INFO com.jongmin.reactive.practice.SchedulerEx - onNext: 2
23:55:57.827 [pool-1-thread-1] INFO com.jongmin.reactive.practice.SchedulerEx - onNext: 3
23:55:57.827 [pool-1-thread-1] INFO com.jongmin.reactive.practice.SchedulerEx - onNext: 4
23:55:57.827 [pool-1-thread-1] INFO com.jongmin.reactive.practice.SchedulerEx - onNext: 5
23:55:57.827 [pool-1-thread-1] INFO com.jongmin.reactive.practice.SchedulerEx - onComplete

main 스레드는 바로 해제되어 이후의 일을 진행할 수 있게 되었고 onSubscribe 이후의 처리는 모두 별도의 스레드에서 진행된다.

그러나 아직 “빠른 프로듀서”와 “느린 컨슈머”의 문제가 남아있다. publisher가 데이터를 빠르게 생산하지만 subscriber의 onNext에서 데이터를 소비하는 작업에 시간이 오래 걸리는 경우인 것이다.
이때는 subscriber 또한 별도의 스레드에서 onNext 처리를 하도록 함으로써 해결할 수 있다.

subscribeOn

subscriber도 별도의 스레드에서 동작하도록 만들어보자.

1
2
3
4
5
6
7
8
9
10
11
12
13
14
15
16
17
18
19
20
21
22
23
private static Subscriber<Integer> subscriberOn(Subscriber<Integer> sub) {
return new Subscriber<Integer>() {
@Override
public void onSubscribe(Subscription s) {
Executors.newSingleThreadExecutor().execute(() -> sub.onSubscribe(s));
}

@Override
public void onNext(Integer i) {
Executors.newSingleThreadExecutor().execute(() -> sub.onNext(i));
}

@Override
public void onError(Throwable t) {
Executors.newSingleThreadExecutor().execute(() -> sub.onError(t));
}

@Override
public void onComplete() {
Executors.newSingleThreadExecutor().execute(() -> sub.onComplete());
}
};
}

파라미터로 전달받은 subscriber의 onSubscribe, onNext, onError, onComplete 메서드를 별도의 스레드에서 실행하도록 하는 subscriber를 새로 만들어서 반환한다. subscriberOn 메서드를 기존의 subscriber에 적용해 실행하면 다음과 같이 실행결과를 확인할 수 있다.

1
2
3
4
5
6
7
8
9
10
- 실행결과
00:14:53.604 [main] INFO com.jongmin.reactive.practice.SchedulerEx - exit
00:14:53.604 [pool-2-thread-1] INFO com.jongmin.reactive.practice.SchedulerEx - onSubscribe
00:14:53.607 [pool-2-thread-1] INFO com.jongmin.reactive.practice.SchedulerEx - request: 9223372036854775807
00:14:53.609 [pool-3-thread-1] INFO com.jongmin.reactive.practice.SchedulerEx - onNext: 1
00:14:53.609 [pool-4-thread-1] INFO com.jongmin.reactive.practice.SchedulerEx - onNext: 2
00:14:53.609 [pool-5-thread-1] INFO com.jongmin.reactive.practice.SchedulerEx - onNext: 3
00:14:53.609 [pool-6-thread-1] INFO com.jongmin.reactive.practice.SchedulerEx - onNext: 4
00:14:53.610 [pool-7-thread-1] INFO com.jongmin.reactive.practice.SchedulerEx - onNext: 5
00:14:53.610 [pool-8-thread-1] INFO com.jongmin.reactive.practice.SchedulerEx - onComplete

이제는 main 스레드는 subscriber를 publisher에 등록(subscribe)까지만 하고 그 이후의 작업은 publisher와 subscriber 모두 별도의 스레드에서 동작하게 되었다.

전체 코드는 다음과 같다.

1
2
3
4
5
6
7
8
9
10
11
12
13
14
15
16
17
18
19
20
21
22
23
24
25
26
27
28
29
30
31
32
33
34
35
36
37
38
39
40
41
42
43
44
45
46
47
48
49
50
51
52
53
54
55
56
57
58
59
60
61
62
63
64
65
66
67
68
69
70
71
72
73
74
75
76
77
78
79
80
81
82
83
84
85
86
87
88
89
@Slf4j
public class SchedulerEx {
public static void main(String[] args) {
Publisher<Integer> pub = new Publisher<Integer>() {
@Override
public void subscribe(Subscriber<? super Integer> sub) {
sub.onSubscribe(new Subscription() {
@Override
public void request(long n) {
log.info("request: {}", n);
sub.onNext(1);
sub.onNext(2);
sub.onNext(3);
sub.onNext(4);
sub.onNext(5);
sub.onComplete();
}

@Override
public void cancel() {

}
});
}
};

Subscriber<Integer> sub = new Subscriber<Integer>() {
@Override
public void onSubscribe(Subscription s) {
log.info("onSubscribe");
s.request(Long.MAX_VALUE);
}

@Override
public void onNext(Integer integer) {
log.info("onNext: {}", integer);
}

@Override
public void onError(Throwable t) {
log.info("onError", t);
}

@Override
public void onComplete() {
log.info("onComplete");
}
};

publishOn(pub).subscribe(subscriberOn(sub));

log.info("exit");
}

private static Publisher<Integer> publishOn(Publisher<Integer> pub) {
return new Publisher<Integer>() {
@Override
public void subscribe(Subscriber<? super Integer> sub) {
Executors.newSingleThreadExecutor().execute(() -> {
pub.subscribe(sub);
});
}
};
}

private static Subscriber<Integer> subscriberOn(Subscriber<Integer> sub) {
return new Subscriber<Integer>() {
@Override
public void onSubscribe(Subscription s) {
Executors.newSingleThreadExecutor().execute(() -> sub.onSubscribe(s));
}

@Override
public void onNext(Integer i) {
Executors.newSingleThreadExecutor().execute(() -> sub.onNext(i));
}

@Override
public void onError(Throwable t) {
Executors.newSingleThreadExecutor().execute(() -> sub.onError(t));
}

@Override
public void onComplete() {
Executors.newSingleThreadExecutor().execute(() -> sub.onComplete());
}
};
}
}

Reactive Streams (2)

지난번 Reactive Streams API를 구현한 예제를 바탕으로 간단한 Operator를 만들어보자.

Operator라 함은 Stream의 map연산 처럼 Publisher가 제공하는 data를 가공할 수 있도록 하는 것이다.

먼저 간단한 Publisher와 Subscriber 코드이다.

1
2
3
4
5
6
7
8
9
10
11
12
13
14
15
16
17
18
19
20
21
22
23
24
25
26
27
28
29
30
31
32
33
34
35
36
37
38
39
40
41
42
43
44
45
46
47
48
49
50
51
52
53
54
55
56
57
58
59
60
61
62
@Slf4j
public class PubSub {
public static void main(String[] args) {
Publisher<Integer> pub = iterPub(Stream.iterate(1, a -> a + 1)
.limit(5)
.collect(Collectors.toList()));
pub.subscribe(logSub());
}

private static Publisher<Integer> iterPub(List<Integer> iter) {
return new Publisher<Integer>() {
@Override
public void subscribe(Subscriber sub) {
sub.onSubscribe(new Subscription() {
@Override
public void request(long n) {
iter.forEach(i -> sub.onNext(i));
sub.onComplete();
}

@Override
public void cancel() {
}
});
}
};
}

private static Subscriber<Integer> logSub() {
return new Subscriber<Integer>() {
@Override
public void onSubscribe(Subscription s) {
log.info("onSubscribe");
s.request(Long.MAX_VALUE);
}

@Override
public void onNext(Integer i) {
log.info("onNext: {}", i);
}

@Override
public void onError(Throwable t) {
log.info("onError", t);
}

@Override
public void onComplete() {
log.info("onComplete");
}
};
}
}

- 실행결과
23:32:28.255 [main] INFO com.jongmin.reactive.practice.PubSub - onSubscribe
23:32:28.260 [main] INFO com.jongmin.reactive.practice.PubSub - onNext: 1
23:32:28.262 [main] INFO com.jongmin.reactive.practice.PubSub - onNext: 2
23:32:28.262 [main] INFO com.jongmin.reactive.practice.PubSub - onNext: 3
23:32:28.262 [main] INFO com.jongmin.reactive.practice.PubSub - onNext: 4
23:32:28.262 [main] INFO com.jongmin.reactive.practice.PubSub - onNext: 5
23:32:28.262 [main] INFO com.jongmin.reactive.practice.PubSub - onComplete

Operator

Publisher -> [Data1] -> Operator -> [Data2] -> Subscriber

위와 같이 Data1을 Data2로 변환하는 Operator를 만들어보자.

1
2
3
4
5
6
7
8
9
10
11
12
13
14
15
16
17
18
19
20
21
22
23
24
25
26
27
28
29
30
31
32
33
34
35
36
37
38
39
40
41
42
43
44
45
46
47
48
49
50
51
52
53
54
55
56
57
58
59
60
61
@Slf4j
public class PubSub {
public static void main(String[] args) {
Publisher<Integer> pub = iterPub(Stream.iterate(1, a -> a + 1)
.limit(5)
.collect(Collectors.toList()));
Publisher<Integer> mapPub = mapPub(pub, s -> s * 10);
// iterrPub -> [Data1] -> mapPub -> [Data2] -> logSub
mapPub.subscribe(logSub());
}

private static Publisher<Integer> mapPub(Publisher<Integer> pub, Function<Integer, Integer> f) {
return new Publisher<Integer>() {
@Override
public void subscribe(Subscriber<? super Integer> sub) {
pub.subscribe(new Subscriber<Integer>() {
@Override
public void onSubscribe(Subscription s) {
sub.onSubscribe(s);
}

@Override
public void onNext(Integer i) {
sub.onNext(f.apply(i));
}

@Override
public void onError(Throwable t) {
sub.onError(t);
}

@Override
public void onComplete() {
sub.onComplete();
}
});
}
};
}

private static Publisher<Integer> iterPub(List<Integer> iter) {
...
...
...
}

private static Subscriber<Integer> logSub() {
...
...
...
}
}

- 실행결과
23:45:19.758 [main] INFO com.jongmin.reactive.practice.PubSub - onSubscribe
23:45:19.764 [main] INFO com.jongmin.reactive.practice.PubSub - onNext: 10
23:45:19.767 [main] INFO com.jongmin.reactive.practice.PubSub - onNext: 20
23:45:19.767 [main] INFO com.jongmin.reactive.practice.PubSub - onNext: 30
23:45:19.767 [main] INFO com.jongmin.reactive.practice.PubSub - onNext: 40
23:45:19.767 [main] INFO com.jongmin.reactive.practice.PubSub - onNext: 50
23:45:19.767 [main] INFO com.jongmin.reactive.practice.PubSub - onComplete

mapPub 메서드가 추가되었다. Data를 제공하는 Publisher와 가공에 사용할 Function을 받아 Operator(새로운 Publisher)를 반환한다.

실제 하는 일은 단순하다. 기존 Publisher와 Subscriber를 이어준다.

Operator가 기존 Publisher를 subscribe하고, 받게되는 Subscription을 기존 Subscriber에게 전달한다.

DelegateSub

Operator가 하는 일은 기존 Publisher와 Subscriber를 이어주면서, onNext 부분에서 전달받은 Function을 적용해주는 것 뿐이다.

onNext를 제외하고는 Operator 마다 코드가 반복될 수 있기 때문에 해당 부분을 DelegateSub으로 분리해보자.

1
2
3
4
5
6
7
8
9
10
11
12
13
14
15
16
17
18
19
20
21
22
23
24
25
26
27
28
public class DelegateSub implements Subscriber<Integer> {

Subscriber sub;

public DelegateSub(Subscriber sub) {
this.sub = sub;
}

@Override
public void onSubscribe(Subscription s) {
sub.onSubscribe(s);
}

@Override
public void onNext(Integer i) {
sub.onNext(i);
}

@Override
public void onError(Throwable t) {
sub.onError(t);
}

@Override
public void onComplete() {
sub.onComplete();
}
}

DelegateSub을 사용해서 기존 코드를 다음과 같이 수정할 수 있다. 필요한 onNext 메서드만 오버라이딩해서 사용한다.

1
2
3
4
5
6
7
8
9
10
11
12
13
14
15
16
17
18
19
20
21
22
23
24
25
26
27
28
29
30
31
32
33
34
35
36
@Slf4j
public class PubSub2 {
public static void main(String[] args) {
Publisher<Integer> pub = iterPub(Stream.iterate(1, a -> a + 1)
.limit(5)
.collect(Collectors.toList()));
Publisher<Integer> mapPub = mapPub(pub, s -> s * 10);
mapPub.subscribe(logSub());
}

private static Publisher<Integer> mapPub(Publisher<Integer> pub, Function<Integer, Integer> f) {
return new Publisher<Integer>() {
@Override
public void subscribe(Subscriber<? super Integer> sub) {
pub.subscribe(new DelegateSub(sub) {
@Override
public void onNext(Integer i) {
sub.onNext(f.apply(i));
}
});
}
};
}

private static Publisher<Integer> iterPub(List<Integer> iter) {
...
...
...
}

private static Subscriber<Integer> logSub() {
...
...
...
}
}

SumPub

이번에는 Publisher로부터 전달받은 Data를 전부 더하는 sum operation을 만들어보자.

기존 Publisher와 Subscriber를 onNext로 이어주지 않고, onComplete이 호출되었을 때, sum 값을 onNext로 전달한 뒤 onComplete을 호출해 종료한다.

1
2
3
4
5
6
7
8
9
10
11
12
13
14
15
16
17
18
19
20
21
22
23
24
25
26
27
28
29
30
31
32
33
34
35
36
37
38
39
40
41
42
43
44
45
46
47
48
49
@Slf4j
public class PubSub2 {
public static void main(String[] args) {
Publisher<Integer> pub = iterPub(Stream.iterate(1, a -> a + 1)
.limit(5)
.collect(Collectors.toList()));
Publisher<Integer> sumPub = sumPub(pub);
sumPub.subscribe(logSub());
}

private static Publisher<Integer> sumPub(Publisher<Integer> pub) {
return new Publisher<Integer>() {
@Override
public void subscribe(Subscriber<? super Integer> sub) {
pub.subscribe(new DelegateSub(sub) {
int sum = 0;

@Override
public void onNext(Integer i) {
sum += i;
}

@Override
public void onComplete() {
sub.onNext(sum);
sub.onComplete();
}
});
}
};
}

private static Publisher<Integer> iterPub(List<Integer> iter) {
...
...
...
}

private static Subscriber<Integer> logSub() {
...
...
...
}
}

- 실행결과
00:30:48.643 [main] INFO com.jongmin.reactive.practice.PubSub2 - onSubscribe
00:30:48.648 [main] INFO com.jongmin.reactive.practice.PubSub2 - onNext: 15
00:30:48.650 [main] INFO com.jongmin.reactive.practice.PubSub2 - onComplete

Reactive Streams (1)

Reactive Streams 란?

reactive-streams.org 에서는 Reactive Streams를 다음과 같이 정의하고 있다.

Reactive Streams is an initiative to provide a standard for asynchronous stream processing with non-blocking back pressure.

Reactive Streams란 non-blocking과 back pressure를 이용한 asynchronous 스트림 처리의 표준이다.

중요한 키워드가 여러개 등장 했는데, 먼저 back pressure에 대해서 알아보자.

Back Pressure

Back Pressure는 Reactive Streams에서 가장 중요한 요소라고 할 수 있다. Back Pressure가 등장하게 된 배경을 이해하기 위해서 먼저 옵저버 패턴을 이해하고 옵저버 패턴이 갖고 있는 문제점을 인식할 수 있어야한다.

Observable & Observer

옵저버 패턴(observer pattern) 은 객체의 상태 변화를 관찰하는 관찰자들, 즉 옵저버들의 목록을 객체에 등록하여 상태 변화가 있을 때마다 메서드 등을 통해 객체가 직접 목록의 각 옵저버에게 통지하도록 하는 디자인 패턴이다. 주로 분산 이벤트 핸들링 시스템을 구현하는 데 사용된다. 발행/구독 모델로 알려져 있기도 하다.

옵저버 패턴 - 위키백과

예를 들면, 안드로이드에서 Button이 클릭되었을 때 실행할 함수를 onclicklistener에 추가하는데 이와 같이 이벤트 핸들링 처리를 위해 사용되는 패턴이다. 이 패턴에는 Observable과 Observer가 등장한다.

  • Osbservable: 등록된 Observer들을 관리하며, 새로운 데이터(이벤트)가 들어오면 등록된 Observer에게 데이터를 전달한다. 데이터를 생성해서 전달하기 때문에 Publisher(발행)라고 부른다.
  • Observer: Observable로 부터 데이터(이벤트)를 받을 수 있다. 데이터를 전달 받기 때문에 Subscriber(구독)라고 부른다.

Java는 이미 JDK 1.0 부터 옵저버 패턴을 쉽게 구현할 수 있는 인터페이스를 제공하고 있다. 아래의 코드는 JDK 1.0에 포함된 Observable과 Observer 인터페이스를 사용해 만든 간단한 예시 코드이다.

1
2
3
4
5
6
7
8
9
10
11
12
13
14
15
16
17
18
19
20
21
22
23
24
25
26
27
28
29
30
31
32
33
34
35
36
37
38
39
40
41
42
43
44
45
@Slf4j
public class Ob {
// Source -> Event/Data -> Observer
static class IntObservable extends Observable implements Runnable {

@Override
public void run() {
for (int i = 1; i <= 10; i++) {
setChanged();
notifyObservers(i); // push
}
}
}

public static void main(String[] args) {
Observer ob = new Observer() {
@Override
public void update(Observable o, Object arg) {
log.info("{}", arg);
}
};

IntObservable io = new IntObservable();
io.addObserver(ob);

ExecutorService es = Executors.newSingleThreadExecutor();
es.execute(io);

log.info("EXIT");
es.shutdown();
}
}

- 실행결과
01:47:30.715 [main] INFO com.jongmin.reactive.practice.Ob - EXIT
01:47:30.715 [pool-1-thread-1] INFO com.jongmin.reactive.practice.Ob - 1
01:47:30.719 [pool-1-thread-1] INFO com.jongmin.reactive.practice.Ob - 2
01:47:30.719 [pool-1-thread-1] INFO com.jongmin.reactive.practice.Ob - 3
01:47:30.719 [pool-1-thread-1] INFO com.jongmin.reactive.practice.Ob - 4
01:47:30.719 [pool-1-thread-1] INFO com.jongmin.reactive.practice.Ob - 5
01:47:30.719 [pool-1-thread-1] INFO com.jongmin.reactive.practice.Ob - 6
01:47:30.719 [pool-1-thread-1] INFO com.jongmin.reactive.practice.Ob - 7
01:47:30.719 [pool-1-thread-1] INFO com.jongmin.reactive.practice.Ob - 8
01:47:30.719 [pool-1-thread-1] INFO com.jongmin.reactive.practice.Ob - 9
01:47:30.719 [pool-1-thread-1] INFO com.jongmin.reactive.practice.Ob - 10

문제점

옵저버 패턴에서는 Publisher(Observable)이 Subscriber(Observer)에게 데이터(이벤트)를 Push(notifyObservers)하는 방식으로 전달한다. 이때, Publisher는 Subscriber의 상태에 상관없이 데이터를 전달하는데만 집중한다.

만약, Subscriber는 1초에 10개의 데이터를 처리할 수 있는데 Publisher가 1초에 20개의 데이터를 전달(Push)한다면 어떤 문제가 발생할까? 다음과 같은 문제가 발생할 수 있다.

  • Subscriber에 별도의 queue(버퍼)를 두고 처리하지 않고 대기중인 데이터를 저장할 수 있다.
  • 하지만, queue의 사용 가능한 공간도 전부 금방 소모될 것이다.
  • queue의 크기를 넘어가게 되면 데이터는 소실될 것이다.
  • queue의 크기를 너무 크게 생성하면 OOM(Out Of Memory) 문제가 발생할 수 있다.

해결 방법

Observable과 Observer의 문제를 어떻게 해결할 수 있을까? Publisher가 Subscriber에게 데이터를 Push 하던 기존의 방식을 Subscriber가 Publisher에게 자신이 처리할 수 있는 만큼의 데이터를 Request하는 방식으로 해결할 수 있다. 필요한(처리할 수 있는) 만큼만 요청해서 Pull하는 것이다. 데이터 요청의 크기가 Subscriber에 의해서 결정되는 것이다. 이를 dynamic pull 방식이라 부르며, Back Pressure의 기본 원리이다.

Reactive Streams API

Reactive Streams는 표준화된 API이다. 2013년 netflix, pivotal, lightbend의 엔지니어들에 의해서 처음 시작되어, 2015 4월에 JVM에 대한 1.0.0 스펙이 릴리즈 되었다.
Java 9부터는 reactive streams이 java.util.concurrent의 패키지 아래 Flow라는 형태로 JDK에 포함되었다. 기존에 reactive streams가 가진 API와 스펙, pull방식을 사용하는 원칙을 그대로 수용하였다.

아래는 Reactive Streams API이다.

1
2
3
4
5
6
7
8
9
10
11
12
13
14
15
public interface Publisher<T> {
public void subscribe(Subscriber<? super T> s);
}

public interface Subscription {
public void request(long n);
public void cancel();
}

public interface Subscriber<T> {
public void onSubscribe(Subscription s);
public void onNext(T t);
public void onError(Throwable t);
public void onComplete();
}

실제로 보면 굉장히 간단한 API들의 조합으로 이루어져 있다.

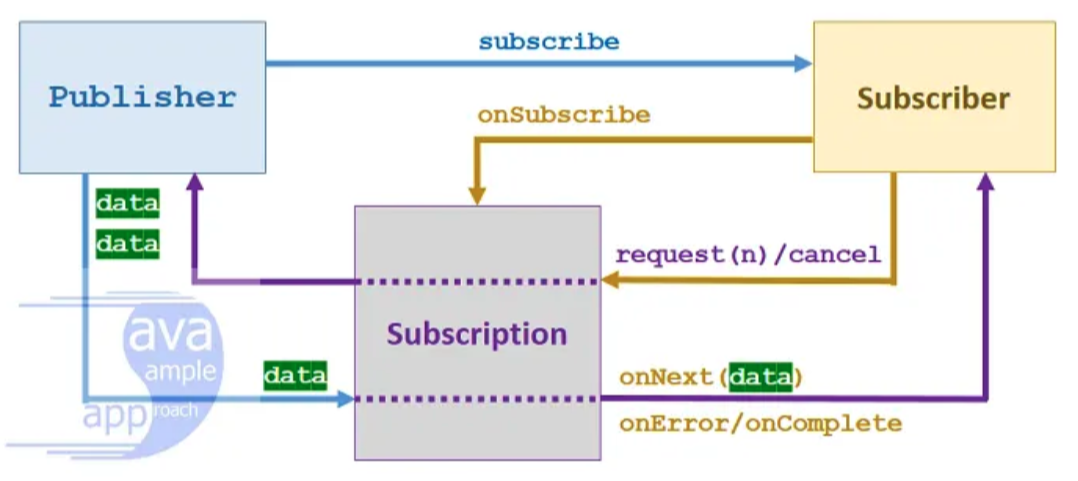
  • Publisher: Subscriber를 받아들이는 subscribe 메서드 하나만 갖는다.
  • Subscriber: 데이터를 받아 처리할 수 있는 onNext, 에러를 처리하는 onError, 모든 데이터를 받아 완료되었을 때는 onComplete, 그리고 Publisher로부터 Subscription을 전달 받는 onSubscribe 메서드로 이루어진다.
  • Subscription: n개의 데이터를 요청하는 request와 구독을 취소하는 cancel을 갖는다.

전체적인 흐름은 다음과 같다.
reactive streams

  1. Subscriber가 Publisher에게 구독을 요청한다.
  2. Publisher는 Subscriber의 onSubscribe 메서드를 통해 Subscription을 전달한다.
  3. Subscriber는 Publisher에게 직접 데이터를 요청하지 않고 Subscription을 통해 요청한다.
  4. Publisher는 Subscription을 통해 onNext에 데이터를 전달하고 완료되면 onComplete, 에러가 발생하면 onError에 전달한다.

Example

마지막으로 Reactive Streams API를 간단하게 구현해 테스트 해보자.

Reactive Streams API의 Interface는 간단해 보이지만 이를 구현한 구현체는 Reactive Streams Specification을 만족해야만 한다. 구현체가 Specification을 만족하는지는 Reactive Streams TCK(Technology Compatibility Kit)라는 도구를 이용해 검증할 수 있다.

1
2
3
4
5
6
7
8
9
10
11
12
13
14
15
16
17
18
19
20
21
22
23
24
25
26
27
28
29
30
31
32
33
34
35
36
37
38
39
40
41
42
43
44
45
46
47
48
49
50
51
52
53
54
55
56
57
58
59
60
61
62
63
64
65
66
67
68
69
70
@Slf4j
public class PubSub {
public static void main(String[] args) {
Iterable<Integer> iter = Arrays.asList(1, 2, 3, 4, 5);

Publisher p = new Publisher() {
@Override
public void subscribe(Subscriber subscriber) {
Iterator<Integer> it = iter.iterator();

subscriber.onSubscribe(new Subscription() {
@Override
public void request(long n) {
while(n-- > 0) {
if (it.hasNext()) {
subscriber.onNext(it.next());
} else {
subscriber.onComplete();
break;
}
}
}

@Override
public void cancel() {
log.info("cancel");
}
});
}
};

Subscriber<Integer> s = new Subscriber<Integer>() {
Subscription subscription;

@Override
public void onSubscribe(Subscription subscription) {
log.info("onSubscribe");
this.subscription = subscription;
this.subscription.request(1);
}

@Override
public void onNext(Integer item) {
log.info("onNext: {}", item);
this.subscription.request(1);
}

@Override
public void onError(Throwable t) {
log.info("onError");
}

@Override
public void onComplete() {
log.info("onComplete");
}
};

p.subscribe(s);
}
}

- 실행결과
00:19:08.655 [main] INFO com.jongmin.reactive.practice.PubSub - onSubscribe
00:19:08.660 [main] INFO com.jongmin.reactive.practice.PubSub - onNext: 1
00:19:08.662 [main] INFO com.jongmin.reactive.practice.PubSub - onNext: 2
00:19:08.663 [main] INFO com.jongmin.reactive.practice.PubSub - onNext: 3
00:19:08.663 [main] INFO com.jongmin.reactive.practice.PubSub - onNext: 4
00:19:08.663 [main] INFO com.jongmin.reactive.practice.PubSub - onNext: 5
00:19:08.663 [main] INFO com.jongmin.reactive.practice.PubSub - onComplete

오픈소스 컷 컨트리뷰트 경험기

얼마 전 개발자 생에 처음으로 오픈소스에 컨트리뷰트를 하는 경험을 하였습니다. 이번 포스팅에서는 오픈소스 첫 컨트리뷰트 관련해 이야기 해보려 합니다.

어떻게 시작하게 되었는가?

개발자라면 한 번쯤 오픈소스에 기여하고 컨트리뷰터가 되어보고 싶다는 생각을 가져봅니다. 저 역시 언젠가 한 번쯤… 이라는 생각은 오래 전 부터 갖고 있었지만 막상 실행에 옮기기 까지가 쉽지 않았습니다. 이미 오픈소스에 기여해 본 많은 개발자 분들이 오픈소스 기여에 쉽게 입문 할 수 있도록 여러 가이드들도 많이 만들어 주셨지만 저는 그 마저도 이용을 하지 못하고 있었습니다. 그러던 도중 우연히 Armeria Sprint라는 좋은 기회가 찾아왔습니다.

LINE의 오픈소스와 Armeria에 대해 조금 더 알아보고 싶다면 다음 글들이 도움이 될 것 같습니다.

Armeria Sprint

사내에서 개발하여 오픈소스로 공개한 프로젝트인 Armeria에 기여할 수 있도록 사내 개발자를 대상으로 Armeria Sprint 행사가 있었습니다.

오픈소스 스프린트란?
오픈소스 스프린트란 오픈소스에 관심있는 사람들이 모여서 오픈소스에 기여해 보는 것이라고 정의할 수 있습니다. 행사마다 편차가 있겠지만 보통 진행 기간을 하루 정도로 잡고 오전에는 다같이 모여서 각자 할 일(어떤 이슈를 맡아서 할지)을 정하고 오후에는 집중해서 코딩을 합니다.
참고 : GitHub Contributions 그래프를 푸릇푸릇하게 만들어보아요(feat. Armeria Sprint)

오픈소스에 기여해 보고 싶어도 여러 이유로 시작하지 못하고 있었던 저는 해당 행사의 인원 모집이 시작되자마자 고민없이 바로 신청해 참가할 수 있었습니다.

행사는 이틀에 나누어서 첫째 날에는 환영 세션이 2시간 동안 진행되었고, 둘째 날에는 스프린트가 4시간 동안 진행되었습니다. 행사 동안에는 간단한 자기 소개, 오픈소스에 기여하기 전에 알야아할 것, 스프린트 기간 동안 해결할 이슈 정하기, 그리고 마지막으로 집중해서 코딩하기와 같은 활동들이 있었습니다.

Contribute

오픈소스에 처음 기여할 때 어려운 부분 중 하나가 **”어떤 이슈를 맡아 해결하여 기여를 할 것인가”**인데요. 저는 이번 Armeria Sprint를 통해 현재 해결해야 할 이슈들이 어떤 것들이 있는지, 해당 이슈는 어떤 부분에 대한 내용인지에 대해 직접 듣고 모르는 부분은 직접 물어보며 진행 할 수 있었기 때문에 조금은 더 수월하게 진행할 수 있었습니다.

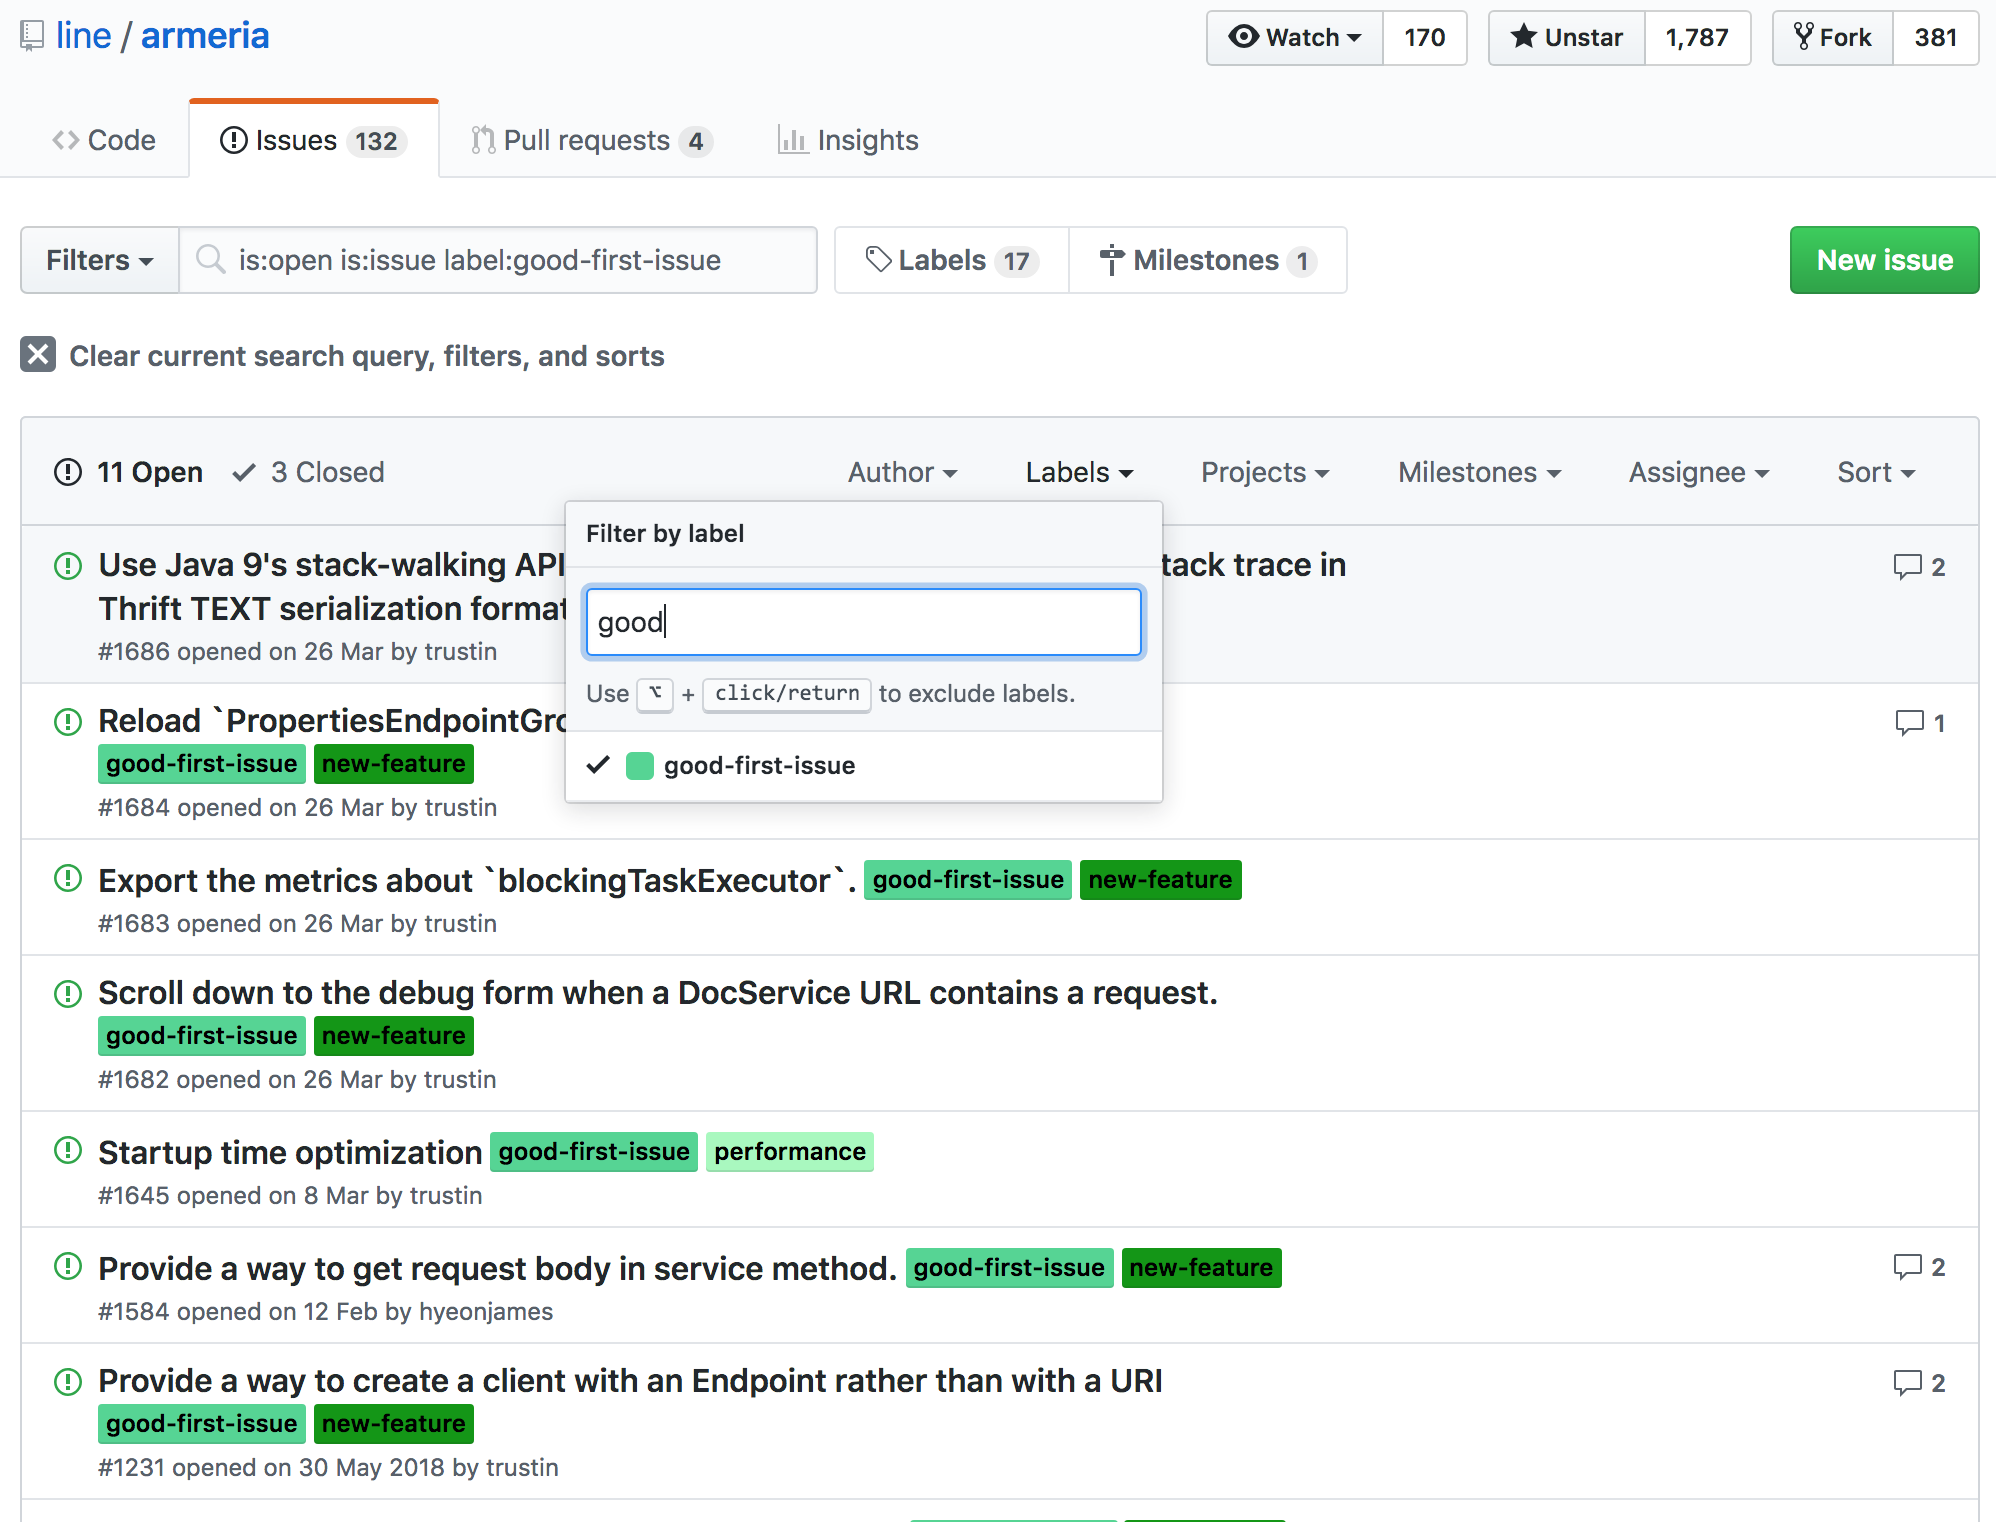
아마 처음 온라인으로 직접 이슈를 처음 선택하기에는 어려운 부분이 있을 것 같은데요. Armeria에서는 good-first-issue 라는 이름의 Label을 붙여 조금은 해결하기 쉬운 이슈들을 표시해주고 있습니다.

해당 이슈들 중 아는 부분이 있거나 해보고 싶은 이슈가 있다면 본인이 해결해 보겠다는 코멘트를 남긴 후 작업을 진행하면 됩니다.
내가 맡은 이슈가 어떤 문제를 해결(개선)하기 위한 것인지, 코드의 어떤 부분을 수정해야 하는지 파악하는 것이 처음에 가장 중요하다고 생각합니다. 이를 토대로 처음 PR을 올리게 되면 maintainer 분들이 꼼꼼한 리뷰와 함께 코멘트를 남겨주시기 때문에 같이 고민해가며 코드를 점차 개선해 나아갈 수 있습니다.

아래는 Armeria Sprint 동안 제가 맡았던 Issue와 PR입니다.

스프린트 2일차 때, 약 4시간 정도의 시간 동안 코딩을 하고 당일날 첫 PR을 올릴 수 있었습니다. 첫 PR을 올리고 다음날 maintainer 분들의 리뷰 코멘트가 달리기 시작했고, 틈틈히 코멘트 반영과 리뷰를 반복한 결과 약 3주 정도 후 첫 PR이 머지될 수 있었습니다.

위 과정을 반복하며 오픈소스에 기여하는데 있어 필요한 부분들을 다시 한 번 생각해 보게 되었습니다.

  • 몇번의 리뷰와 코멘트 반영 없이 한번에 PR이 머지되기는 쉽지 않습니다. 프로젝트의 maintainer가 아닌 이상 내가 작성한 코드가 모든 경우를 다 커버할 수 있을지는 테스트 코드를 작성하더라도 쉽게 확신할 수 없습니다. 그렇기 때문에 이슈 해결을 위한 코드와 테스트 코드를 작성한 후에는 PR을 만들어 리뷰를 요청드리는게 더 빠르게 머지될 수 있는 방법 같습니다.
  • 저는 Armeria Sprint를 통해 처음 궁금했던 부분들에 대해 오프라인에서 직접 여쭤보고 답을 받을 수 있었지만, 실제 오픈소스에 기여하는 과정에서는 모든 과정이 온라인에서 진행됩니다. 따라서 글로 본인의 의사를 잘 전달할 수 있는 능력이 중요합니다.
    • 나의 생각이 어떠한지, 어떤 부분에 대해서 모르는지 아는지를 글로써 잘 전달해야 maintainer 분들도 참고해 도움이 될 수 있는 코멘트를 남겨주실 수 있습니다.
  • 모든 의사소통은 영어를 이용해서 하지만 Google 번역기가 있으니 너무 걱정하지 않아도 됩니다.

후기

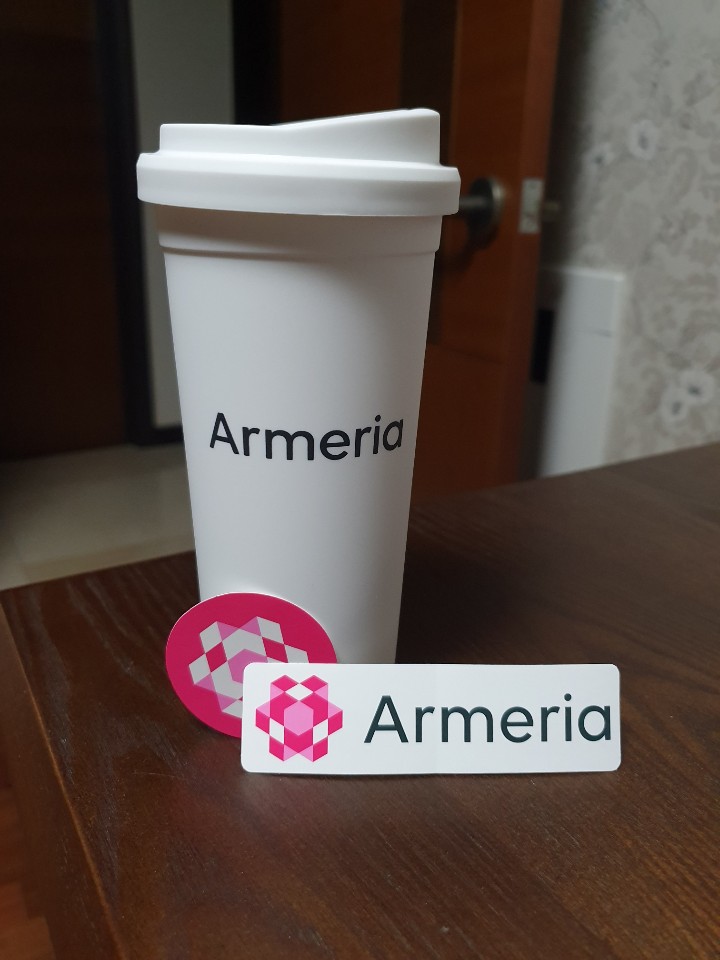
Armeria Sprint에서 기념품으로 컵을 받았는데요.

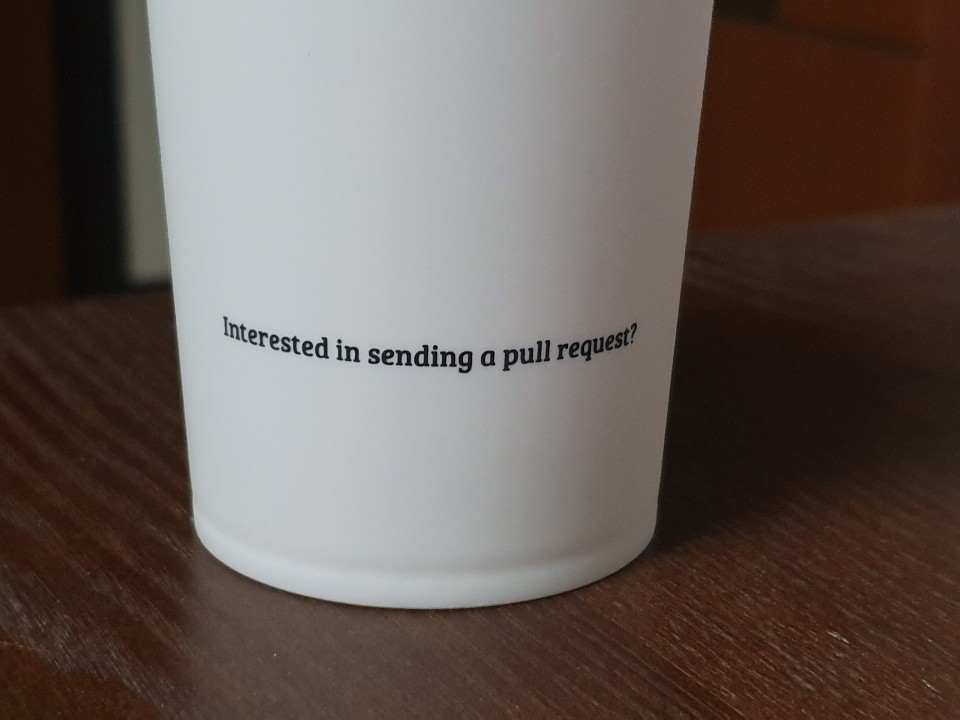
뒤에 이런 문구가 적혀 있었습니다. 오픈소스에 그리고 Armeria에 관심이 있다면 여러분들도 한 번 기여해보세요!

처음으로 오픈소스에 기여해보았다는 것, 그리고 그 오픈소스가 Armeria라는 것이 매우 재밌고 뜻 깊은 경험이었습니다. 저도 이번 첫 컨트리뷰트를 시작으로 가능하면 꾸준히 기여를 해보려고 합니다.

CompletableFuture

해당 포스팅은 토비님의 토비의 봄 TV 11회 스프링 리액티브 프로그래밍 (7) CompletableFuture 라이브 코딩을 보며 따라했던 실습 내용을 바탕으로 정리한 글입니다.

실습 코드들은 IntelliJ를 이용해 SpringBoot 2.1.3.RELEASE 버전 기반으로 프로젝트를 생성 후(web, lombok 포함) 진행했습니다.

이번에는 자바8에 나온 CompletableFuture 라는 새로운 비동기 자바 프로그래밍 기술에 대해서 알아보고, 지난 3회 정도 동안 다루어 왔던 자바 서블릿, 스프링의 비동기 기술 발전의 내용을 자바 8을 기준으로 다시 재작성합니다.

CompletableFuture

먼저 간단한 코드를 통해서 CompletableFuture 사용법에 대해서 알아보겠습니다.

runAsync & thenRun

1
2
3
4
5
6
7
8
9
10
11
12
13
14
15
16
17
18
19
20
21
22
@Slf4j
public class CFuture {

public static void main(String[] args) throws ExecutionException, InterruptedException {
// Async 작업이 끝나고 해당 스레드에서 계속해서 작업을 수행한다.
CompletableFuture
.runAsync(() -> log.info("runAsync"))
.thenRun(() -> log.info("thenRun"))
.thenRun(() -> log.info("thenRun"));
log.info("exit");

// 별도의 pool을 설정하지 않으면 자바7 부터는 ForkJoinPool이 자동으로 사용된다.
ForkJoinPool.commonPool().shutdown();
ForkJoinPool.commonPool().awaitTermination(10, TimeUnit.SECONDS);
}
}

// 결과
23:43:15.841 [main] INFO com.example.study.CFuture - exit
23:43:15.841 [ForkJoinPool.commonPool-worker-1] INFO com.example.study.CFuture - runAsync
23:43:15.845 [ForkJoinPool.commonPool-worker-1] INFO com.example.study.CFuture - thenRun

supplyAsync, thenApply, thenAccept

1
2
3
4
5
6
7
8
9
10
11
12
13
14
15
16
17
18
19
20
21
22
23
24
25
26
27
28
29
30
@Slf4j
public class CFuture {

public static void main(String[] args) throws ExecutionException, InterruptedException {
// Async 작업이 끝나고 해당 스레드에서 계속해서 작업을 수행한다.
CompletableFuture
.supplyAsync(() -> {
log.info("supplyAsync");
return 1;
})
// 앞의 비동기 작업의 결과를 받아 사용해 새로운 값을 return 한다.
.thenApply(s -> {
log.info("thenApply {}", s);
return s + 1;
})
// 앞의 비동기 작업의 결과를 받아 사용하며 return이 없다.
.thenAccept(s -> log.info("thenAccept {}", s));
log.info("exit");

// 별도의 pool을 설정하지않으면 자바7 부터는 ForkJoinPool이 자동으로 사용된다.
ForkJoinPool.commonPool().shutdown();
ForkJoinPool.commonPool().awaitTermination(10, TimeUnit.SECONDS);
}
}

// 결과
23:50:00.650 [main] INFO com.example.study.CFuture - exit
23:50:00.650 [ForkJoinPool.commonPool-worker-1] INFO com.example.study.CFuture - supplyAsync
23:50:00.654 [ForkJoinPool.commonPool-worker-1] INFO com.example.study.CFuture - thenApply 1
23:50:00.656 [ForkJoinPool.commonPool-worker-1] INFO com.example.study.CFuture - thenAccept 2

thenCompose

1
2
3
4
5
6
7
8
9
10
11
12
13
14
15
16
17
18
19
20
21
22
23
24
25
26
27
28
29
30
31
32
33
34
35
36
@Slf4j
public class CFuture {

public static void main(String[] args) throws ExecutionException, InterruptedException {
// Async 작업이 끝나고 해당 스레드에서 계속해서 작업을 수행한다.
CompletableFuture
.supplyAsync(() -> {
log.info("supplyAsync");
return 1;
})
// return이 CompletableFuture인 경우 thenCompose를 사용한다.
.thenCompose(s -> {
log.info("thenApply {}", s);
return CompletableFuture.completedFuture(s + 1);
})
// 앞의 비동기 작업의 결과를 받아 사용해 새로운 값을 return 한다.
.thenApply(s -> {
log.info("thenApply {}", s);
return s + 1;
})
// 앞의 비동기 작업의 결과를 받아 사용하며 return이 없다.
.thenAccept(s -> log.info("thenAccept {}", s));
log.info("exit");

// 별도의 pool을 설정하지않으면 자바7 부터는 ForkJoinPool이 자동으로 사용된다.
ForkJoinPool.commonPool().shutdown();
ForkJoinPool.commonPool().awaitTermination(10, TimeUnit.SECONDS);
}
}

// 결과
23:50:35.893 [main] INFO com.example.study.CFuture - exit
23:50:35.893 [ForkJoinPool.commonPool-worker-1] INFO com.example.study.CFuture - supplyAsync
23:50:35.897 [ForkJoinPool.commonPool-worker-1] INFO com.example.study.CFuture - thenApply 1
23:50:35.899 [ForkJoinPool.commonPool-worker-1] INFO com.example.study.CFuture - thenApply 2
23:50:35.899 [ForkJoinPool.commonPool-worker-1] INFO com.example.study.CFuture - thenAccept 3

exceptionally

1
2
3
4
5
6
7
8
9
10
11
12
13
14
15
16
17
18
19
20
21
22
23
24
25
26
27
28
29
30
31
32
33
34
35
36
37
38
39
40
41
@Slf4j
public class CFuture {

public static void main(String[] args) throws ExecutionException, InterruptedException {
// Async 작업이 끝나고 해당 스레드에서 계속해서 작업을 수행한다.
CompletableFuture
.supplyAsync(() -> {
log.info("supplyAsync");
return 1;
})
// return이 CompletableFuture인 경우 thenCompose를 사용한다.
.thenCompose(s -> {
log.info("thenApply {}", s);
if (1 == 1) throw new RuntimeException();
return CompletableFuture.completedFuture(s + 1);
})
// 앞의 비동기 작업의 결과를 받아 사용해 새로운 값을 return 한다.
.thenApply(s -> {
log.info("thenApply {}", s);
return s + 1;
})
.exceptionally(e -> {
log.info("exceptionally");
return -10;
})
// 앞의 비동기 작업의 결과를 받아 사용하며 return이 없다.
.thenAccept(s -> log.info("thenAccept {}", s));
log.info("exit");

// 별도의 pool을 설정하지않으면 자바7 부터는 ForkJoinPool이 자동으로 사용된다.
ForkJoinPool.commonPool().shutdown();
ForkJoinPool.commonPool().awaitTermination(10, TimeUnit.SECONDS);
}
}

// 결과
23:51:31.255 [ForkJoinPool.commonPool-worker-1] INFO com.example.study.CFuture - supplyAsync
23:51:31.257 [main] INFO com.example.study.CFuture - exit
23:51:31.259 [ForkJoinPool.commonPool-worker-1] INFO com.example.study.CFuture - thenApply 1
23:51:31.261 [ForkJoinPool.commonPool-worker-1] INFO com.example.study.CFuture - exceptionally
23:51:31.261 [ForkJoinPool.commonPool-worker-1] INFO com.example.study.CFuture - thenAccept -10

thenApplyAsync

1
2
3
4
5
6
7
8
9
10
11
12
13
14
15
16
17
18
19
20
21
22
23
24
25
26
27
28
29
30
31
32
33
34
35
36
37
38
39
40
41
42
43
44
45
46
47
48
49
50
@Slf4j
public class CFuture {

public static void main(String[] args) throws ExecutionException, InterruptedException {
ExecutorService es = Executors.newFixedThreadPool(10);

// Async 작업이 끝나고 해당 스레드에서 계속해서 작업을 수행한다.
CompletableFuture
.supplyAsync(() -> {
log.info("supplyAsync");
return 1;
}, es)
// return이 CompletableFuture인 경우 thenCompose를 사용한다.
.thenCompose(s -> {
log.info("thenApply {}", s);
return CompletableFuture.completedFuture(s + 1);
})
// 앞의 비동기 작업의 결과를 받아 사용해 새로운 값을 return 한다.
.thenApply(s -> {
log.info("thenApply {}", s);
return s + 2;
})
// 이 작업은 다른 스레드에서 처리를 하려고 할 때, thenApplyAsync를 사용한다.
// 스레드의 사용을 더 효율적으로 하고 자원을 더 효율적으로 사용한다.
// 현재 스레드 풀의 정책에 따라서 새로운 스레드를 할당하거나 대기중인 스레드를 사용한다. (스레드 풀 전략에 따라 다르다.)
.thenApplyAsync(s -> {
log.info("thenApply {}", s);
return s + 3;
}, es)
.exceptionally(e -> {
log.info("exceptionally");
return -10;
})
// 앞의 비동기 작업의 결과를 받아 사용하며 return이 없다.
.thenAcceptAsync(s -> log.info("thenAccept {}", s), es);
log.info("exit");

// 별도의 pool을 설정하지않으면 자바7 부터는 ForkJoinPool이 자동으로 사용된다.
ForkJoinPool.commonPool().shutdown();
ForkJoinPool.commonPool().awaitTermination(10, TimeUnit.SECONDS);
}
}

// 결과
23:54:00.043 [pool-1-thread-1] INFO com.example.study.CFuture - supplyAsync
23:54:00.043 [main] INFO com.example.study.CFuture - exit
23:54:00.047 [pool-1-thread-1] INFO com.example.study.CFuture - thenApply 1
23:54:00.048 [pool-1-thread-1] INFO com.example.study.CFuture - thenApply 2
23:54:00.049 [pool-1-thread-2] INFO com.example.study.CFuture - thenApply 4
23:54:00.049 [pool-1-thread-3] INFO com.example.study.CFuture - thenAccept 7

ListenableFuture에서 CompletableFuture로 변환

Spring 4.0에 들어간 AsyncRestTemplate이 return하는 것은 CompletableFuture가 아닌 ListenableFuture입니다.
Spring 4까지는 자바 6~8을 지원하기 때문에 CompletableFuture로 return을 만들지 못하고 계속 ListenableFuture를 유지했습니다. 따라서 ListenableFuture를 CompletableFuture로 만들어 체이닝하기 위해서는 유틸성 wrapper 메서드를 만들어 사용하면 됩니다.

1
2
3
4
5
6
7
8
9
10
11
12
13
14
15
16
17
18
19
20
21
22
23
24
25
26
27
28
29
30
31
32
33
34
35
36
37
38
39
40
41
42
43
44
45
46
47
48
49
50
51
52
53
54
55
56
57
58
59
60
61
62
63
64
65
66
67
68
69
70
71
72
73
74
75
@SpringBootApplication
@EnableAsync
@Slf4j
public class StudyApplication {

@RestController
public static class MyController {
AsyncRestTemplate rt = new AsyncRestTemplate(new Netty4ClientHttpRequestFactory(new NioEventLoopGroup(1)));

@Autowired
MyService myService;

static final String URL1 = "http://localhost:8081/service?req={req}";
static final String URL2 = "http://localhost:8081/service2?req={req}";

@GetMapping("/rest")
public DeferredResult<String> rest(int idx) {
DeferredResult<String> dr = new DeferredResult<>();

toCF(rt.getForEntity("http://localhost:8081/service?req={req}", String.class, "hello" + idx))
.thenCompose(s -> toCF(rt.getForEntity("http://localhost:8081/service2?req={req}", String.class, s.getBody())))
.thenCompose(s -> toCF(myService.work(s.getBody())))
.thenAccept(s -> dr.setResult(s))
.exceptionally(e -> {
dr.setErrorResult(e.getMessage());
return null;
});

// f1.addCallback(s -> {
// ListenableFuture<ResponseEntity<String>> f2 = rt.getForEntity("http://localhost:8081/service2?req={req}", String.class, s.getBody());
// f2.addCallback(s2 -> {
// ListenableFuture<String> f3 = myService.work(s2.getBody());
// f3.addCallback(s3 -> {
// dr.setResult(s3);
// }, e -> {
// dr.setErrorResult(e.getMessage());
// });
// }, e -> {
// dr.setErrorResult(e.getMessage());
// });
// }, e -> {
// dr.setErrorResult(e.getMessage());
// });

return dr;
}

<T> CompletableFuture<T> toCF(ListenableFuture<T> lf) {
CompletableFuture<T> cf = new CompletableFuture<>();
lf.addCallback(s -> cf.complete(s), e -> cf.completeExceptionally(e));
return cf;
}
}

@Service
public static class MyService {
@Async
public ListenableFuture<String> work(String req) {
return new AsyncResult<>(req + "/asyncwork");
}
}

@Bean
public ThreadPoolTaskExecutor myThreadPool() {
ThreadPoolTaskExecutor te = new ThreadPoolTaskExecutor();
te.setCorePoolSize(1);
te.setMaxPoolSize(1);
te.initialize();
return te;
}

public static void main(String[] args) {
SpringApplication.run(StudyApplication.class, args);
}
}

@Bean Lite Mode & inter-bean references

@Bean Methods in @Configuration Classes

일반적으로 @Bean 어노테이션은 @Configuration 어노테이션이 사용된 클래스 내의 메서드에 선언이 됩니다. 이 경우 @Bean 어노테이션을 사용하는 메서드는 같은 클래스의 다른 @Bean 메소드를 직접 호출하여 참조할 수 있습니다. 이렇게하면 bean 간의 참조(reference)가 강하게 만들어집니다.

아래 코드의 실행 후 로그를 통해 a() 메서드의 결과로 생성되는 A 클래스의 빈은 b() 와 c() 메서드에서 a() 메서드를 직접 호출해 참조가 되는 것을 확인할 수 있습니다.

1
2
3
4
5
6
7
8
9
10
11
12
13
14
15
16
17
18
19
20
21
22
23
24
25
26
27
28
29
30
31
32
33
34
35
36
37
38
39
40
41
42
43
44
45
46
47
48
49
50
51
52
53
54
55
56
57
@SpringBootApplication
public class TestApplication {

@Autowired
private ApplicationContext context;

public static void main(String[] args) {
ApplicationContext context = SpringApplication.run(TestApplication.class, args);
}

@Configuration
public static class TestConfiguration {

@Bean
public A a() {
return new A();
}

@Bean
public B b() {
A a = a();
System.out.println(a);
return new B();
}

@Bean
public C c() {
A a = a();
System.out.println(a);
return new C();
}
}

public static class A {
}

public static class B {
}

public static class C {
}
}


// 샐행 결과
2019-04-30 19:41:04.837 INFO 24509 --- [ main] com.example.test.TestApplication : Starting TestApplication on AL01297960.local with PID 24509 (/Users/user/work/test/build/classes/java/main started by user in /Users/user/work/test)
2019-04-30 19:41:04.841 INFO 24509 --- [ main] com.example.test.TestApplication : No active profile set, falling back to default profiles: default
2019-04-30 19:41:06.229 INFO 24509 --- [ main] o.s.b.w.embedded.tomcat.TomcatWebServer : Tomcat initialized with port(s): 8080 (http)
2019-04-30 19:41:06.262 INFO 24509 --- [ main] o.apache.catalina.core.StandardService : Starting service [Tomcat]
2019-04-30 19:41:06.262 INFO 24509 --- [ main] org.apache.catalina.core.StandardEngine : Starting Servlet engine: [Apache Tomcat/9.0.17]
2019-04-30 19:41:06.353 INFO 24509 --- [ main] o.a.c.c.C.[Tomcat].[localhost].[/] : Initializing Spring embedded WebApplicationContext
2019-04-30 19:41:06.353 INFO 24509 --- [ main] o.s.web.context.ContextLoader : Root WebApplicationContext: initialization completed in 1441 ms
com.example.test.TestApplication$A@42163c37
2019-04-30 19:41:06.620 INFO 24509 --- [ main] o.s.s.concurrent.ThreadPoolTaskExecutor : Initializing ExecutorService 'applicationTaskExecutor'
2019-04-30 19:41:06.846 INFO 24509 --- [ main] o.s.b.w.embedded.tomcat.TomcatWebServer : Tomcat started on port(s): 8080 (http) with context path ''
2019-04-30 19:41:06.850 INFO 24509 --- [ main] com.example.test.TestApplication : Started TestApplication in 2.489 seconds (JVM running for 3.45)

이러한 관계를 **빈 간의 참조(inter-bean references)**라 부릅니다. 이러한 빈 간의 참조는 @Configuration 클래스의 @Bean이 cglib wrapper에 의해 래핑되기 때문에 동작하게 됩니다.(@Bean 메서드에 대한 호출을 가로채고 Bean 인스턴스를 컨텍스트에서 반환하게 됩니다.)

@Bean Lite Mode

처음 알게된 분도 계실 수 있을텐데요, @Bean 메소드는 @Configuration으로 주석을 달지 않은 클래스 내에서도 선언 될 수도 있습니다. 이런 경우, @Bean 메서드는 **lite mode**로 처리됩니다.

lite mode의 Bean 메서드는 스프링 컨테이너에 의해 일반 팩토리 메서드로 처리됩니다. 그렇기 때문에, lite mode에서는 빈 간의 참조가 지원되지 않습니다.

1
2
3
4
5
6
7
8
9
10
11
12
13
14
15
16
17
18
19
20
21
22
23
24
25
26
27
28
29
30
31
32
33
34
35
36
37
38
39
40
41
42
43
44
45
46
47
48
49
50
51
52
53
54
55
56
57
@SpringBootApplication
public class TestApplication {

@Autowired
private ApplicationContext context;

public static void main(String[] args) {
ApplicationContext context = SpringApplication.run(TestApplication.class, args);
}

@Configuration
public static class TestConfiguration {

public A a() {
return new A();
}

@Bean
public B b() {
A a = a();
System.out.println(a);
return new B();
}

@Bean
public C c() {
A a = a();
System.out.println(a);
return new C();
}
}

public static class A {
}

public static class B {
}

public static class C {
}
}


// 실행 결과
```java
2019-04-30 20:02:17.530 INFO 65524 --- [ main] com.example.test.TestApplication : Starting TestApplication on AL01297960.local with PID 65524 (/Users/user/work/test/build/classes/java/main started by user in /Users/user/work/test)
2019-04-30 20:02:17.534 INFO 65524 --- [ main] com.example.test.TestApplication : No active profile set, falling back to default profiles: default
2019-04-30 20:02:18.857 INFO 65524 --- [ main] o.s.b.w.embedded.tomcat.TomcatWebServer : Tomcat initialized with port(s): 8080 (http)
2019-04-30 20:02:18.891 INFO 65524 --- [ main] o.apache.catalina.core.StandardService : Starting service [Tomcat]
2019-04-30 20:02:18.891 INFO 65524 --- [ main] org.apache.catalina.core.StandardEngine : Starting Servlet engine: [Apache Tomcat/9.0.17]
2019-04-30 20:02:18.973 INFO 65524 --- [ main] o.a.c.c.C.[Tomcat].[localhost].[/] : Initializing Spring embedded WebApplicationContext
2019-04-30 20:02:18.973 INFO 65524 --- [ main] o.s.web.context.ContextLoader : Root WebApplicationContext: initialization completed in 1368 ms
com.example.test.TestApplication$A@919d542c
com.example.test.TestApplication$A@414fc49c
2019-04-30 20:02:19.240 INFO 65524 --- [ main] o.s.s.concurrent.ThreadPoolTaskExecutor : Initializing ExecutorService 'applicationTaskExecutor'
2019-04-30 20:02:19.471 INFO 65524 --- [ main] o.s.b.w.embedded.tomcat.TomcatWebServer : Tomcat started on port(s): 8080 (http) with context path ''
2019-04-30 20:02:19.474 INFO 65524 --- [ main] com.example.test.TestApplication : Started TestApplication in 2.406 seconds (JVM running for 3.2)